
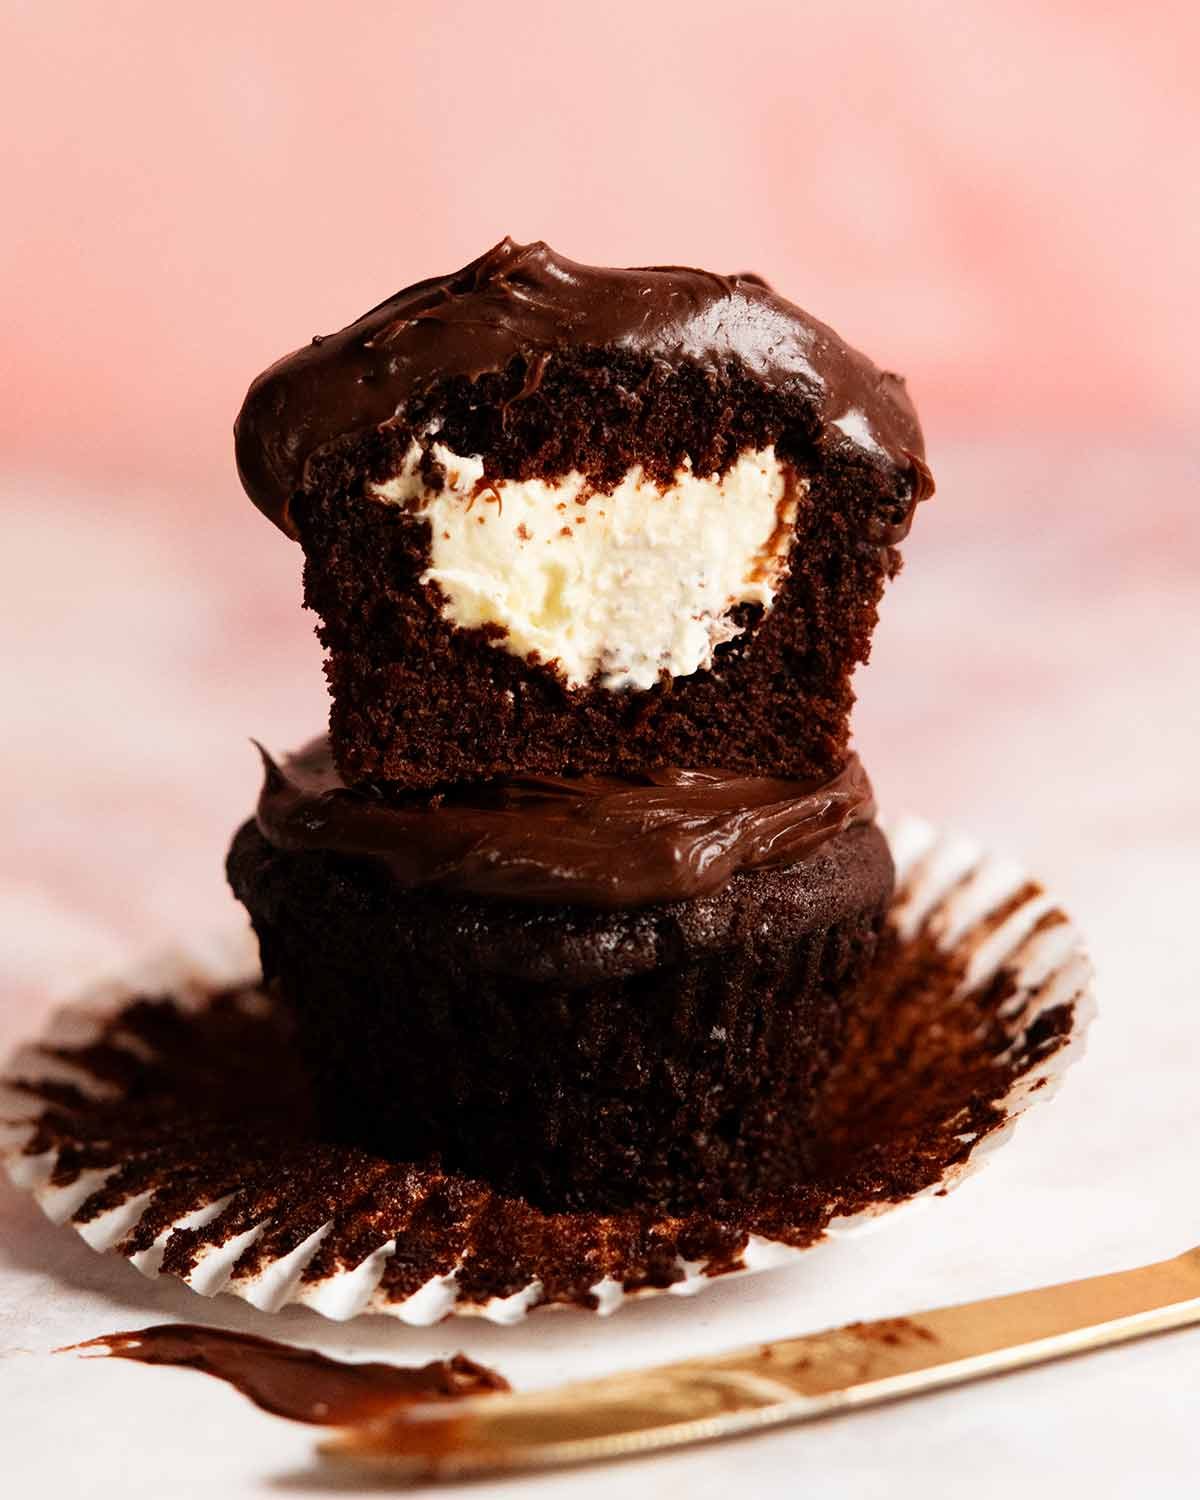
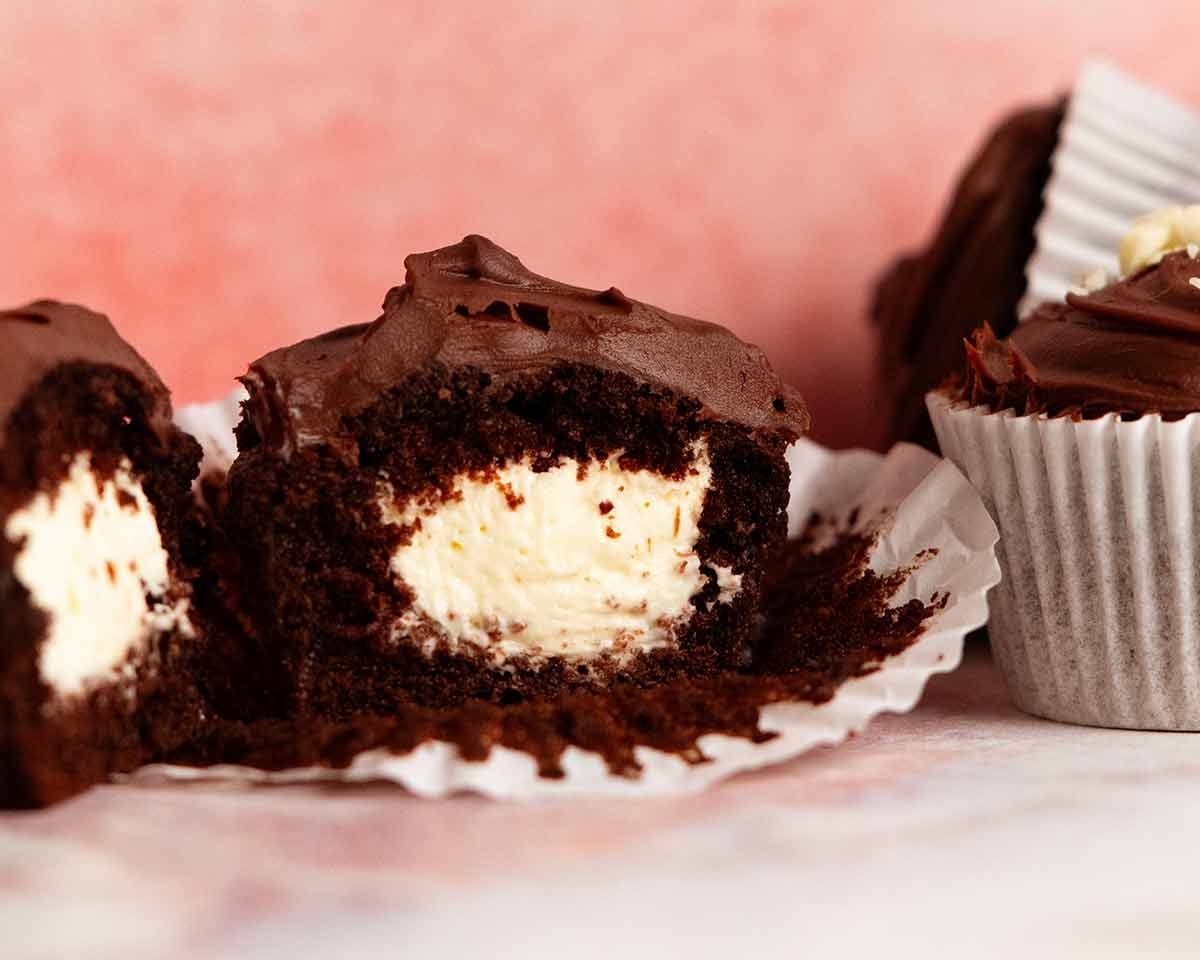
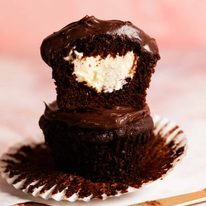
Whipped cream-filled chocolate cupcakes! These “surprise inside” deeply chocolatey cupcakes have a hidden whipped vanilla cream filling and a thick chocolate ganache fudge frosting. Try to tell me you aren’t already reaching for the mixing bowl!!
Cream filled cupcakes are WOW!
These are the cupcakes you make when you want someone to bite in, their eyes widen and they go mmmm! before declaring “wow, these are so much better than regular cupcakes!”.
The idea came from Sally McKenney’s new cookbook, Sally’s Baking 101. I’ve been sending readers to her site Sally’s Baking Addiction for years whenever I was asked for a baking recipe I didn’t have – because her recipes are so reliable!
Her latest cookbook released last month is considered the “ultimate baking guide” and one recipe that jumped out at me was her cream-filled chocolate cupcakes, a homemade version of boxed Hostess cupcakes sold in the States. I don’t need to try them to know homemade is better – I’m always a little suspicious of shelf stable baked goods, especially ones with cream in them!
Sally’s are filled with buttercream, but I opted for vanilla whipped cream (lighter and fluffier appealed!) which I stabilised with a small amount of cream cheese so the cupcakes will last for a few days without the cream melting. I also used my own chocolate cupcake recipe and ganache.
But, the credit for inspiring these little beauties goes entirely to Sally. Thanks Sally, and congratulations on your new book!


Ingredients
Here’s what you need to make these. You’ll need to pull out your electric beater for the cream, but everything else is hand mixed!
1. Chocolate cupcake
The chocolate cupcake is adapted from my Chocolate Cake recipe that I’ll forever be loyal to – hand mixed, deep chocolate flavour, ultra moist. It’s not a direct scale down because it didn’t work as well in cupcake form and I was after a specific dome shape for this recipe. But the ingredients are the same – with the exception of brown sugar (explained below).

Flour – Just plain / all-purpose flour. Not cake flour (makes the crumb too damp) and not self raising flour (the amount of built-in baking powder is the wrong amount).
Cocoa powder – Regular unsweetened cocoa powder, not dutch processed. Well, dutch processed will work, but it’s more expensive and unnecessary here, I feel. Reserve it for the special occasion cakes where I insist on using it! 🙂
Brown rather than white sugar – Because it retains moisture better for a crumb with better shelf life. Cupcakes lose moisture faster than cakes so I switched the sugar to brown sugar.
Baking soda AND baking powder – These have different effects on the way cakes and cupcakes rise as well as the texture of the crumb. For these cupcakes I actually had to fiddle with the ratios quite a few times to get it right. I wanted a small dome, not completely flat, because I’m smearing with ganache rather than piping on a tall mound of frosting.
So yes, sorry, you need both if you want to make exactly what I’ve made!
White vinegar – Just half a teaspoon adds can’t-taste-it acidity into the batter which gives the baking soda a kick-start with the rise.
Eggs – Large eggs, being 50/55g / 2 oz each, eggs sold in cartons labelled “large eggs” (as opposed to jumbo etc). Take them out of the fridge 30 minutes prior to bring them to room temperature so they incorporate better into the batter. Got eggs much larger or smaller? See here for how to use the right amount. 🙂
Oil – Makes cake crumbs more moist than butter. I don’t use it in all cakes though, like my vanilla cake where butter plays a key role in flavour. It works in chocolate cake because chocolate is the dominant flavour.
Coffee powder – Entirely optional, a fairly well known bakers’ trick these days which brings out the chocolate flavour. You can’t taste it!
Hot water – This helps bloom the cocoa powder to make this taste more chocolatey. It definitely works, I remember trying my Chocolate Cake with just milk, no hot water, and the chocolate flavour was not as strong.
Vanilla – For flavour. I recommend vanilla extract (extracted from real vanilla) rather than imitation essence (fake, flavour is not as good). I don’t use vanilla beans or vanilla bean paste for general baking – reserve it for times you want to see seeds, like creme brûlée, Panna Cotta, pouring custard (Creme Anglaise).
Salt – Things brings out all the flavours in the cake. Fairly standard practice in sweet baking these days!
2. vanilla whipped cream filling
I use a little cream cheese which acts as a stabiliser for the whipped cream so you can keep the cupcakes for a 3 days without the cream melting into a puddle inside. It also a slight hint of welcome background tang in an otherwise rather indulgent treat!
You can also use other methods to stabilise the whipped cream – see my Stabilised Whipped Cream recipe for alternatives (shop bought cream stabiliser powder, mascarpone or gelatine).

Cream – Use thickened cream (heavy cream in the US) or any regular cream labeled for whipping. Avoid pouring creams (for cooking) and very thick dollop creams (can’t be whipped). High-fat double cream (45%+) can also be whipped and is more stable, so you can skip the cream cheese. It usually holds for 2 days, but is much richer due to the higher fat. 🙂
Cream cheese (block) – As mentioned above, I use this to stabilise the whipped cream. Make sure it’s at room temperature so it beats in easily! See my Stabilised Whipped Cream recipe for alternative cream stabiliser methods (shop bought cream stabiliser powder, mascarpone or gelatine).
Tub cream cheese is softer than block cream cheese (because it’s intended to be spreadable) and not always suitable for using as a substitute, but in today’s recipe it is ok to use.
Vanilla extract – For flavour! See above for notes on imitation (not recommended) vs extract (good).
Sugar – Just 2 tablespoons, to lightly sweetened. You could also use icing sugar / powdered sugar.
3. Chocolate ganache frosting
Ganache is a 2 ingredient rich chocolate frosting – just cream and chocolate.
Be sure to use the right chocolate – dark chocolate / semi-sweet. Not milk chocolate, not 70% – you need different amounts of cream for these. And make sure to use the right cream – proper full fat cream, not light cream, not dollop cream. Else your ganache will not thicken enough to spread, or it will set too thick and solid (not pleasant to eat).

Dark chocolate / semi-sweet chocolate – Use chocolate from the baking aisle sold in packets as melts/buttons/wafers (designed for easy melting), or chips (these also melt well). For the most lux result, buy a good quality block chocolate and chop it up yourself (I do this when baking to impress).
Do not use eating chocolate from the confectionary aisle (it’s designed not to melt!). If you want to use milk or white chocolate, see my chocolate ganache recipe for the right cream-to-chocolate ratios. 70% cocoa (bittersweet chocolate) will also work but the ganache is not quite as sweet, personally I prefer dark chocolate.
Cream – Use thickened cream (US: heavy cream), or any cream intended for whipping with 30 – 36% fat which is the regular cream sold at grocery stores.
Low fat cream will not work even if it is designed for whipping, the ganache will never set (as I discovered during one of my “healthy” phases), and thicker, richer creams with higher than 36% fat makes the ganache overly rich and thick.
How to make Whipped Cream Filled Cupcakes
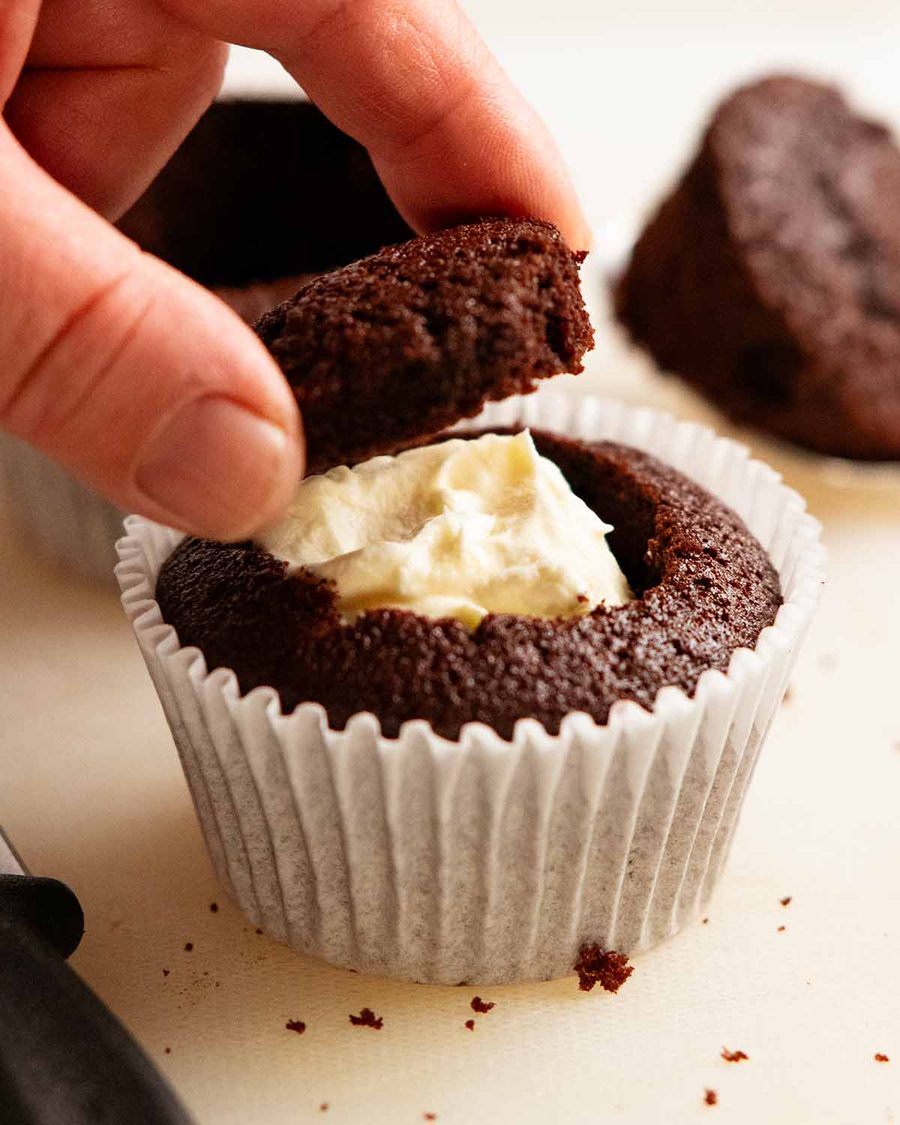
The cream filling part is super easy – just cut a small hole in the cupcake using a small knife, scoop it out with a spoon. Trim off the excess cake to leave a lid, fill with cream, pop the lid back on!
1. Make the ganache first
It takes around 2 hours for the ganache to thicken to spreadable consistency, so make this first.
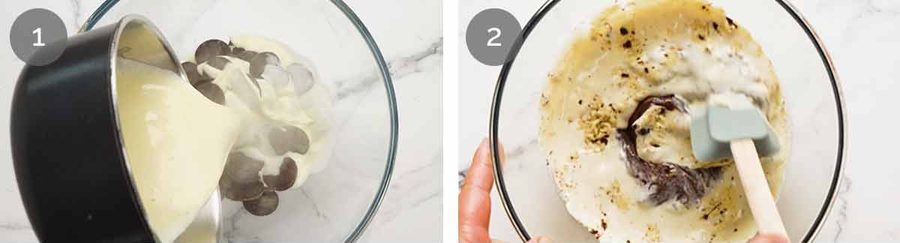
Melt chocolate – Heat the cream until just before boiling so it’s hot, but do not let it boil – that’s too hot and may make the chocolate seize. You just want to make it steamy-hot. Do it in a saucepan on the stove or in the microwave. Then pour it over the chocolate and give the bowl a shake to ensure all the chocolate is submerged.
Leave for 7 minutes to let the heat in the cream melt the chocolate. Don’t cover with a lid (condensation is not a friend of chocolate) and don’t stir.
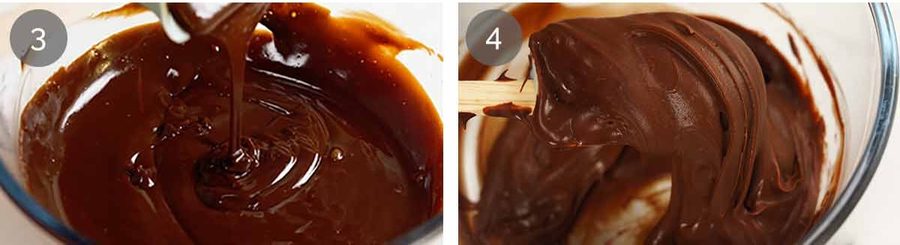
Mix with a rubber spatula until the cream and chocolate are combined to make a runny, shiny molten chocolate mixture. It will take about a minute as cream and chocolate are not natural friends, however, they will combine.
If there are little unmelted chocolate lumps, pop the bowl in the microwave for 20 second to warm up slightly to make it melt.
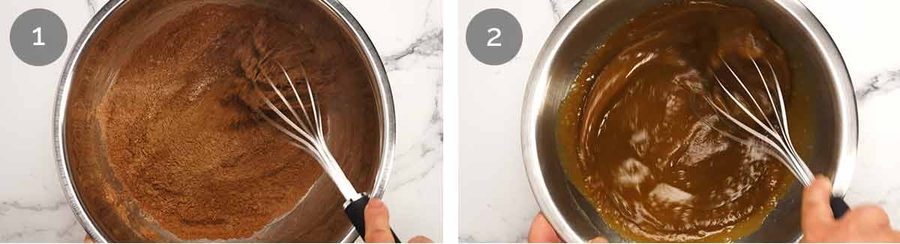
Texture – Once mixed, it will be runny and shiny. Too thin to spread on cupcakes!
Refrigerate for 2 hours, mixing every now and then, until it a spreadable peanut butter consistency. You can leave it longer, or overnight – the ganache will become too firm to spread but can be softened by leaving it out on the counter for 30 minutes or so.
2. make the chocolate cupcakes
The easiest part!
Mix Dry – Whisk the cocoa (don’t forget to sift out pesky lumps), flour, baking powder, baking soda and salt in a large bowl.
Mix wet – Whisk the eggs, oil, milk, sugar (yes this is a wet ingredient in baking), vanilla and vinegar in a separate bowl.
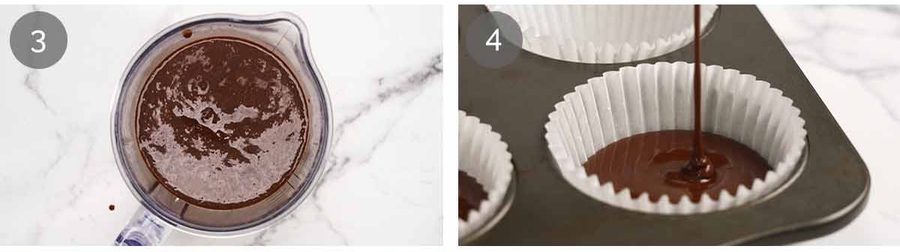
Finish batter – Pour the Wet into the Dry ingredients bowl and whisk to combine. Dissolve the coffee granules in the hot water then whisk that in. The batter will be fairly thin.
Fill cupcake liners – Fill the cupcake liners half full with batter. I find it easiest to do this with a jug because the batter is so thin. Don’t fill more than halfway, else the cupcakes will overflow and/or sink in the middle.
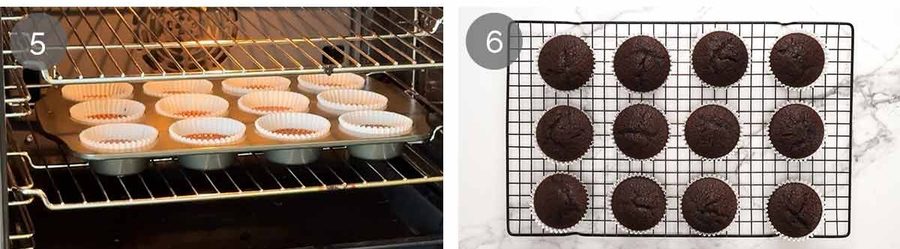
Bake for 22 minutes or until toothpick inserted into the middle comes out clean.
Cool in the pan for 5 minutes then transfer onto a cooling rack and fully cool for 1 1/2 hours. If the middle is even slightly warm, the cream will melt on contact.
3. filling and frosting
If you are a cream monster, you may want to make your cavities larger, though bear in mind we are making cream filled cupcakes here, not just eating spoonfuls of cream!
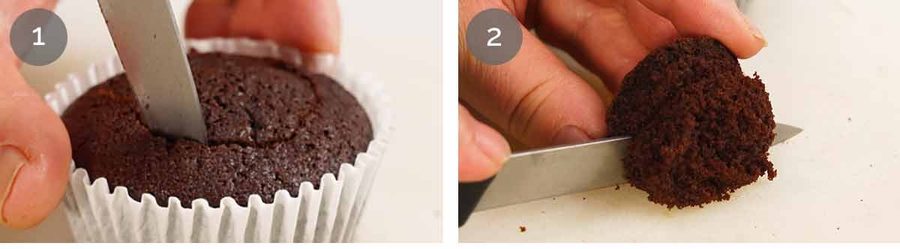
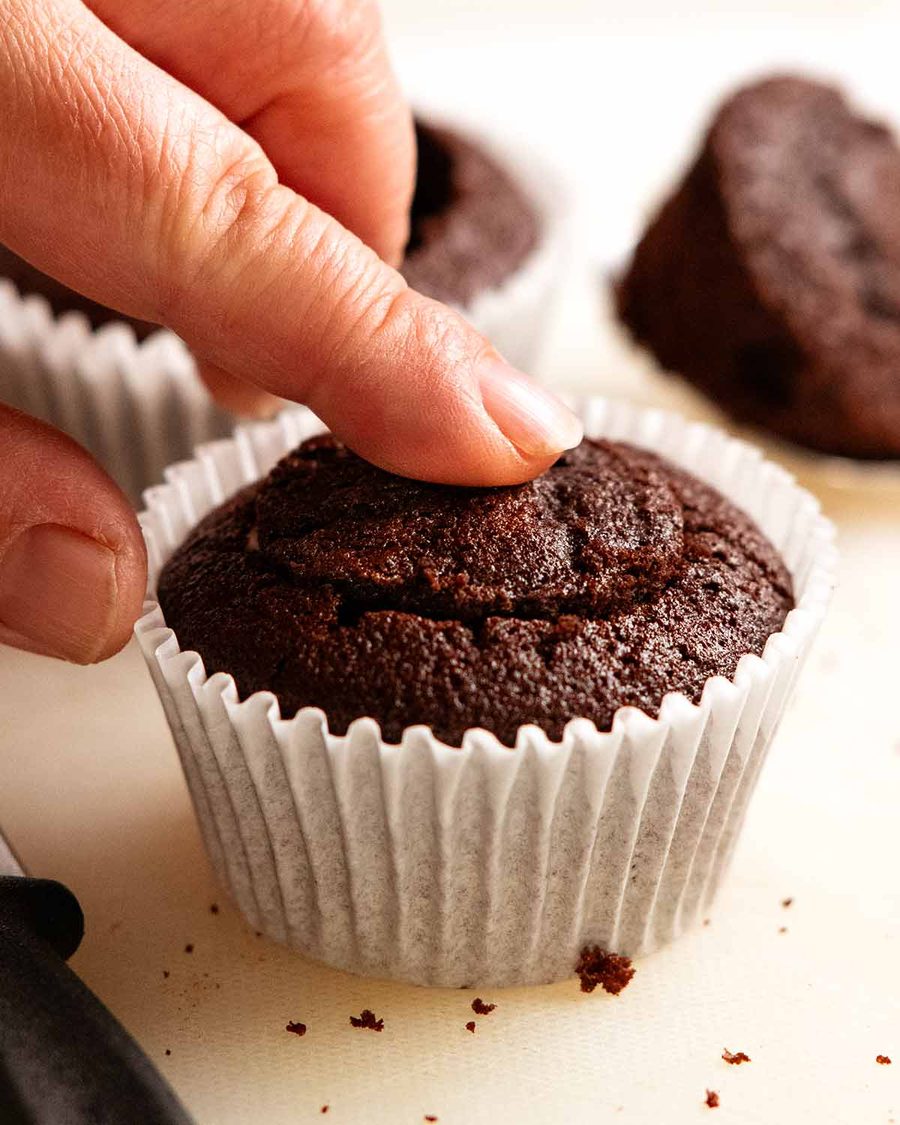
Cut hole – Using a small knife held upright, cut a circle into the surface of the cupcake leaving a 1.25 cm / 1/2″ border. Use a spoon to scoop the cake out (I roll into balls to make cake truffles rolled in melted residual ganache!).
Trim excess off the cake you scooped out to leave a ~1cm/0.4″ thick lid. Make sure you keep the lids and cupcakes together so they fit properly – unless you are a baking genius who cuts lids exactly the same size for every single cupcake (not me, that’s for sure!!)
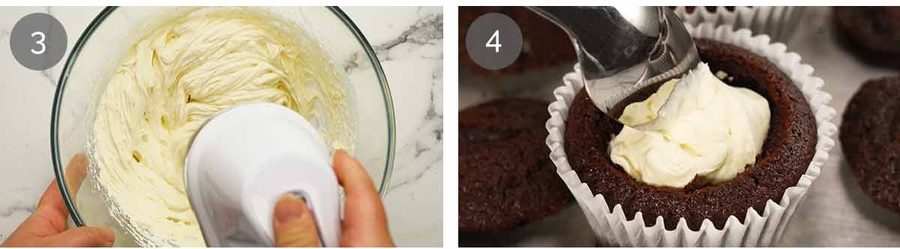
Whip stabilised cream – Beat the room temperature cream cheese, vanilla and sugar for 1 minute on high until soft and fluffy. Then add the cold cream and beat until firm peaks form,
Fill the cupcake cavities with cream, leaving room for the lid.
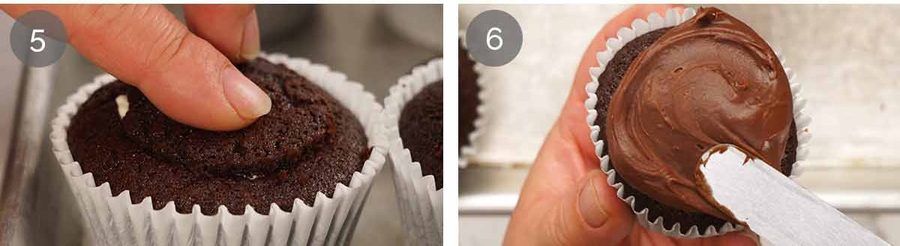
Lid – Pop the lid back on and press down lightly so it is almost flush with the surface of the cupcake.
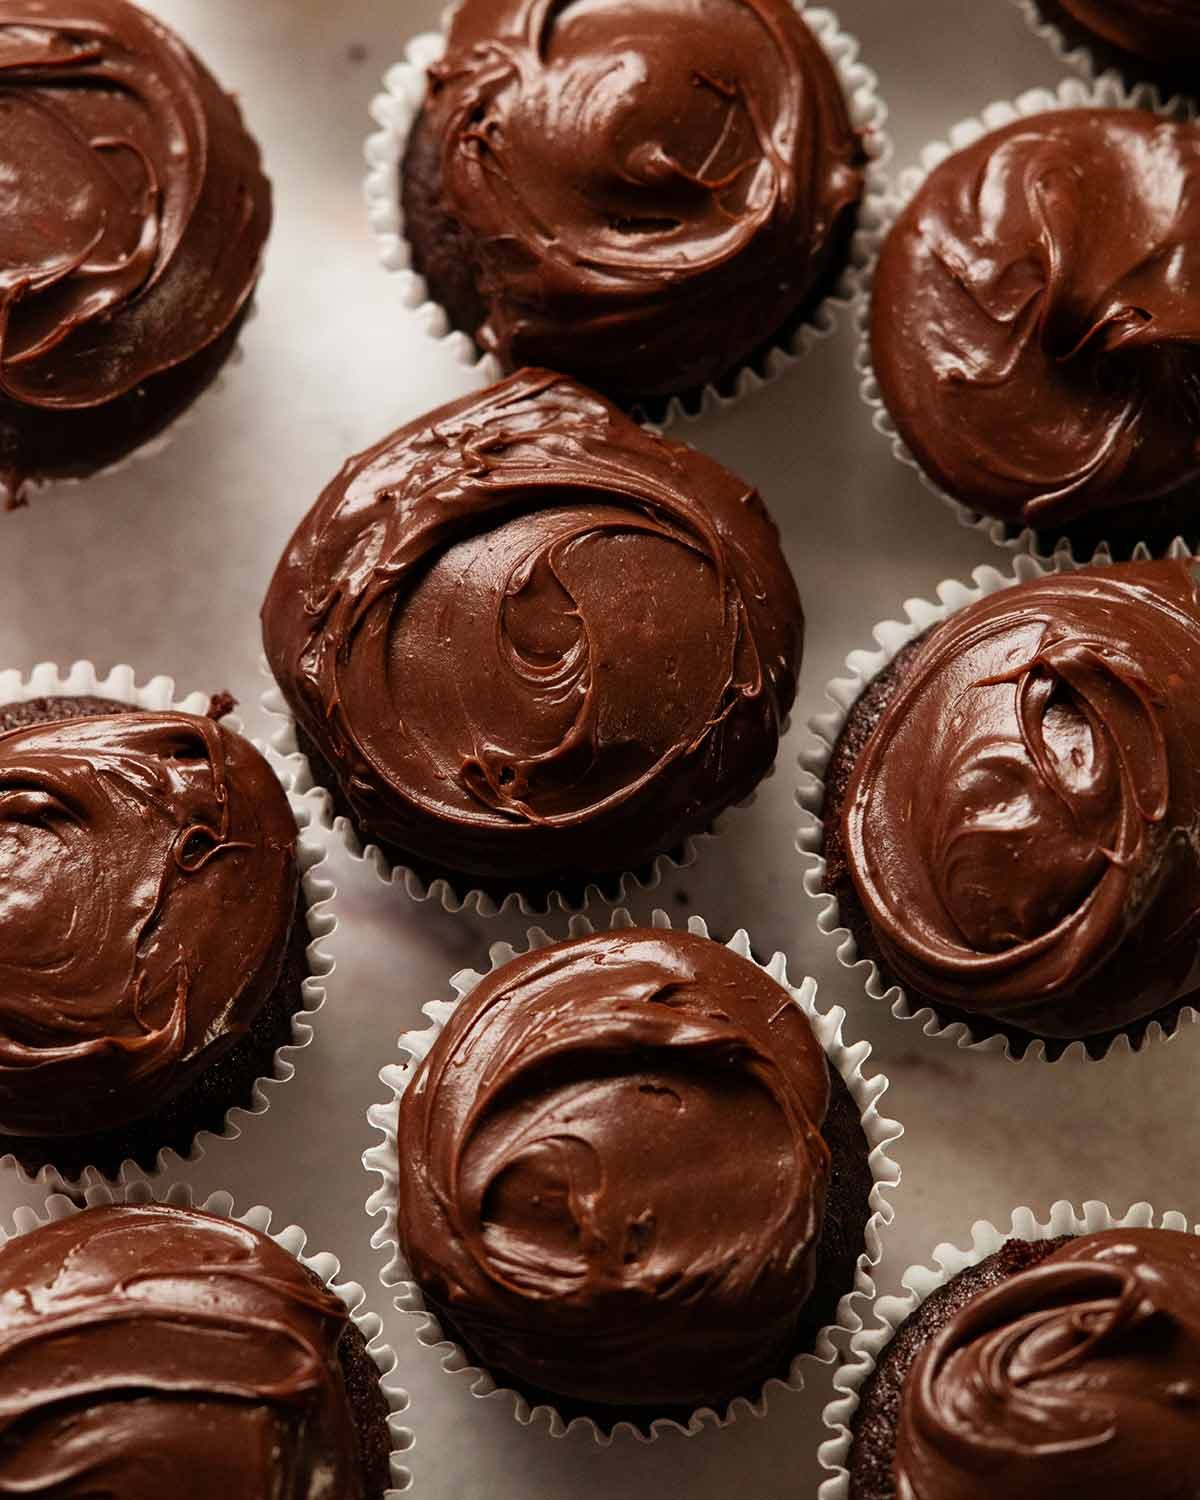
Ganache frosting – Dollop a heaped tablespoon of ganache onto the cupcake then spread thickly. Decorate if desired – mine are sprinkled with chopped white chocolate. Chocolate sprinkles, mini hearts, shaved chocolate or little truffle balls come to mind, though I think ganache is pretty enough as it is!
Then DEVOUR!!!

These keep for 3 days!
Even those these are cupcakes filled with whipped cream which ordinarily weeps into a melty mess within hours, these will last for 3 days in the fridge because we stabilised the cream with the cream cheese.
To be honest, because the cream is inside the cupcake rather than piped on top, it doesn’t really matter as much if the cream is a little less fluffy than freshly whipped. I didn’t mind this on day 3 even with plain whipped cream (I whipped to stiff peaks), but it is better when it’s been stabilised a bit because it stays fluffier. Also, the slight tang from the cream cheese makes this extra good, I think.
So there you go! I just realised it’s my first stuffed cupcake recipe. I can tell you for sure there will be more! – Nagi x
Watch how to make it
Hungry for more? Subscribe to my newsletter and follow along on Facebook, Pinterest and Instagram for all of the latest updates.
Vanilla Cream Filled Chocolate Ganache Cupcakes
Ingredients
Dry ingredients:
- 3/4 cup plain flour / all-purpose flour
- 1/2 cup cocoa powder , sifted (unsweetened regular, not dutch processed)
- 1/2 tsp baking powder
- 1/2 tsp baking soda (bi-carbonate soda)
- 1/2 tsp cooking salt / kosher salt (halve for table salt, +25% for flakes)
Wet ingredients:
- 3/4 cup (tightly packed) brown sugar
- 2 large eggs at room temperature
- 1/3 cup oil (canola, vegetable or any other plain flavoured oil)
- 1/3 cup milk (preferably full fat though any % will work, even non dairy)
- 1 tsp vanilla extract
- 1/2 tsp white vinegar – activates baking soda (Note 1)
Hot coffee flavour enhancer (Note 2):
- 1 tsp coffee granules , optional (Note 2)
- 1/3 cup hot water
Chocolate Ganache Frosting:
- 180g / 6 oz dark chocolate / semi-sweet chocolate melts or chips , or chopped dark chocolate – (Note 3 for other chocolate)
- 3/4 cup (180 ml) thickened cream / heavy cream (or any regular cream 30% – 36% fat, NOT low fat cream – Note 4)
Stabilised vanilla whipped cream:
- 2/3 cup thickened cream / heavy cream (or any whipped cream)
- 50g/ 3 tbsp block cream cheese , softened (stabilises cream – Note 5), substitute with tub cream cheese
- 2 tbsp caster sugar / superfine sugar
- 1 tsp vanilla extract
Instructions
ABBREVIATED RECIPE
- Ganache first: pour hot cream over ganache, stand 7 minutes, stir until smooth, fridge 2 hrs until spreadable. Cupcakes: Whisk Dry and Wet in separate bowls, whisk Wet into Dry, then whisk in hot coffee. Fill cupcake liners halfway, bake 22 minutes at 180°C/350°F (160°C fan), cool 1.5 hrs. Cream: Whip cream cheese, vanilla and sugar first, then cream. Cut out cavity, trim to make lid. Fill with cream, put lid on, top with ganache. Enjoy!
FULL RECIPE
Ganache first:
- Melt chocolate – Place chocolate in a microwave-proof bowl. Heat cream until hot, just before boiling – do not let it boil, it's too hot. Pour over chocolate, shake bowl to submerge all the chocolate.
- Leave for 7 minutes – DO NOT COVER (condensation = enemy of chocolate). Mix with a spatula until combined and smooth (~ 1 minute, be patient). If you have little unmelted lumps, microwave for 20 seconds then mix again (repeat as needed)
- Cool to thicken (goal: peanut butter spread consistency) – Cool in the fridge for 2 hours, OR refrigerate longer / overnight then leave to soften on counter for 15 – 20 minutes so it becomes spreadable.
Cupcakes:
- Preheat oven to 180°C/350°F (160°C fan-forced). Put cupcake liners in a standard 12 hole muffin tin.
- Batter – Whisk the Dry ingredients in a large bowl. Whisk the Wet ingredients in a separate bowl until combined.
- Hot coffee – dissolve coffee granules in the hot water.
- Finish batter – Pour the Wet mixture into the Dry ingredients. Whisk until combined. Add hot coffee and whisk again until combined. Firmly bang bowl on counter 3 times (removes large air bubbles).
- Fill – Transfer mixture into a pouring jug (scrape out all batter). Fill cupcake liners halfway (no more – else cupcakes will overflow/sink).
- Bake 22 minutes or until a toothpick inserted into the centre comes out clean.
- Cool in the pan for 5 minutes then transfer to cooling rack to fully cool for at least 1 1/2 hours.
Filling / frost:
- Cut cream hole – Use a small knife to cut a shallow cylinder-shaped cavity out of the cupcake, leaving a 1.25 cm / 1/2" border. Use a spoon to scoop the cake out. Trim so you are left with a 1 cm / 0.4" thick lid. (Keep lids and cupcakes together so the holes match the lids!)
- Whipped cream – Put the cream cheese, vanilla and sugar in a bowl. Beat with an electric beater on high for 1 minute until soft and creamy. Add cream and peat until firm peaks form. (If using stand mixer, use whisk attachment).
- Fill – Use a teaspoon to fill the cavity with cream, then cover with the lid, pressing in so it sits flush with the cupcake surface. Fill as much as you can without making cream ooze out when you put the lid on!
- Frost – Dollop a very heaped tablespoon of ganache on top, then spread. Sprinkle with white chocolate or decorate as desired. ENJOY!
Recipe Notes:
Nutrition Information:
Life of Dozer
JB and I went to site to do a BBQ lunch for the builders today, trying out an upcoming recipe on them! I took Mr Dozer along. Always cracks me up watching tough tradies melt into puddles over him. 😂 I love it!!


These look amazing – is there a gluten free substitute for the cupcake mix?
Soooo good. Well worth the effort
Thanks so much!!
Nothing screams party like a cupcake 😋I’m making these to take to a murder mystery party on Halloween!! Even bought spooky sprinkles for the tops 👻
Hi Nagi,
I have made your chocolate cake with buttercream frosting. It was delectable.. So-o-o chocolatety and yummy.
Can’t wait to make these delicious cupcakes.
This recipe was posted on 3/10/25, just in time for me to make it the next day, which was my wedding anniversary. They say that the way to a man’s heart is through the stomach! 😉
It was the first time that I made ganache. My teenage daughter is a pro at that. Thank God that the steps were easy to follow.
My husband liked the cupcakes very much. So did my teenage son. 🙂 My son is wondering if I can make a bigger version of this for his birthday next year. 😉
Thank you Nagi!
This recipe actually came out on my birthday! We had all the ingredients on hand and they were delicious! Just the right amount of sweetness!
One word for these ‘DIVINE’ made these for a 17th birthday dinner party. Thanks Nagi!
Forgot to attach my 5 stars – because they most certainly deserve 5 stars!!!
I made these today for my sons birthday, as a pre birthday treat. I’m making your Nutella cheesecake for his actual birthday cake on Wednesday and these were a celebration cupcake for his last day as a 6 year old for tomorrow. I just wanted an excuse to make them really 🤣 and they were absoutely delightful!! I never want boring normal cupcakes again haha!
Awesome recipe! Made it for my adult daughter’s birthday and it was a big hit! Plus we are both big dog lovers too! We have sister Border Collies! love seeing all the posts about Dozer!
I made these today & I don’t think I’ll share them with my family – the best cupcake I’ve ever eaten & my ganache did not come out glossy but tasted amazing…
I love that you explain how things work Nagi. That’s great.. and especially since most recipes don’t bother to do so.
Too rich full of cream
Sorry, today. I.am not interesting with your cup cake so ri ch so long recipe all cream …
Hi Nagi, I’ve been following Sally’s Baking Addiction since before she was married. Certainly drooling recipes!
Beautiful Dozer, he can live with me anytime. I have 5x grand dogs I look after…not all at once! 🤣
Hi Nagi, I made this today and it’s sooooo delicious!! I love the cakes and cream filling isn’t too sweet because the ganache on top will make the balance of sweetness perfect! If you have a sweet tooth, you can just add more ganache on top! Love your recipes, thank you!
YUM!!! Next birthday party get’s these!!
Love the love Dozer is getting! xo We went thru a border crossing with our dog and the
border guards were very strict until they met her. Then they turned to mush! It was very sweet ❤️
Will definitely try. Looks yummy
YUM!!! Next birthday party get’s these!!
We went thru a border crossing with our dog and the border guards were very strict until they met her. Then they turned to mush! It was very sweet ❤️
Can I use self raising flour and miss out the baking powder and soda?
Hi Nagi. These look delicious, and I will definitely try them. Dozer is looking great, bless him. All that love is keeping him going. That is what I used to say about my toy poodle, who beyond expectations lived til 19.
Also, I just wanted to sayI love your ethics, the way you always give acknowledgment to your inspirations. You are such a good person.