
The best ever Sweet and Sour Pork recipe is loaded with tricks the Chinese have been using for centuries: double dredge and double fry for extra crispy, cornflour instead of flour, economical pork used for juiciness, but tenderised with baking soda so you’d swear they’re pricey chops, and a sauce that’s not sickeningly sweet.
BONUS: oven baked Sweet and Sour Pork directions included!

Sweet and Sour Pork
There’s a lot of information in this Sweet & Sour Pork recipe, so I’m going to skip all the usual attempts at a charming story and just give you the high points!
Crispiest pork you’ll ever make – too many recipes make grand promises but fall short;
Double fry high temp – fast becoming the worst kept Asian secret, double frying is THE secret to crispy, less oily food;
Cornflour / cornstarch, not flour – for a crispier coating. Flour isn’t even crispy fresh out of the oil;
Double dredge – the first layer seals the juices inside, acts as a glue for the 2nd dredge and is a second layer of crispiness;
Tenderise cheap but flavourful pork using baking soda – a trick used by Chinese restaurants all around the world. It’s called velveting – here’s how to velvet chicken and beef; and
Really great sauce – newsflash: Sweet & Sour Sauce is made with more than just sugar, ketchup and vinegar!
Wait a sec – did I just convince you that you’ve gotta try this?! 😂

How to make Sweet and Sour Pork – OVERVIEW
Marinate pork to infuse with flavour and tenderise the meat (we’re using economical shoulder and scotch pork);
Double dredge in cornflour/cornstarch, not flour, for extra crispy;
Double fry for extra crispy – a trick Asians have been using for centuries; and
10 second toss to coat pork in Sweet and Sour Sauce!
Pork Marinade Ingredients
Here’s what you need for the pork and marinade:

Pork – the best cut (in order of preference): pork scotch (aka pork neck, pork collar), pork shoulder, leg, tenderloin then loin. See below for more information on each cut;
Baking soda (aka bi-carb) and cornflour/cornstarch – meat tenderising method widely used across Asia (notably in Chinese cooking) that is starting to be discovered by Western countries! Called velveting, it also works brilliantly with chicken and beef.
For thin strips used in stir fries (as per the velveting chicken and beef directions), I use more baking soda to meat weight, marinate barely (20 – 40 min), then rinse it off before cooking. This won’t work for Sweet & Sour Pork because it would over tenderise the outside before the inside is tenderised because the pieces are chunkier. In this recipe, we use less baking soda, marinate for longer and do not rinse off – this tenderises the pork more evenly;
Garlic, ginger and onion – flavour, flavour, flavour! Grated to make them “juicy” so the flavour penetrates better; and
Soy sauce – for seasoning and flavour.
The more economical the pork cut, the longer the marinade time to tenderise.
Best pork for Sweet and Sour Pork

In order of preference:
Pork scotch roast or steaks – also known as pork neck, and called pork collar or pork collar butt in the US, this is a common pork cut in Australia sold in both roast form and steaks (pork scotch steaks or scotch fillet steaks). Highly versatile cut that can be slow cooked (such as this slow roasted brown sugar pork and Char Siu) or quick cooked like steak (use it for any of my pork chop recipes). Pork scotch is ribboned with fat which keeps each piece juicy and has a good pork flavour. This is the cut that we believe higher end Chinese restaurants use;
Pork shoulder – while typically known as a slow cooking cut to break down tough connective tissue (like for pulled pork and Momofuku Pork Bossam), the baking soda and cornflour in the marinade tenderises the pork so it’s tender even after a quick fry. Without the marinade, the pork is tough and chewy! Not quite as tender as scotch, but almost – it’s on par with the really good local Chinese restaurants;
Pork leg – with similar cooking qualities to pork shoulder, this is an excellent option for Sweet & Sour pork as well. The only reason I don’t use it for things like stir fries is because I get it on the bone and cook it whole;
Pork tenderloin – this is a very tender, lean cut of pork with a milder flavour. It can be used but be aware it is more prone to drying out from overcooking in pursuit of crispy pork. Marinating helps alleviate this problem but still a bit harder to get cook timing exactly right;
Pork loin – bringing up the rear because it is lean like tenderloin, but it is not quite as tender and is even harder/drier than tenderloin if you overcook.
Any generic “pork steaks” would fall under #4 or #5 assuming it’s intended for quick cooking.
Pork cuts not recommended: Pork belly (too fatty), spare ribs (unless deboned), pickled pork (just – no).
Sweet and Sour Sauce
Here’s what goes in Sweet and Sour Sauce. It gets the red colour from ketchup – food colouring not required!!
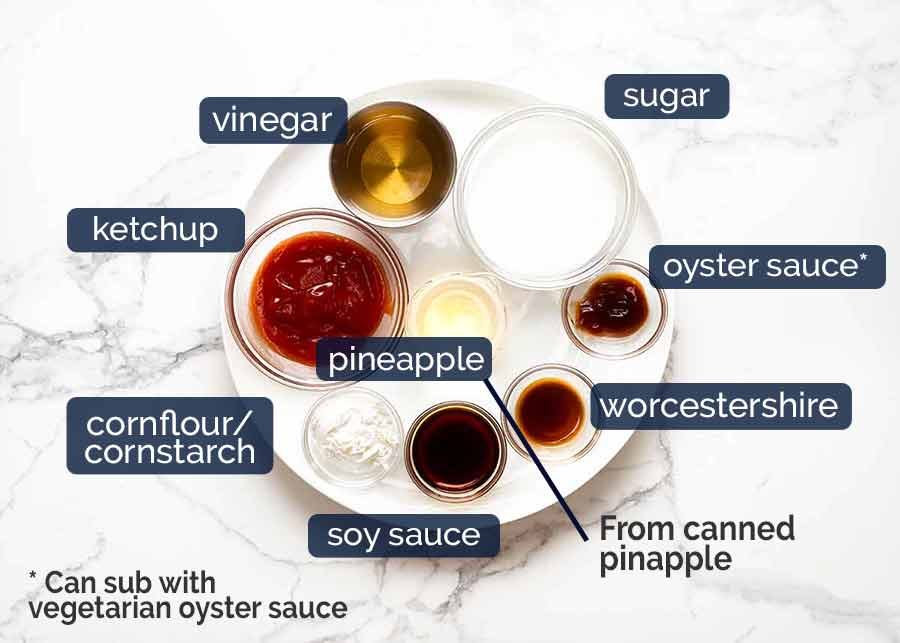
Ketchup – provides sweetness, flavour and some thickening;
Cider vinegar – to balance out the sweet
Sugar – just 1/3 of a cup, far less than most recipes and definitely less than restaurants. This is sweet enough, trust me!
Worcestershire sauce, oyster and soy sauce – so it actually tastes like what you get at restaurants rather than just a ketchup sugar sauce! Oyster sauce can be substituted with vegetarian oyster sauce which nowadays is widely available in Australian grocery stores like Coles and Woolworths (Asian section and/or health food section, Ayam brand);
Pineapple juice – from the can of pineapple pieces used in the stir fry, because why waste it? Using fresh pineapple? Just skip this and add extra water; and
Cornflour/cornstarch – for thickening. Sweet and sour sauce is thicker than most stir fries so it clings to the pork pieces!
You’ll notice that my sauce is not quite the crazy red you get at restaurants. That’s because I choose not to use food colouring!
Ingredients in the Stir Fry
And here’s what goes in the Sweet and Sour Pork Stir Fry. I know some people are big advocates of fresh pineapple. I never use fresh – because they’re in season in summer and I (typically) don’t deep fry in summer!

Newsflash: Even restaurant Sweet & Sour Pork doesn’t stay crispy!
I know we all aspire to it, but the fact is that the pork in Sweet and Sour Pork doesn’t stay crispy for long once coated in sauce – even at restaurants. The pork IS crispy without sauce, but once coated, it stays pretty crispy for around maybe 5 minutes, then after that you’re left with the coating the sauce clings to but it’s not as crispy anymore.
This is the case even with restaurants, unless they use a different type of batter (like the puffy batter for Honey Chicken which truly stays crispy for hours) or they use speciality ingredients like Xanthum gum.
Want to avoid deep frying? The BEST oven baked sweet & sour pork is in the recipe too!
Double frying and double cornflour coating = crispiest pork
So now that’s out of the way, the steps below show how to make the crispiest pork for Sweet & Sour Pork:
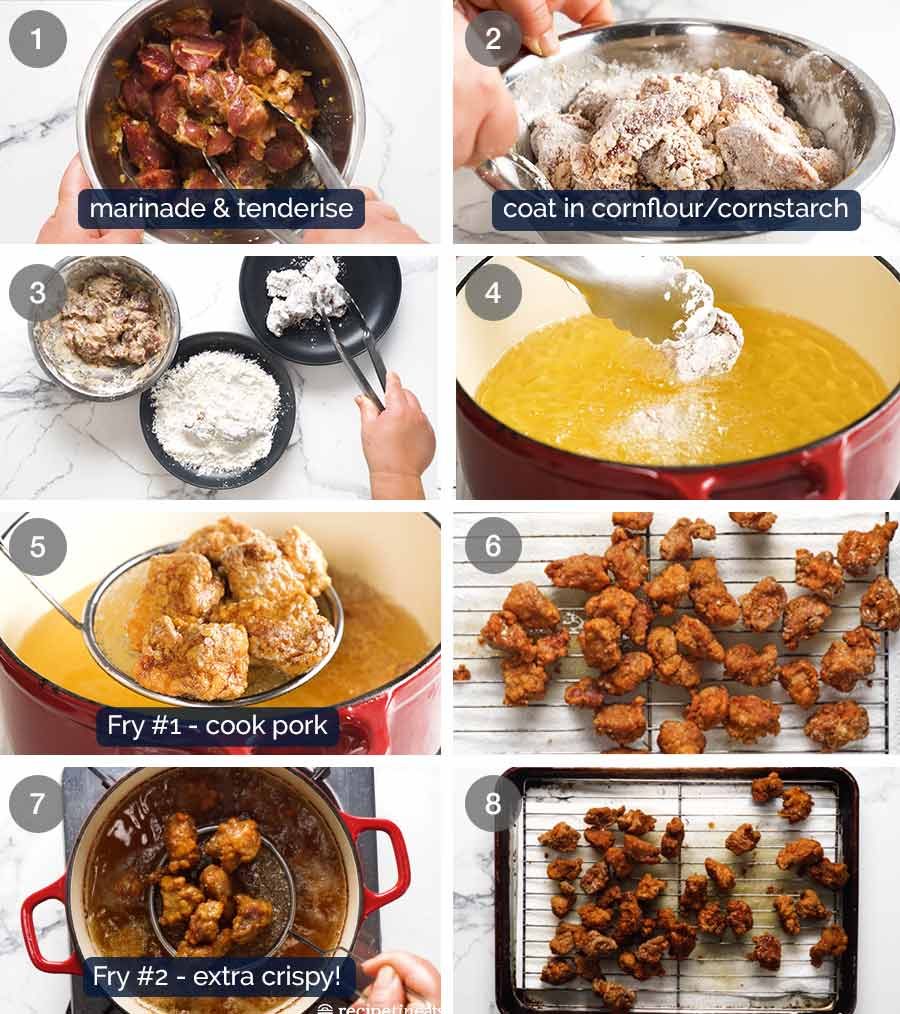
Marinate to tenderise the pork. Overnight for tougher cuts (like scotch/collar and shoulder) and 3 hours for more tender pork (like tenderloin and loin). Unlike with chicken and beef, there is no need to rinse the baking soda off because we’re using less and marinating for longer;
Coat in cornflour/cornstarch – this is dredge #1, for extra crispy pork. Coat it, then leave for 5 minutes and the cornflour will become wet from the juices from the pork. It will be super sticky at this stage – which is why no egg is required for the coating to adhere;
Dip into cornflour – this is the coating for Sweet & Sour Pork. Be sure to shake off excess otherwise you’ll end up with white specks on your pork;
Fry #1 – Fry at 180°C/350°F for 3 minutes to cook the pork through and make it golden. It won’t be that crispy at this stage – this step is mainly to cook the pork through;
Drain on RACK – elevating the pork on a rack will help keep the pork crispy. It sweats on paper towels, making it softer;
Fry #2 Hotter Temp – A trick used by Asians for centuries (eg in Japanese Karaage!), this will make your pork stay crispy for longer once it’s tossed in the sauce. Just fry for 1 1/2 minutes until it is deep golden brown. Without double frying, the pork starts losing crispiness within 2 minutes once it hits the sauce. WITH double fry, the surface starts to soften after around 5 minutes but the rate at which it completely softens is far slower than with single fry.
Fast becoming the worst kept Asian secret – double fry is THE secret to ultra crispy less greasy fried food!
Here’s a comparison of how the pork looks after Fry #1 and Fry #2. Added bonus: the higher temp makes the pork less oily too.

Single Fry Option
However, all that said and done, a single fry (for slightly longer) is excellent too if you need an express version. I was doing single fry for most of my life until I discovered the double fry – and nobody ever complained!
The oil used in this recipe can be used another two times because the pork coating is neutral in flavour.
How to re-use oil
The oil can be reused twice because the pork flavour is pretty neutral in this recipe so it doesn’t infuse oil with flavour, as opposed to heavily seasoned food like Southern Fried Chicken which taints the oil with flavour.
To re-use the oil, cool in pot, line mesh colander with a single layer of paper towel, strain oil. Store until required – personally would stick to savoury rather than sweet.
Use for any savoury deep fried recipes – such as General Tso’s Chicken, Stay-Crispy Honey Chicken, Chicken Parmigiana, Arancini Balls, Japanese Karaage, Mongolian Beef, Schnitzel or Southern Fried Chicken!
How to make Sweet and Sour Pork
We’re on the home stretch! Here’s how it comes together:

KEY TIP: Toss the pork QUICKLY in the sauce – aim for 10 seconds – to prolong its crispy life!


Serve with plain rice or Fried Rice if you want to go all out. And if you’re making the effort to make Sweet and Sour Pork at home, why wouldn’t you?? (Tip: Fried rice reheats 100% perfectly, so make it first then just reheat it).
For extra vegetables, add a side of Chinese Broccoli with Oyster Sauce (a restaurant favourite!), or for fresh options, try Smashed Cucumbers, this Asian Salad or Asian Slaw, or Chinese Lettuce with Creamy Sesame Sauce.
And lastly, because I know someone’s going to ask, and for all those times you’re desperate for a Sweet & Sour Pork fix but can’t face the oil….oven directions are included.
Is it as good as deep fried? Of course not – and anyone who tells you otherwise is outright lying. I’ve tried it every which way I can, and I can’t replicate it exactly.
But you can get 85% 80% of the way there, and once it’s all mixed up with the sauce you won’t really notice anyway. But your hips will thank you for it! – Nagi x
Watch how to make it
Note: video typo! Marinating time shows 2 hours, but it should be 24 hours. 🙂
Hungry for more? Subscribe to my newsletter and follow along on Facebook, Pinterest and Instagram for all of the latest updates.

Sweet and Sour Pork
Ingredients
Tenderised Marinated Pork:
- 400g/14oz pork scotch roast (aka pork neck, collar butt) or shoulder / butt, cut into 2cm / 4/5" cubes (Note 1)
- 1/2 onion , finely grated (Note 2a)
- 1 tsp garlic , finely grated (Note 2a)
- 1 tsp ginger , finely grated (Note 2a)
- 3/8 tsp baking soda (bi-carb) (Note 2b)
- 2 tsp cornflour/cornstarch
- 2 tbsp light soy sauce , or all purpose (Note 3)
For frying:
- 5 tbsp cornflour/cornstarch – for mixing in
- 1/2 cup cornflour/cornstarch – for Coating
- 2 – 3 cups vegetable or canola oil
Sweet & Sour Sauce:
- 1/3 cup white sugar
- 1/3 cup apple cider vinegar (or 1/4 cup normal white vinegar)
- 3 tbsp pineapple juice (from a 227g/8oz can pineapple pieces in juice, preferably no added sugar, Note 4)
- 3 tbsp ketchup (or Aussie tomato sauce)
- 1/2 tsp Worcestershire sauce
- 1 tbsp soy sauce , light
- 1 tsp Oyster Sauce (Note 5)
- 4 tsp cornflour/corn starch
- 1/2 cup water
Stir Frying:
- 1 tbsp oil
- 1 garlic clove , finely chopped
- 2 tsp ginger , finely chopped
- 1 onion (medium), cut into 2.5cm/ 1″ cubes (brown, white, yellow)
- 1/2 red capsicum/bell pepper (large), cut into 2.5cm / 1″ cubes
- 1/2 green capsicum/bell pepper (large), cut into 2.5cm / 1″ cubes
- 1 cup pineapple pieces (from the can of pineapple under Sauce)
Instructions
Marinade Pork:
- Mix Pork with Marinade. Marinade 18 to 24 hours. (See Note 1 for marinating time for other cuts)
Preparation:
- Rack & warm oven: Preheat oven to 80°C/175°F and place rack on tray – to keep pork warm.
- Sauce: Place all Sauce ingredients EXCEPT water in a large jug or small bowl. Mix until combined, then mix in water.
- Be Stir Fry Ready: Have all ingredients lined up, ready to toss in. After Fry #2, things move quickly.
Double dredge:
- Coating #1: Mix 5 tablespoons cornflour into the pork and leave for 5 minutes. At first, it will be white from the cornflour, but after a while it will sweat and make the cornflour (mostly / partially) wet, and will be sticky (this is key for coating to stick).
- Coating #2: Spread 1/2 cup cornflour in a shallow bowl. Coat pork, shaking off excess, and pile onto a plate.
- Reserve cornflour in case you need to dust again just prior to frying. Pork should be at least half white when you put it into the oil (if not, just sprinkle with reserved cornflour).
Fried Crispy Pork (Note 6 for oven):
- Heat oil: Pour enough oil into a large saucepan or small pot so it's 2.5cm / 1" deep. Heat to 180°C/350°F (or until pork immediately starts sizzling when you dip it in).
- Fry #1: Cook pork in batches, being sure not to crowd the pot, for 3 minutes until golden. Drain on rack. This step is just to cook the pork. It takes me 4 batches.
- Fry #2: Turn the stove up slightly and heat oil to 200°C/390°F. Starting with the coolest pork, add half the pork (you can crowd the pot) and cook for 1 1/2 minutes, or until pork is deep golden brown and crispy. Transfer to rack, repeat with remaining pork – I do 2 batches.
- Keep warm in oven.
Sauce & Stir Fry:
- Heat oil in a very large skillet over high heat.
- Add garlic, ginger and onion, stir for 1 1/2 minutes. Add capsicum and stir for 2 minutes.
- Add Sauce & pinapple, then let it come to a rapid simmer. Simmer for 2 minutes until it thickens – when you drag the spoon across the base, a path should briefly appear (see video at 1 min 53 s).
- 10 second toss: Add pork, then QUICKLY toss to coat – aim for 10 seconds!
- Serve asap! Pour onto serving plate, serve immediately! Will stay crispy for around 5 minutes then starts softening but still has a solid coating. This is just the reality of Sweet and Sour Pork, even at restaurants!
Recipe Notes:
- Loin, steaks, tenderloin (aka fillet) – 3 hours to overnight
- Anything labelled “cutlets” or “steak” – – 3 hours to overnight
- Pork leg – per recipe, 24 hrs
- Do not use – belly, bone in ribs, or pickled pork
- BIGGER pieces – cut the pork into 2.5cm / 1″ cubes, marinate and coat per recipe;
- Place rack on tray, spray rack with oil;
- Pour in enough oil to cover base of large skillet, heat to medium high;
- Add pork, then turn to make each side golden (this is the tedious part) – about 2 minutes in total, no longer; then
- Place on rack, spray with oil, bake 13 – 15 minutes at 220°C/430°F until deep golden. Use per recipe.
Life of Dozer
He takes his job as Chief Taste Tester of RecipeTin Eats very seriously. That look of concentration on his face would put any exam-sitting student to shame!
(PS Those chopsticks are Dozers’ – sometimes I just don’t feel like getting slobber on my fingers🤷🏻♀️)

Hello
Is 3/8 tsp bicarbonate Soda correct?
Hi Jeanette! Yes it is. If you don’t have a 1/8th teaspoon measure, just measure 1/4 teaspoon PLUS half of that again, that equals 3/8 🙂 N x
Stunning!! Excellent easy to follow recipe that delivered a fantastic result, not sickly sweet but balanced; did the pork using the oven method and it stayed crispy till the end!!
Delicious!! The best Sweet and Sour Pork I have tasted, much better than what you get in restaurants. Will be making this again!!
This is the best recipe for Sweet & Sour Pork I have ever used.
Mmm .. Can’t wait to make this S&S Pork !! Looks so good ! I would love to make those Built to last Honey Prawns to
have withe it (pictured on the front bottom ) but I can’t find
the recipe for them ..Please Nagi…help…gotta have them with my S&S Pork and ChicKen fried rice !! Mmmmmmmthanks
Love your ŕècipes so much !! ❤❤❤❤❤❤
Hi Juniper – I’m still working on this recipe with prawns, they tend to be juicier so don’t stay as crisp as long! N x
Nagi, could we sub chicken for the pork in sweet sour pork? If so, how long do you think i should marinate?
Hi Kat, 100% – here’s my honey chicken recipe, you can just use this chicken with the sweet and sour sauce 🙂 https://promotown.info/honey-chicken-stay-crispy/%3C/a%3E N x
Tastes great, I made the cheats version without marinating and frying the pork as I was rushed for time. (And I had a tenderloin) Will try the fried pork one time Because that sound delish! Thanks for another great recipe!
Hi Nagi. I made this on the weekend. I can see why you call it “Best Ever”. The family loved it. I added a few more different veggies in it too. Thanks for the great recipes you post. Liz x
Hubby tasted the fried pork on its own and his eyes went wide with big nods of approval 😂 we loved the dish! I also added carrots and zucchini for more veg. Thanks Nagi x
Once again the flavours were divine… such a treat! And easy to flow. Thank you Nagi!
Can this be frozen once cooked?
Hi Lucy, not this one sorry – it won’t stay crispy unfortunately – N x
First time doing any type of ‘deep frying’ and the recipe was amazing. As good as any sweet n sour out there! Hopefully not blasphemy but I used chicken thigh instead of pork… Will try the satay Curry recipe next. Cheers!
Cooked this dish for dinner tonight and it was delicious. Definitely worth the effort. The pork was crispy on the outside, tender inside and bursting with flavour.
Perfect Daphne!!! N x
Absolute flipping’ loved this. We found it wasn’t quite sweet enough so put a bit of honey it at the end. Maybe it’s our English taste buds. This is probably the best recipe of yours I’ve cooked- and I’ve cooked a lot. Thanks for the inspiration xxx
Oh my word, this is amazing! All my kids loved it. No left overs here!
This was hubby’s request for Father’s Day dinner. There was a bit of work involved but it was totally worth it. So delicious and just like in the restaurants. Now all three kids have requested it for their birthday dinners!!
Hi Nagi! Super keen to try this out with the baking method, but was just wondering – do I still have to do the double coating of Cornstarch/Cornflour if I’m using the oven? Thanks in advance!
Here in the US we call cornstarch corn flour. What is corn flour in Aussie? I’m thinking it’s finely ground cornmeal?
Hi Lucretia, cornflour and cornstarch are the same thing, just a different name depending on where you’re located. 🙂 N x
Is there a vegetarian version of this? What would you substitute for the pork? Tofu?
Outstanding! Hubby and teen were fighting each other for the leftovers.
Followed the recipe and used lots of cornflour but coating seemed thin and not really like the pics. Ideas?
Thank you
Hi Mary, sorry you had issues, it should be as per the pictures if you used the amount listed in the recipe – are you talking about the sweet & sour sauce or the batter of the pork? N x
It was the batter. I was reducing the quantity of ingredients may be the problem as I was reducing the calculation for 2. There as lots of cornflour left in the coating bowl. Will try again. Thank you
Every recipe of yours that I’ve made has turned out as good as I hoped. This one was fantastic! It will be a regular, for sure! Thank you so much!