
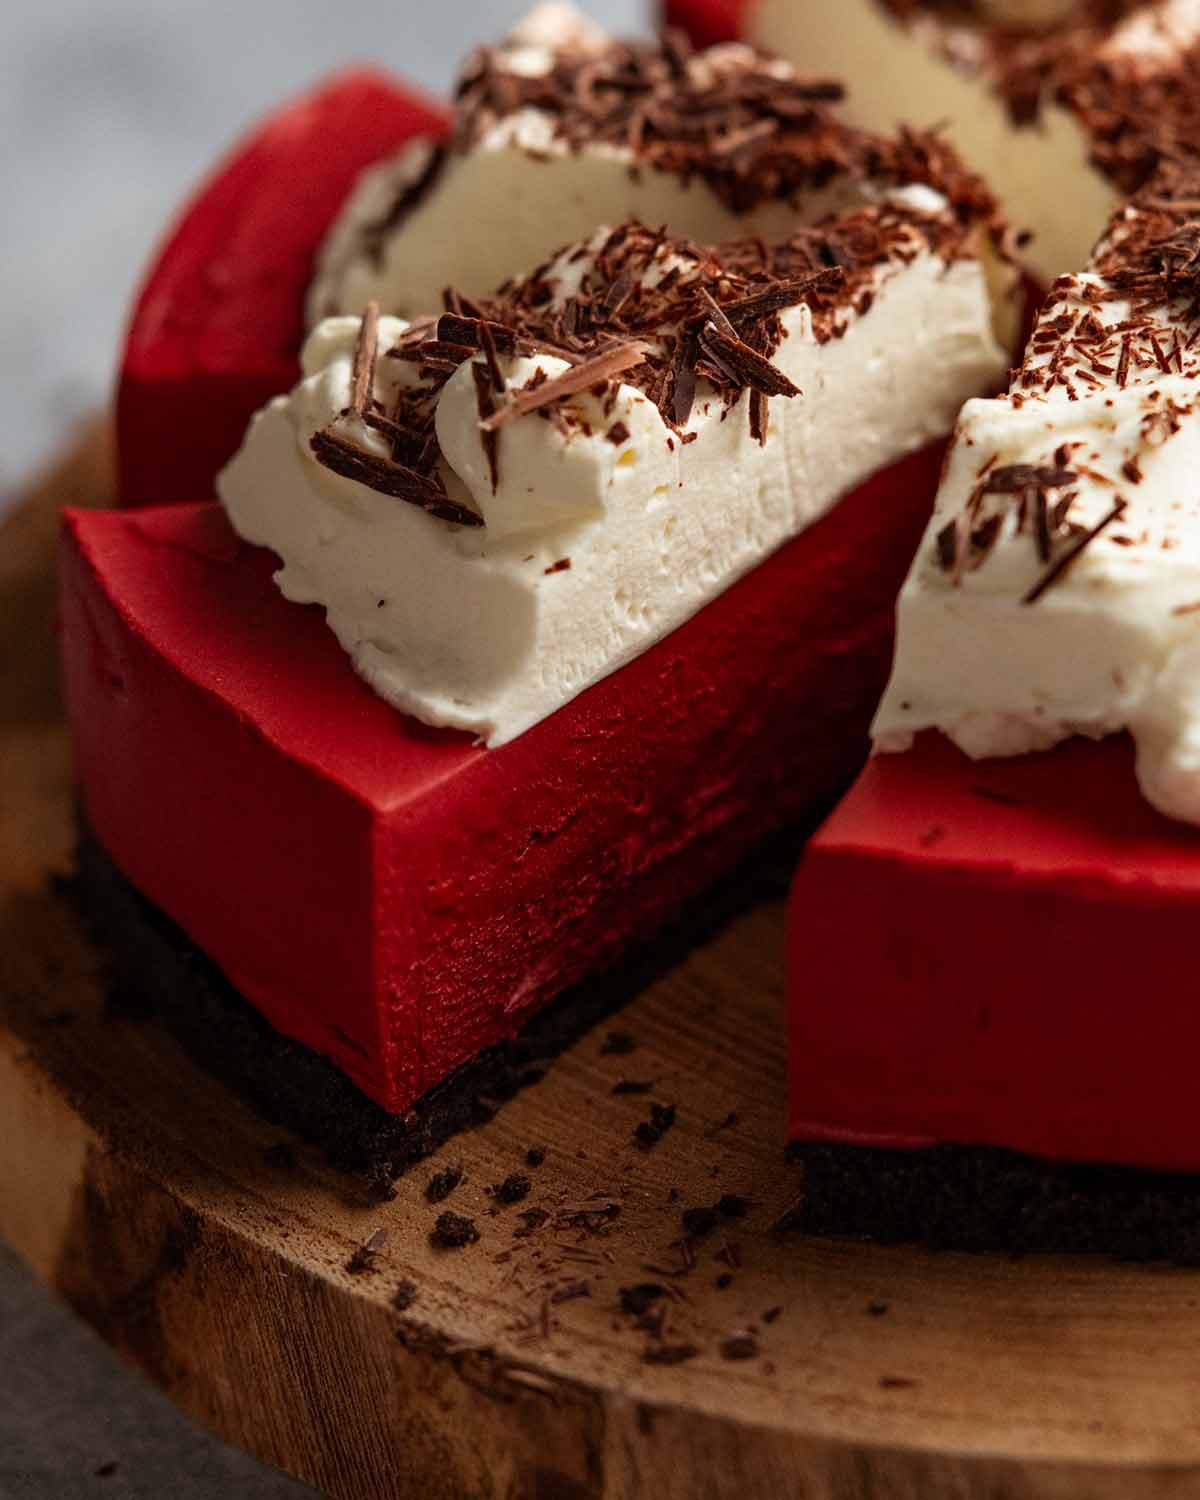
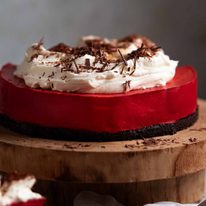
Red Velvet Cheesecake!! A no-bake showstopper where the bold, striking colour of Red Velvet Cake meets the creamy decadence of cheesecake. The filling is beautifully chocolatey, rich-yet-light, with that signature velvety texture. Make this when you have people to impress – it’s special!
Red Velvet Cheesecake
This is a cheesecake that has an Oreo base and an attention-seeking red velvet coloured cheesecake filling with a gorgeous chocolatey flavour.
It tastes luxurious but it’s not overly rich because there’s only 3/4 cup of sugar and the filling is light-but-luscious, the type that cuts neatly into slices but melts into a river of creamy goodness in your mouth.
The recipe is adapted from my classic no-bake cheesecake. A creation I made on a whim when I noticed how my latest recipes were all so yellow and orange. We need colour! I declared dramatically.
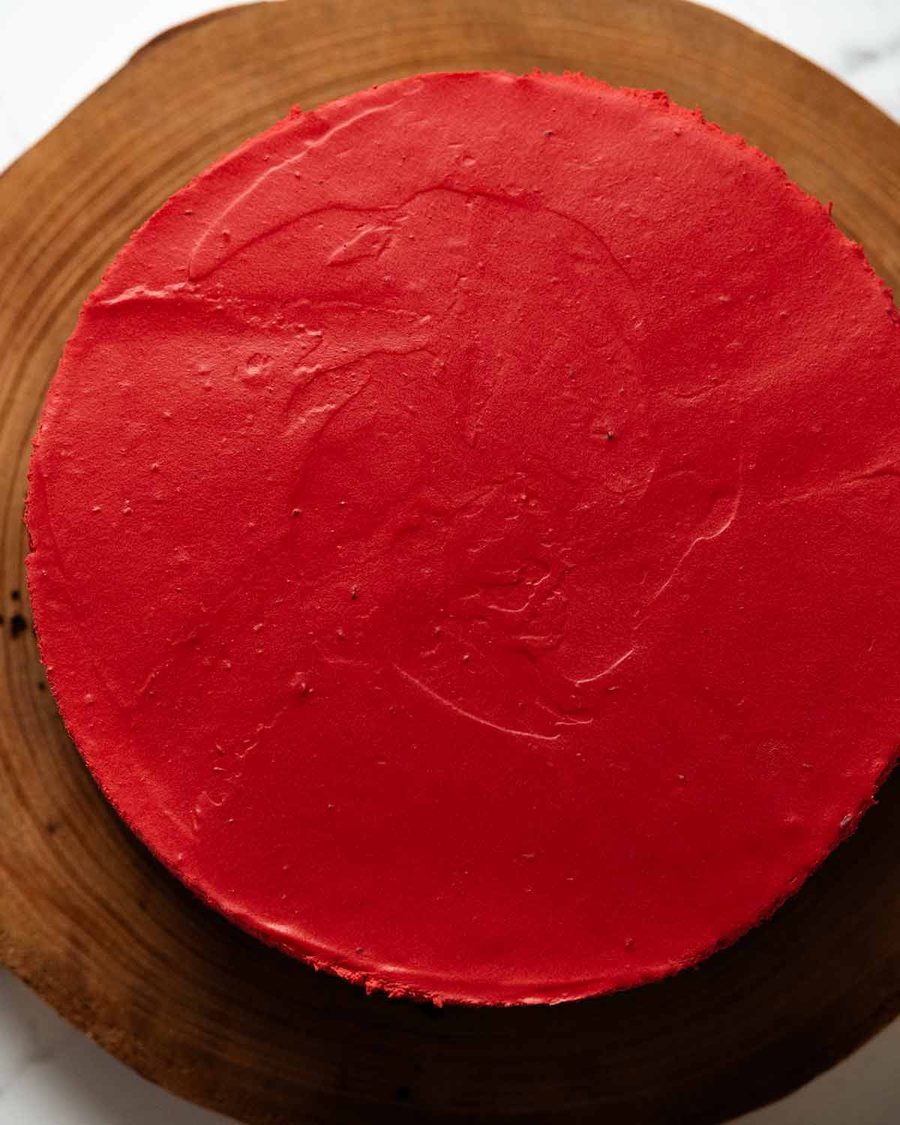
Here is colour!


Ingredients in Red Velvet Cheesecake
Most Red Velvet Cheesecakes use cocoa powder and food colouring which makes the filling a fun, bright candy-red colour. I wanted a deeper, more sophisticated burgundy tone – using melted 70% dark chocolate instead of cocoa powder gave me that, as well as impressive chocolate flavour!
Also – gelatine is key. That’s why the texture of this cheesecake is so terrific – light but luscious is how I describe it – and it won’t melt into a puddle within 10 minutes taking it out of the fridge, nor does it call for 3 blocks of cream cheese which I find too dense for my taste.
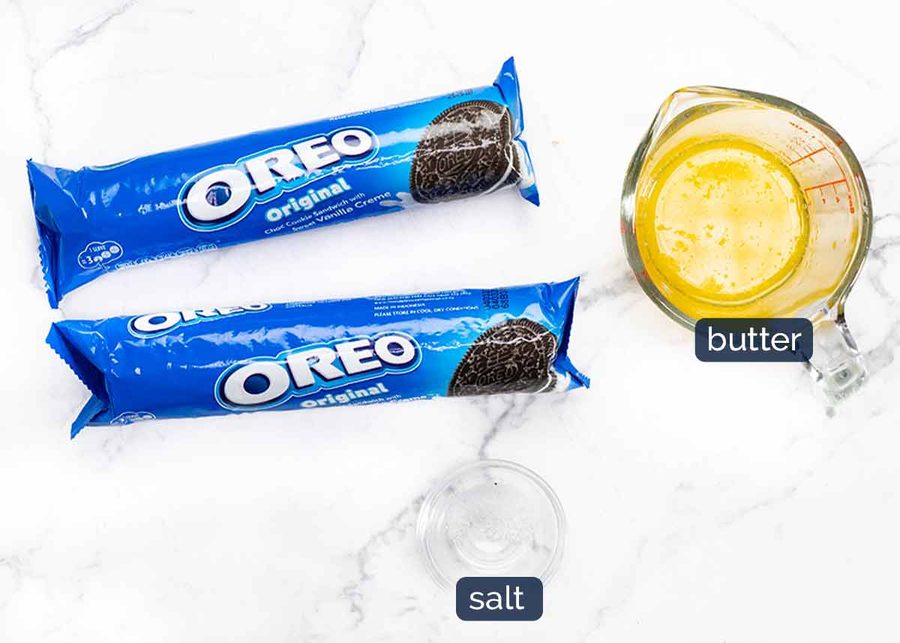
1. RED VELVET CREAM CHEESE FILLING
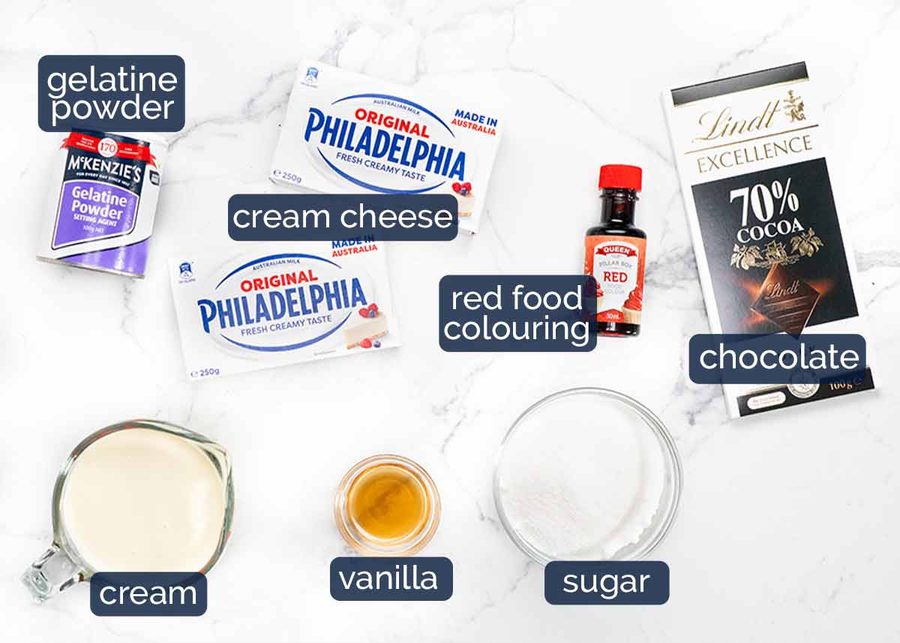
Cream cheese – I use Philadelphia, but if you’ve had success with other brands, feel free to use them. Note: use blocks, not tubs. Tubs are too soft as they are intended to be spreadable. If using tubs, increase gelatine slightly (see recipe notes).
Softened – Take out 1 hour ahead so it’s soft enough to beat smooth and fluffy.
70% cocoa chocolate – This refers to chocolate that is made with 70% cocoa. It is darker in colour and richer in chocolate flavour than regular dark chocolate (typically 40–45% cocoa), giving the filling a deeper, scarlet red colour and a more intense chocolate flavour.
That said, regular dark chocolate (US: semi-sweet) works perfectly, it’s just that the red colour is a bit brighter, and the chocolate flavour slightly milder. I can see this appealing to some people more!
Red food colouring – You’ll need 2 tablespoons of regular liquid colouring to get that bold red hue. It sounds like a lot, but less just doesn’t cut it – the colour is much less impressive and kind of defeats the purpose of making this. Unless, of course, you are after a pink velvet cake! 🙂
If using red gel, start with a drop and add more as needed – it’s much more concentrated.
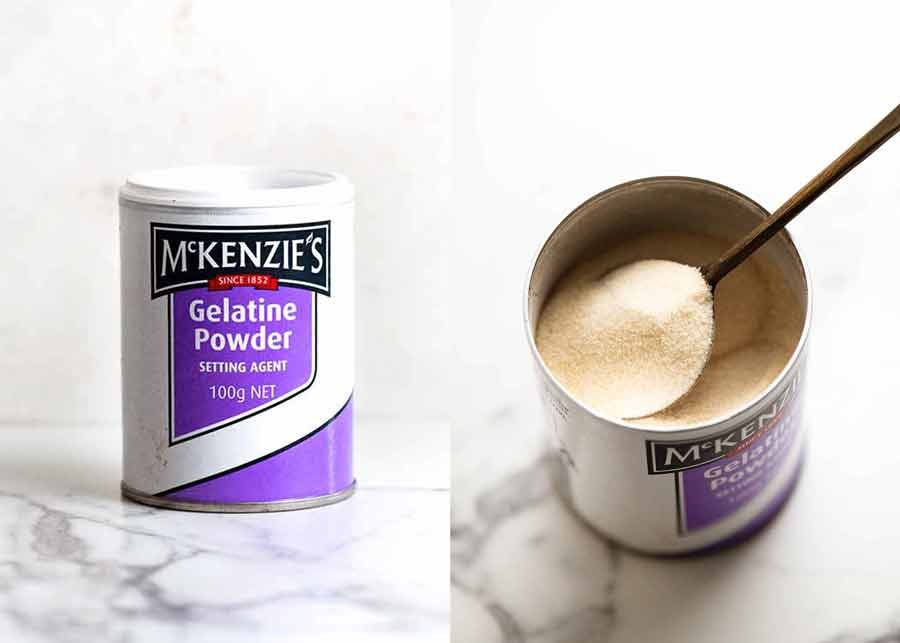
Gelatine – I prefer powder over leaves – easy, cheap, widely available, and consistent in strength from brand to brand, country to country, whereas leaves can vary wildly. Find it in the baking aisle in tubs or sachets.
Water – Used to “bloom” the gelatine. Just 2 tablespoons so flavour isn’t diluted.
Whipping cream – Whipped cream helps make the texture of this cheesecake beautifully light rather than dense. Make sure it’s fridge-cold when you use it else it won’t whip properly. And make sure you get cream labelled as suitable for whipping, not pouring or dolloping cream which cannot be whipped. Full fat please!
We also use cream to decorate the cheesecake.
Sugar – Caster sugar (aka superfine sugar) is best as it dissolves more easily, especially in no-bake recipes. Regular sugar can be substituted by rub some of the mixture between your fingers to ensure there are no granules – if there are, keep beating.
Vanilla – Use extract (real vanilla), not essence (fake). Makes a difference in no-bake recipes where the flavour isn’t cooked.
Salt – A tiny bit to enhance flavour – won’t taste salty.
2. The cheesecake crust
I chose Oreo cookies for the crust because I like the look of the dark chocolate base against the red. Also because they go on sale regularly at my local grocery store!!
No need to scrape out the cream filling, that gets blitzed up as well which, along with the melted butter, is what holds the base together.
How to make Red Velvet Cheesecake
No-bake cheesecakes are simpler to make than baked ones. But there’s one important thing to be mindful of: making sure the melted chocolate and gelatine are fully liquid but not hot. Goal: warm like a bubble bath, but not as hot as your morning coffee. If they start setting or getting gummy, they won’t blend smoothly and you’ll end up with tiny lumps in your otherwise silky smooth filling.
Baking pro? You’ll probably find these steps more detailed than you need, they’re designed to give first-timers the confidence to nail this! Feel free to jump straight to the recipe. 🙂
1. INVERTED BASE (PRO TIP!)
We use a springform pan for cheesecakes so they can be removed without flipping – no cheesecake would survive being turned upside down! For easy removal, turn the springform base upside down – no lip means the cheesecake slides off smoothly without cracking the crust.
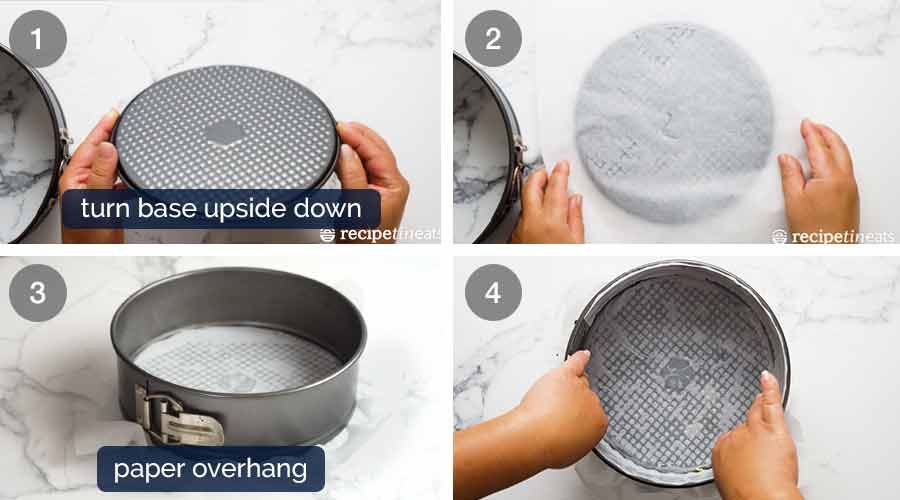
Flip the base of a 20cm/8″ springform pan upside down.
Butter and line – Spray the base with oil or grease very lightly with butter, just enough to hold a square(ish) piece of baking paper (parchment paper) in place so it’s not sliding around when you clip the sides in.
Clip the sides in so the excess paper is sticking out. The overhang makes it easy to slide the cheesecake onto a serving platter – no structural stress!
Line sides – Grease then line the sides as well.
2. oreo biscuit base
In this recipe, I opted not to line the walls so you can see the red filling which is the star of the show!
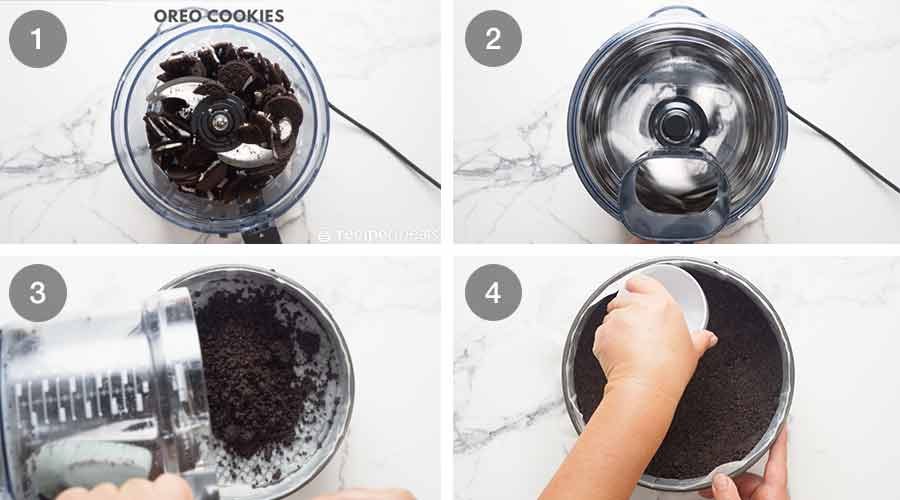
Break up cookies roughly by hand, then place in a food processor;
Blitz until it becomes sand-like. Pour in the melted butter and blitz again briefly to just combine;
Tip this cookie-sand into the lined pan; and
Press into pan – Use something with a flat base and straight sides to press the crumbs firmly against the base of the pan. I use a measuring cup!
3. BLOOM THE GELATINE
Gelatine is simple to use if you just follow the steps I’ve provided. There’s a reason for every direction!

Bloom gelatine – Sprinkle over water in a small bowl (don’t dump in one spot), stir, and let sit 5 minutes to form a rubbery block.
Rubbery! This is what it looks like once set. If it doesn’t set, it’s no good – replace it.
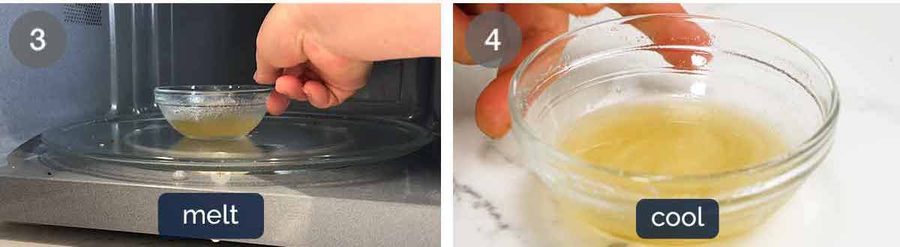
Melt gently – Microwave for just 15 seconds to turn it back into liquid, stir until smooth.
Cool slightly – Let it sit 5 minutes while you make the filling. It should be warm liquid but not hot when added. If it sets again (even around the edges), re-melt gently.
4. MAKE THE FILLING
I prefer a handheld beater for the filling – it’s easier to move around the bowl and needs less scraping. If using a stand mixer, use the whisk for cream, then switch to the paddle for cream cheese to avoid over-aerating (which can cause bubbles).
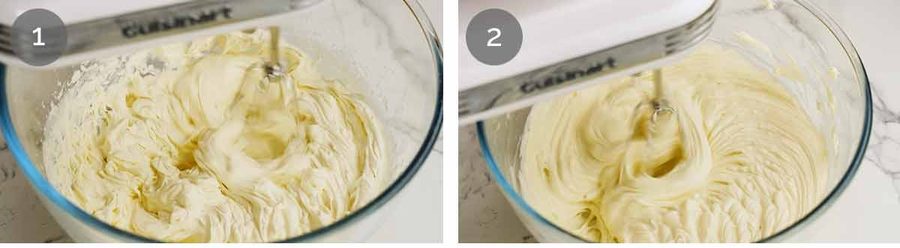
Whip cream – Put the cream in a bowl and whip it on high for 2 minutes or until stiff peaks form. We’re not looking for silky soft whipped cream, we want full on stiff whipped cream, as this makes our cheesecake beautiful light and fluffy.
Beat cream cheese – Put the cream cheese and sugar in a separate bowl and using the same whisk (no need to clean it), beat for 2 minute on high just until it’s smooth and quite fluffy. Then add the melted cooled gelatine and vanilla, and beat until combined (~15 seconds).
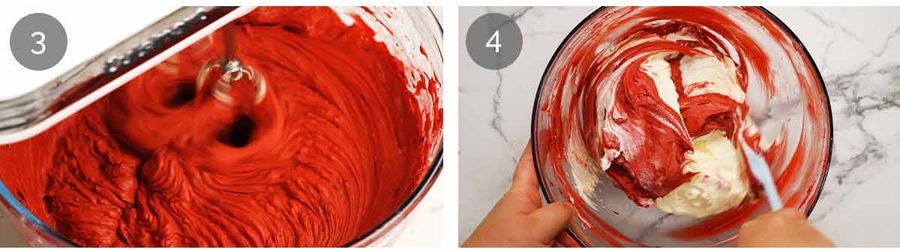
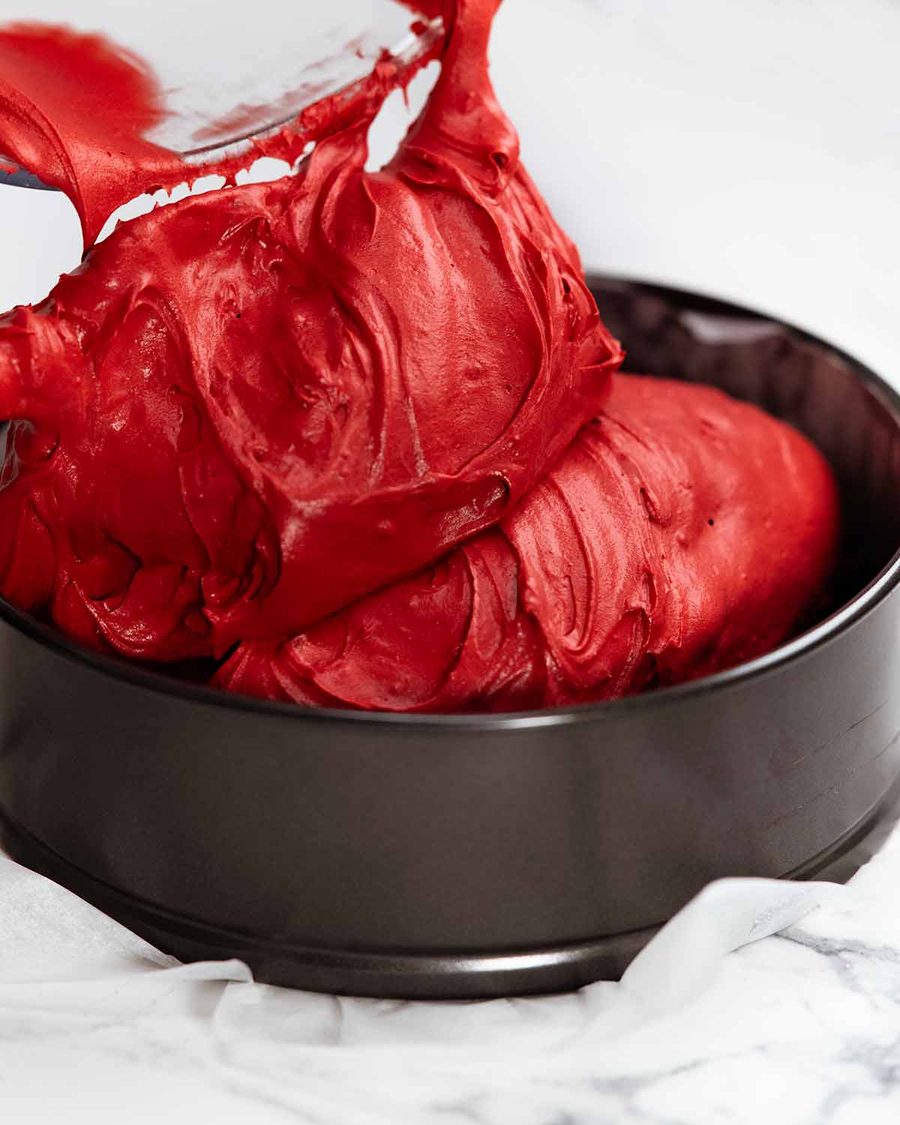
Make it RED! Add the melted chocolate and red food colouring and beat until thoroughly combined, about 1 minute.
Colour check – Whatever the colour the filling is at this stage, it will be slightly paler in the finished cheesecake after the cream is added. Feel free to add more red colouring if you like, but don’t add more chocolate because it will weigh the filling down too much and make it denser (I found 150g/5oz was the limit).
Fold in whipped cream – Using a rubber spatula, fold through about 1/4 of the cream into the cream cheese filling. This lightens up the cream cheese mixture a bit before adding the rest of the cream, so less air is knocked out of the cream. Once the initial cream is mostly mixed through, gently mix through the remaining cream. Don’t stir vigorously as you will knock air out of the whipped cream which will make the cheesecake filling denser than we are aiming for!
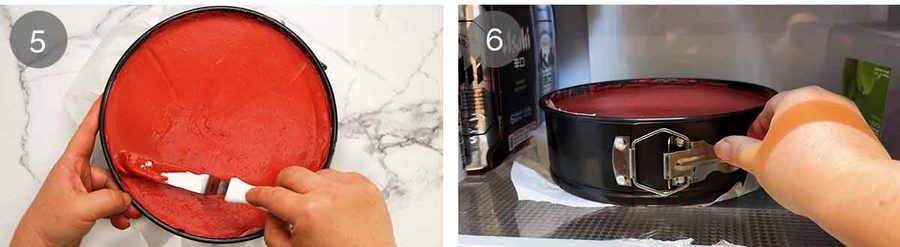
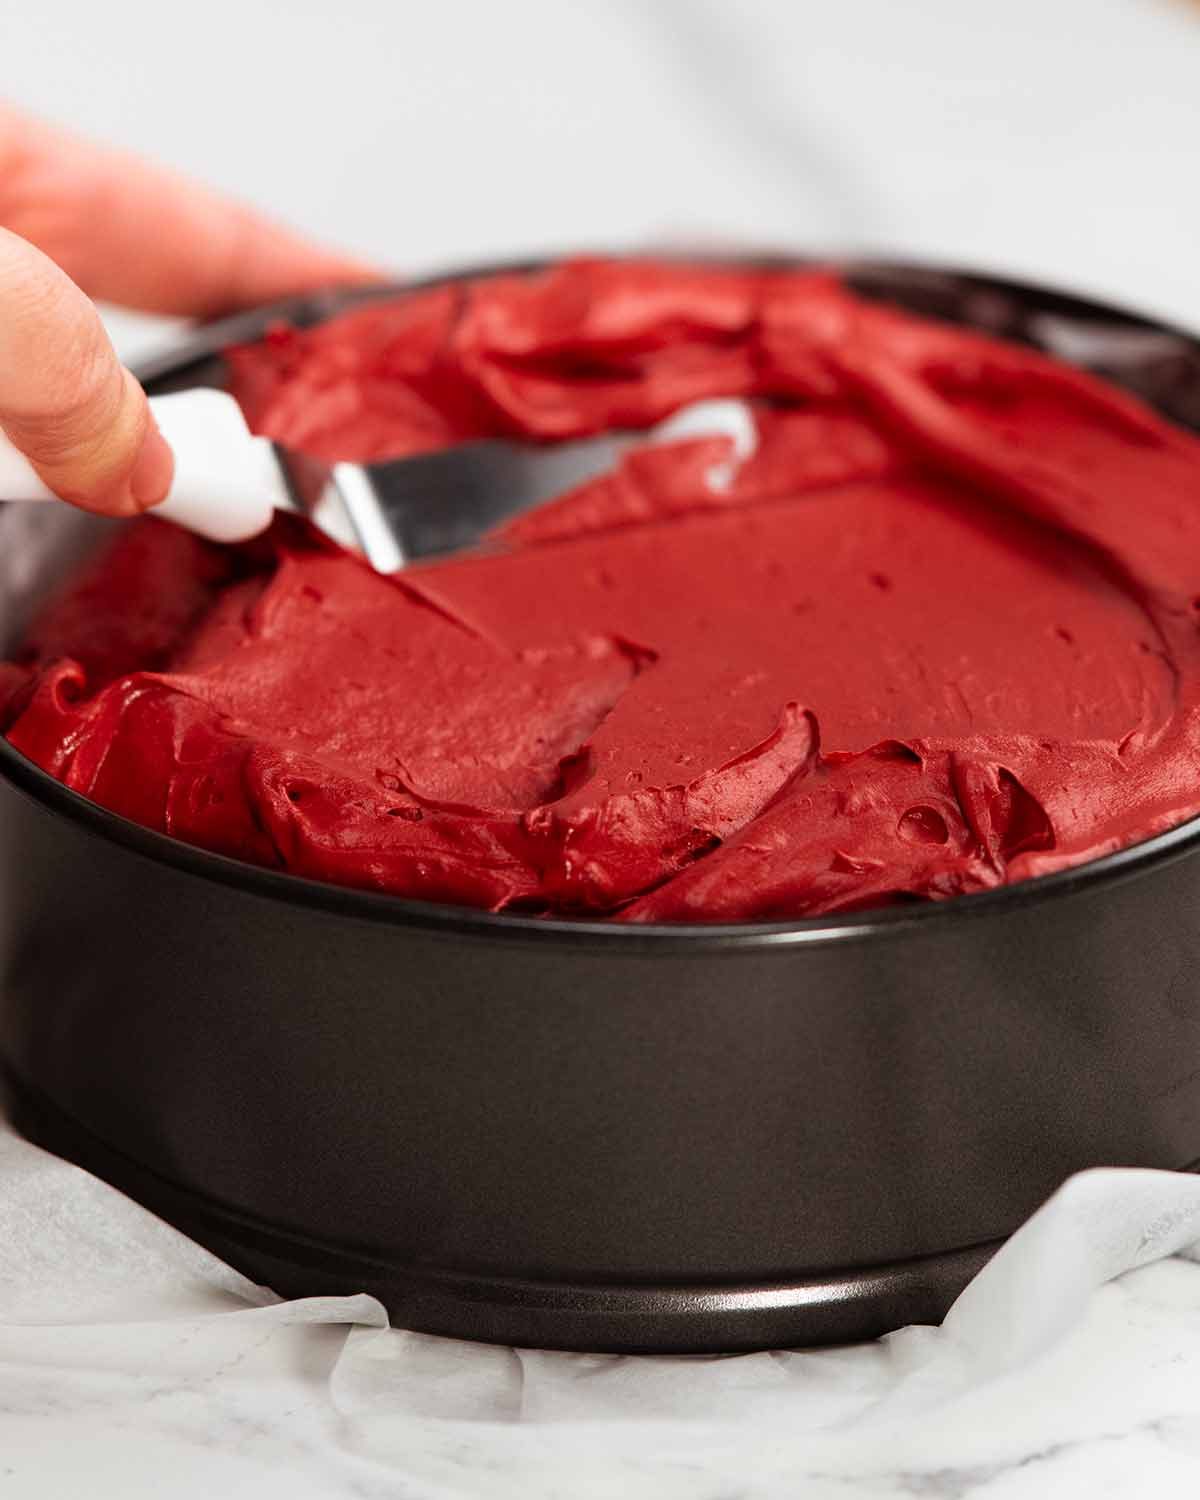
Pour the mixture into the prepared crust and smooth the surface
Refrigerate for 6 hours to let it set. This cheesecake sets faster than my classic cheesecake because it has chocolate in it which helps with the setting.
5. removing from pan and decorating
This is the moment you get to feel smug for flipping the cake pan base – clever you! 🙂
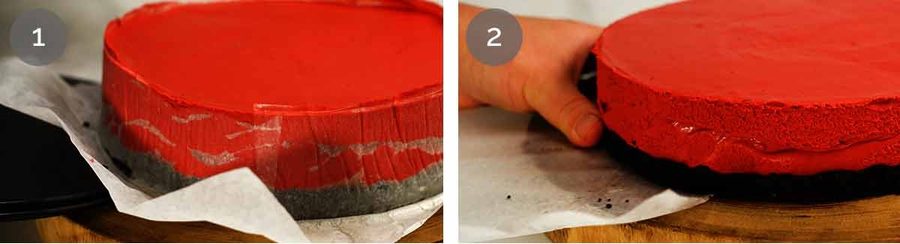
Slide paper off base – Unclip then remove the sides of the springform pan. Grip the paper overhang and slide the cheesecake off the base onto a serving platter.
⚠️ If the paper’s stuck, it’s likely due to too much cold butter acting like glue. Warm the base slightly (e.g. with a warm damp tea towel) or slide a long knife or spatula underneath to loosen it.
Slide the paper out from under the cheesecake. I use my hand to hold the cheesecake as I’m pulling the paper out from underneath it.
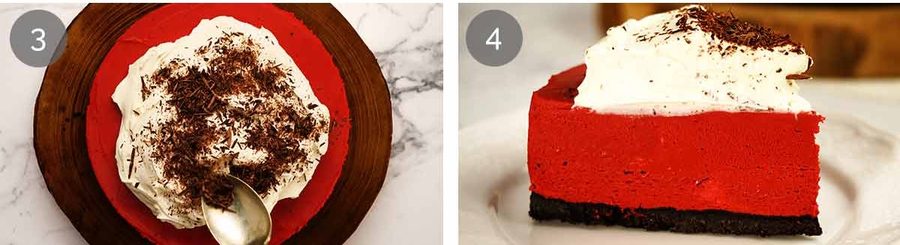
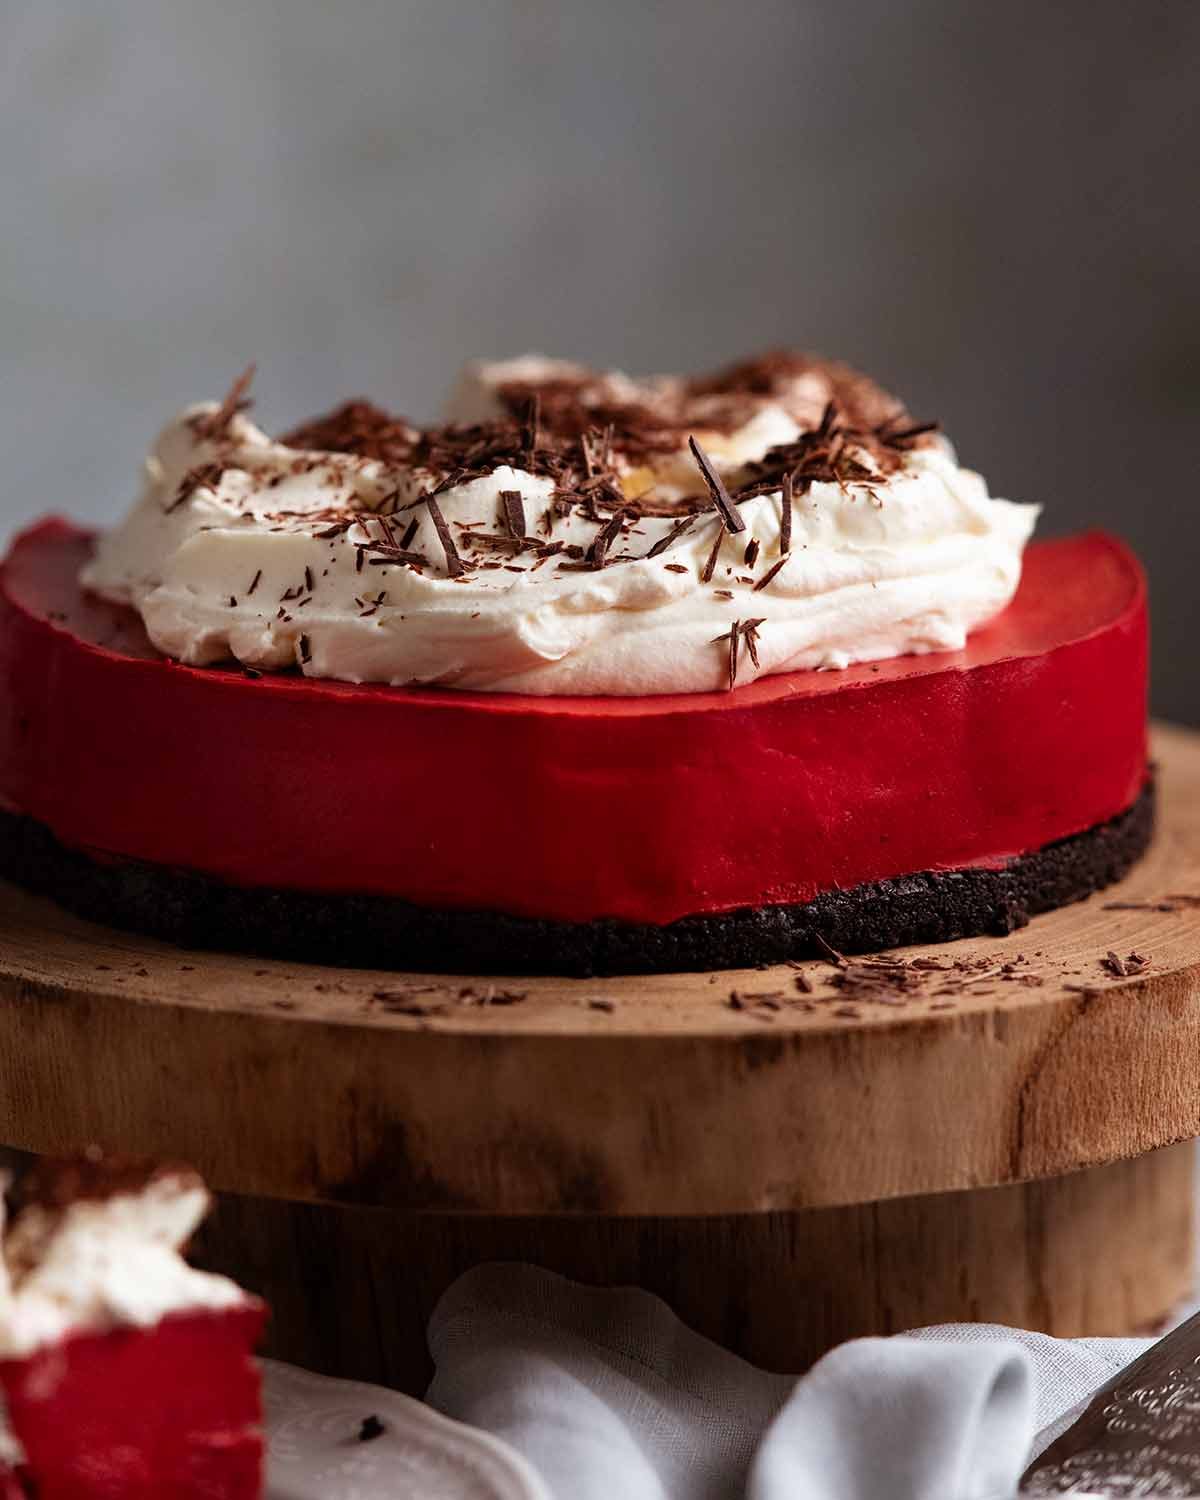
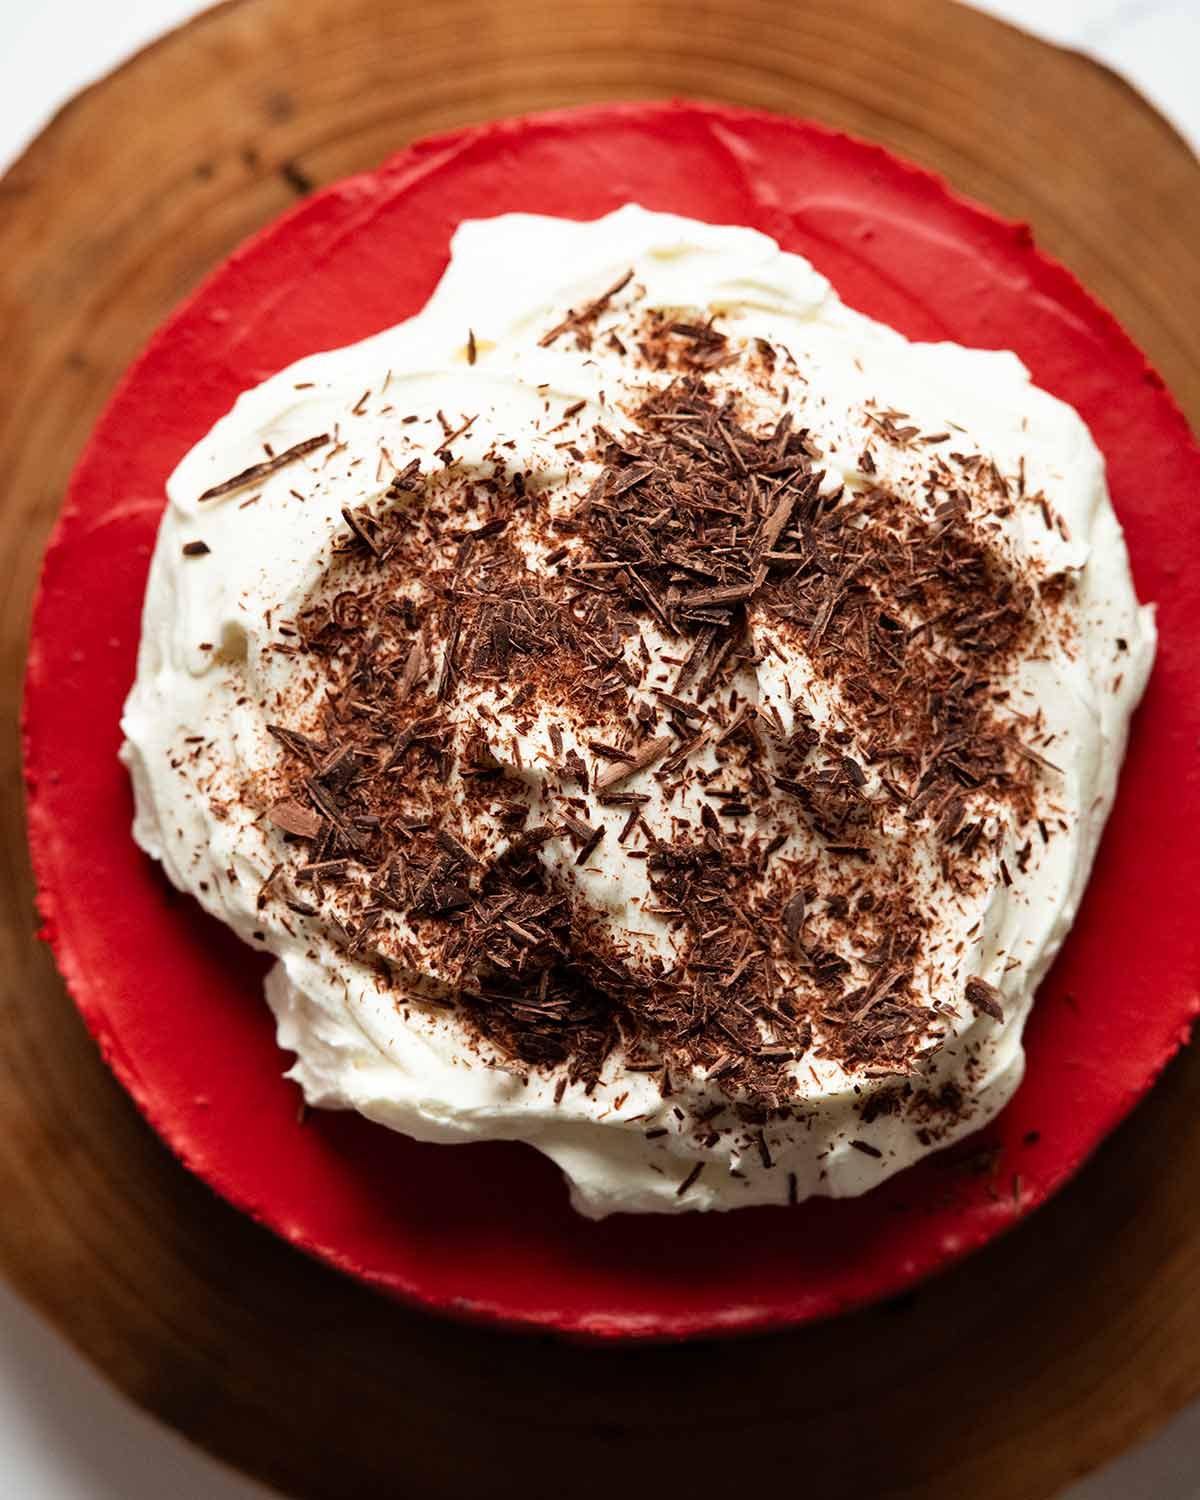
Decorate with whipped cream and chocolate shavings! I pile the whipped cream in the centre leaving a 2.5cm/1″ border so you can see the red filling from above.
Ready to serve! Well, the Red Velvet Cheesecake is ready. So the real question is – are you ready for the inevitable gasps of appreciation when you bring this out??
It won’t melt into a mess!
This is lovely served fridge cold or even if it’s closer to room temperature after sitting out on the table for a while. As long as it’s not an insanely hot day, this Red Velvet Cheesecake will maintain the fluffy-yet-creamy texture rather than melting into a mess, thanks to the gelatine.
It will keep for 5 days in the fridge though the biscuit base gets progressively softer. It’s crispiest in the first 24 hours, then on day 2 it is a bit softer and continues to soften.
The filling, however, maintains its perfect fluffy-yet-creamy texture the whole time. And if you stabilise the cream, it will stay fluffy for days rather than weeping! See the Stabilised Whipped Cream post for how I make it – choose the method that works for you: cream stabiliser powder, gelatine or mascarpone.
Hope you enjoy! – Nagi x
Red velvet cheesecake FAQ
I’m sorry to say I am not familiar enough with vegetarian alternatives to gelatine so I can’t offer advice on how to substitute with agar agar, pectin etc. Sorry! I am hoping a reader experienced with one of these alternatives might share their advice. 🙂
That’s ok! Use the softer spreadable tub version and read the recipe notes for how to add a bit more gelatine to help it set better.
Actually, it wasn’t too bad! I’ve made plenty of no-bake cheesecakes before – classic and flavoured ones like Nutella and Mango – so I’m pretty familiar with how the filling sets and how flavours come through. I used my classic base, added cocoa powder (like in Red Velvet Cake) for a subtle chocolate note, and red food colouring.
But the colour wasn’t quite right – it was too bright. Unlike cake batter, which darkens when baked, no-bake cheesecake stays the same colour after setting. So I added melted dark chocolate (US: semi-sweet), which made it deeper, but still not quite there.
Switching to 70% cocoa chocolate gave me the rich scarlet colour I wanted and amped up the chocolate flavour.
Texture-wise, no issues! Because melted chocolate firms up as it sets, I reduced the gelatine slightly – 2 teaspoons instead of 3 – and it turned out just right.
My only problem – chocolate lumps. I let the melted chocolate cool too much and scraped in the solid bits from the bowl. Rookie error! Next time, I added it in while still lukewarm – not piping hot like my morning coffee, but not room temperature either – and it blended in perfectly. Problem solved.
And that’s it! Then I made it to film the recipe video you see below, then I made another one to photograph.
Between increased workload on a special RTM project we’re working on (I can’t WAIT to tell you all about it!!) and being quite sick this week, JB hasn’t had a chance to make it yet though he’s been heavily involved in the taste testing process!
He’ll make it next week then I’ll come back here and share his process. As regular readers know, he always has a lot to say! 😅
Watch how to make it
Hungry for more? Subscribe to my newsletter and follow along on Facebook, Pinterest and Instagram for all of the latest updates.
Red velvet cheesecake
Ingredients
Base:
- 200g/ 7oz Oreo cookies (1.5 standard packs, Note 1)
- 60g / 4 tbsp unsalted butter , melted
Red velvet cheesecake filling:
- 2 tsp gelatine powder (unflavoured gelatine) (Note 2)
- 2 tbsp water
- 1 cup heavy/thickened cream , fridge cold
- 500g / 1 lb cream cheese , softened (block form, Note 3)
- 3/4 cup caster sugar / superfine sugar (Note 4)
- 1 tsp vanilla extract
- 150g / 5 oz 70% chocolate (or dark chocolate) , chopped and melted, then cooled 3 minutes until lukewarm but no lumps at all (Note 5)
- 6 tsp red food colouring (Note 6) – UK readers especially!
Whipped cream topping:
- 1 1/4 cups heavy/thickened cream , fridge cold (for whipping)
- 3 tbsp caster sugar / superfine sugar
- 1 tsp vanilla extract
- Optional – stabilise the cream so it doesn't deflate – see here for directions
Chocolate topping:
- 2 tbsp shaved or grated dark chocolate (I use a potato peeler, grater also works)
Instructions
- Inverted pan base – Flip the base of a 20cm / 8" springform pan upside down – this makes it easier to remove the finished cheesecake without the lip in the way. Very lightly butter the pan base, then press on a square sheet of baking paper. Clip the pan sides onto the base, letting the excess paper stick out the sides (for easy removal later). Butter and line the pan sides with more baking paper.
Oreo biscuit base:
- Blitz cookies – Roughly break up Oreos with hands and place in food processor. Blitz until they become fine crumbs. Add melted butter, then blitz again until combined.
- Press into pan – Transfer crumbs into prepared pan, pressing evenly and firmly on to the base (I use the underside of a straight-sided, flat-bottomed cup measure to do this).
Red velvet cheesecake filling:
- Bloom gelatine – Place water in a small bowl then sprinkle the gelatine powder across the surface. Stir to partly dissolve. Set aside 5 minutes. It will turn into a solid rubber; this process is called blooming. Microwave the gelatine for 15 seconds to turn it into liquid, stir, then let it stand for 3 to 5 minutes to cool. But it MUST be liquid when added into the mixture (else you'll end up with gelatine lumps), so re-melt if needed.
- Whip the cream until stiff peaks form (2 – 3 minutes on high).
- Whip cream cheese – In a separate bowl (no need to clean beaters), beat the cream cheese and sugar for 2 minutes on high until fluffy and smooth. Add the cooled gelatine liquid and vanilla, beat another 30 seconds to mix it through well.
- Make it red! Add the lukewarm melted chocolate and red food colouring. Beat well for 1 minute until well combined. It should be a dark, seductive scarlet red colour rather than bright red, bearing in mind the cream will lighten it a bit.
- Fold in cream – Add one third of the whipped cream to the cream cheese mixture and gently fold until just combined. Then fold in the remaining cream.
- Transfer to cake pan – Pour the mixture into the prepared tin and place in the fridge for at least 6 hours to set.
Decorating
- Remove cheesecake – Release the sides of the springform pan. Use the paper to slide the cheesecake off the base onto a serving platter. Peel the paper off the sides, then slide the paper out from under the cake.
- Whip cream – Place the cream, sugar and vanilla in a bowl. Beat on high for 2 minutes until softly whipped. (See here for make-ahead stabilised whipped cream option).
- Decorate – Pile the whipped cream on the cheesecake in the middle, leaving a 2.5cm/1" border. Sprinkle with shaved chocolate. Serve!
Recipe Notes:
Nutrition Information:
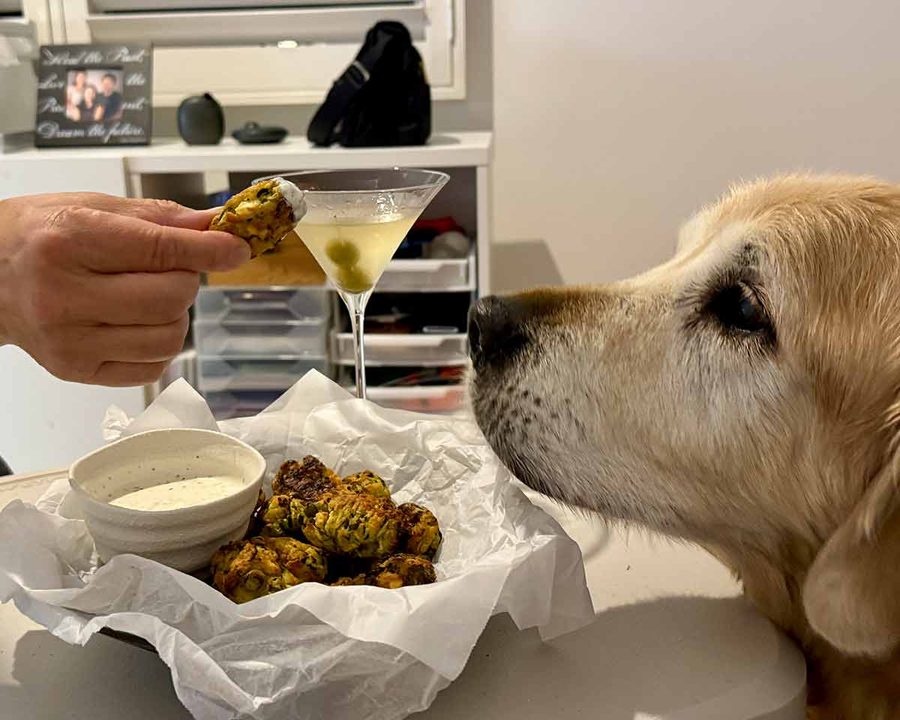
Life of Dozer
Just a random selection of recent Dozer photos on my iPhone!
Foot warmer – who needs slippers?

2. His favourite place – under the table. Wherever we are, it’s the first place he goes! Sometimes I tap away on the computer on the floor next to him, especially when he’s been going through his rough patches over the past year.

3. The things we do with AI – Our vision for a Dozer patting machine!! 😂

4. Failed cookie consumer – Well actually, he ins’t allowed to have crunchy crumbly cookies anymore (due to the risk of accidentally inhaling into lungs), but that doesn’t stop him hovering around my baking efforts – successes and fails!
5. Just on a walk

6. Refusing to go to work – This is what he does when he doesn’t want to get into the car. I wonder when he will figure out a more effective way to be a brat – it’s not exactly an effort for me to step into the garden bed and lead him out. 😂

7. No eating in peace – Leftover Zucchini Tots that I posted earlier this week. Sadly too much garlic for Mr Dozer, but it didn’t stop the wishful thinking!
Actually, that’s a pretty good representation of 48 hours in Life of Dozer!
I love the pic of Dozer in your garden bed – “You can’t get me here!” Sweet boy ❤️ Great mom ❤️
This looks amazing!! Has anyone tried it with the gluten free Oreo alternatives in Australia? Or would I be better off trying to find GF chocolate Ripple bickies? Looks like a showstopper for family gatherings but need a GF option for the base!
I may not be a cake maker or eater but this is one eye-catching and elegant production! It must be one of the most striking cakes I have ever seen and all of my baking friends will be shown the evidence. Have never bought an Oreo . . . I must be the only one around 🙂 ! At the moment am scrolling back to the photo of Dozer with AI help – I don’t much like life alongside the ‘beastie’ but this is gorgeous !!! Hope you both have a good weekend!
Hi Nagi, this looks amazing!
I love baking your recipes to share with my coworkers, but a few are vegetarian/halal so gelatine is a no go.
Are there any alternatives you’d recommend for this recipe? 🙂
Thank you!
I used cooked flour (raw flour can cause food poisoning. I toast flour in a saucepan but you can also use an oven or microwave says internet raw cookie dough – Sally’s baking addiction is super helpful!) to thicken my buttercream frosting with tub cream cheese because the other type doesn’t exist here, and it worked superb! I used 2-3tbsp flour per 165g pot Philadelphia, 75g butter and 125g icing sugar. So my rough calculations says to use 4-6tbsp cooked flour (I just eyeballed flour amount until my frosting created a dollop, rather than drippy icing! Buttercream/Frosting doesn’t change texture in the fridge – so add as much thickener as you need. Super helpful).
I am among the worlds’ most ignorant cooks but at age 86 I am inspired by these beautiful, ultimately clear presentations by Nagi to actually get baking. How can I thank you, Nagi, for helping me break a life-long hesitation. Bless you sincerely, Carla, Perth Western Australia.
Wow Carla, what a beautiful message to receive!! I hope you get a chance to try this one 🙂 – N x
Nagi, I want to buy a hard copy of your book. Is it available in any Perth bookstore? I am trying to avoid postage fees, you see. Carla
Carla, you can buy both books at Kmart. There may be other places too, however that is where I have purchased from.
I live in Sweden and haven’t seen block cream cheese in the last 30 years or so.
But I’ll go with what you recommend for the UK.
I love cheesecake and dark chocolate…
Hi Masja! Yes, do 🙂 I tested that specifically for my classic no bake cheesecake and it worked out exactly the same! – N x
That’s amazing Nagi, I always love your creations, this is another Keper
Thanks
Thank you Bibi! I had fun creating this one 🙂 – N x
My son loves anything red velvet but does not like dark chocolate. Can I use half and half with cocoa and if so, how much of each? Thanks, that looks so good.
Hi Adele! Is he ok with regular dark chocolate chips or milk chocolate? Either of those can be used – use melts if you can find them, they melt more easily than the chips 🙂 Else you can add 4 tbsp of cocoa powder (sifted) for a more subtle chocolate flavour. This was actually the first way I made it and it was nice but the chocolate flavour wasn’t as strong and the red colour wasn’t as dark, it was a brighter red colour! – N x
I love your detailed instructions and information. Please don’t stop.
Thank you Nagi.
I never plan to! 🙂 Happy weekend Danielle, hope you have a great one! – N x
I think this is the granddaughter’s 3rd birthday cake in mid-September…..
Definitely 3rd birthday worthy. I HOPE SHE LOVES IT!! 🙂 – N xx
With all that red food colouring, she’ll be bouncing off the walls! 🙂
Ha Ha !
Mind you, she bounces off the walls now at the thought of grandad’s roast chicken and roast potatoes.
Such a pleasure to have a kid who’ll try anything and isn’t fussy with her food (unlike her mum…) 😁
I love your tasty recipes—you have been one of my best go-to sources for recipes for many years. And, I especially love your pictures of Dozer—please give him big hugs from me
Hug will be passed on!! I’m currently sitting in the vet waiting room as he gets his hydrotherapy session! – N x
Cannot wait to try this Nagi – the no bake one from Christmas has turned into our family fave.
I think may you have left out the word ‘not’ in second para.
“It tastes luxurious but it’s overly rich because there’s only 3/4 cup of sugar….” 🙂
He he – literally wrote the OPPOSITE of what I was trying to say!! 😂 Thanks for picking that up Joy – N x
Looks delicious but I’m vegetarian so don’t eat gelatine. It’s such a pity that the majority of cheesecakes have gelatine in them. Please can you do some non-gelatine cheesecake recipes? 🙏
Hi Dominique, I’m sorry to say I haven’t tried this specific one without gelatine. All my baked cheesecakes don’t have gelatine, are you ok with eggs?? 🙂 – N x
Thanks for your reply. Yes perfectly OK with eggs and dairy, just not any meat products 😊
I love this recipe. One question – would this work with kosher or vegan gelatine? ie fish based or carrageenan or guar gum?
Hi Robert, I’m sorry to say I haven’t tried this with gelatine alternatives so I don’t know the setting strength. I hope someone who is familiar with them shares their advice! – N x
I am going to try a half or quarter size cake and see how it goes.
Um hello a bit Bougie …. Is that a dirty martini with your zucchini tots ?
Filthy martini, actually 😅 I had a bad day at work!!
Nagi….
You are a wonderful human being! I so love you, your recipes and Dozer. Your column is a delight to savor. Thank you for sharing your life…..