
All butter flaky Pie Crust made with classic shortcrust pastry, with easy to follow concise steps AND a short video so you can nail your pie crust every. Single. Time!!! Make this with your hands though if you have a food processor, the dough is done in 1 minute. I exaggerate not.
This is a shortcrust pastry recipe that is perfect to use for sweet and savoury pies and tarts. Pecan Pie, Pumpkin Pie to the great Aussie Meat Pie!

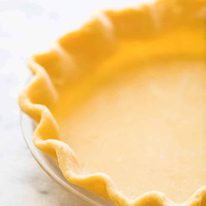
Pie Crust
There’s no magic ingredient in this pie crust recipe, it has the same ingredients as 99% of other recipes out there. But it’s presented neatly, easy to follow, and it’s simple if you just follow the recipe steps incorporating all my little small-but-important tips! 🙂
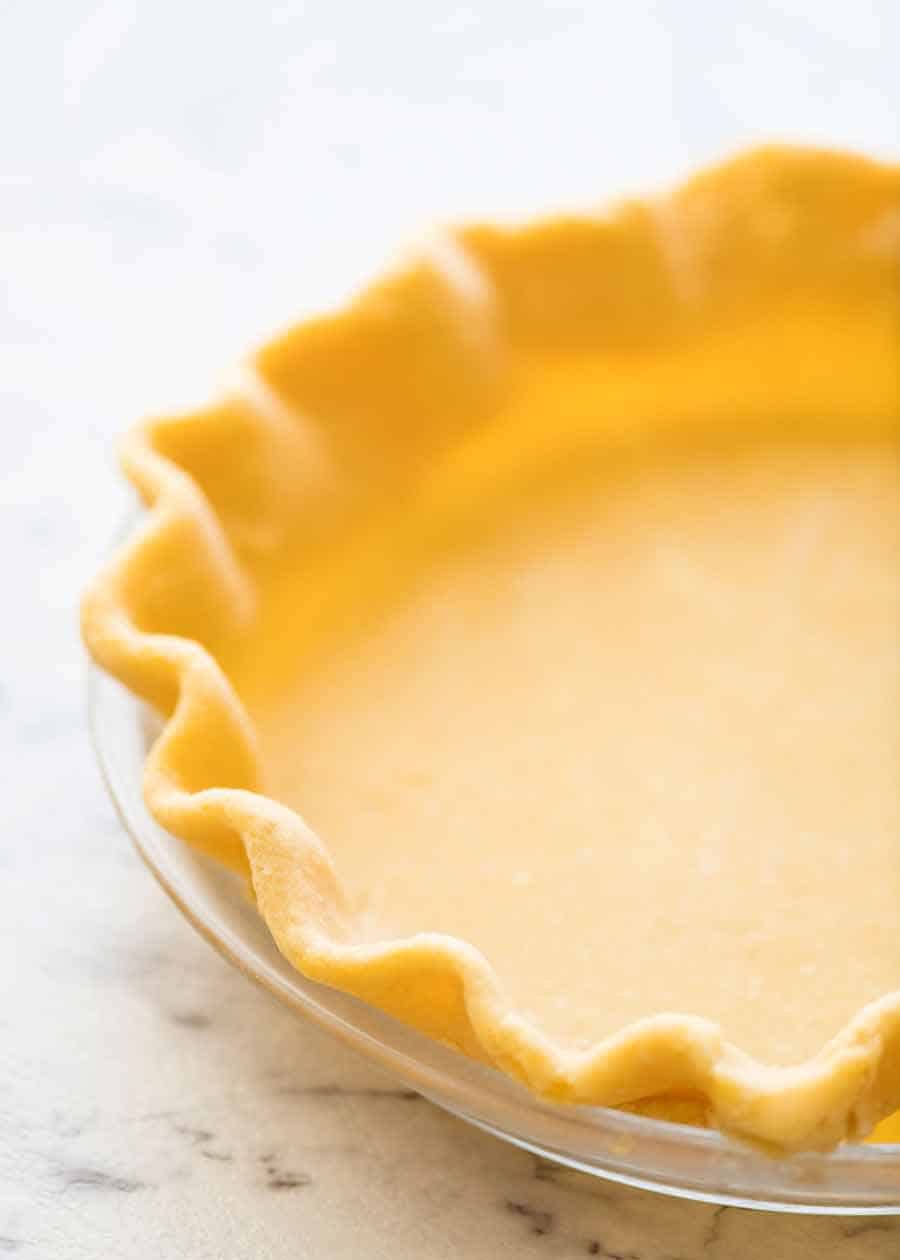
This is my “go-to” pie crust that I use for all things sweet such as Pecan Pie and Pumpkin Pie, as well as savoury pies such as the great Aussie Meat Pie. It’s buttery and flaky, it’s tender enough to cut through with little effort with a fork yet doesn’t disintegrate into crumbs when cutting slices of pie. Nobody wants that piece of pie with no pie crust! 😩
It’s made with just butter, no shortening. Which may immediately deter some people who are loyal to pie crusts made with shortening – but before you run away, let me say this:
Yes, shortening yields a very flaky pastry – but it’s tasteless. And a well made pastry using butter is certainly flaky enough – but more importantly, tastes so much better. Even doing 50/50 of each lacks flavour.
So all-butter it is. And always will be!

What you need to make a pie crust
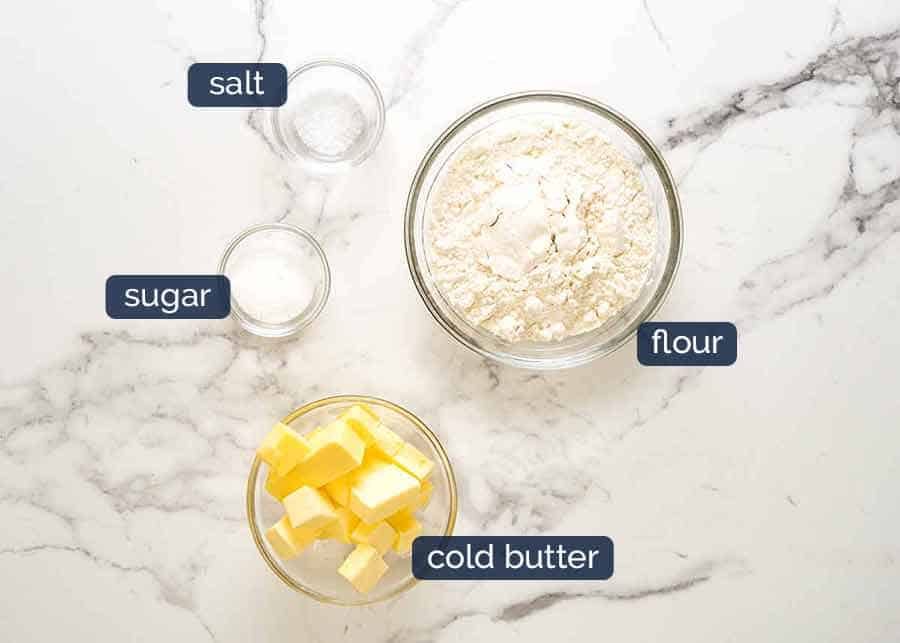
Here’s all you need:
Very cold butter – your goal is to end up with tiny little bits of butter in the dough rather than melted or creamed butter mixed through the dough. The little bits of butter melt in the oven and create air pockets which makes the pastry flaky.
Very cold water – for the same reason as above
Flour, salt and if making pastry for a sweet filling, sugar.
PART 1: 1 minute pie crust dough
I feel like I’ve paid my dues over the years, making pie crust dough by hand – either rubbing the butter in with the tips of fingers or using a pastry cutter. Nowadays, I opt for the simple, foolproof, 1 minute method using a food processor.
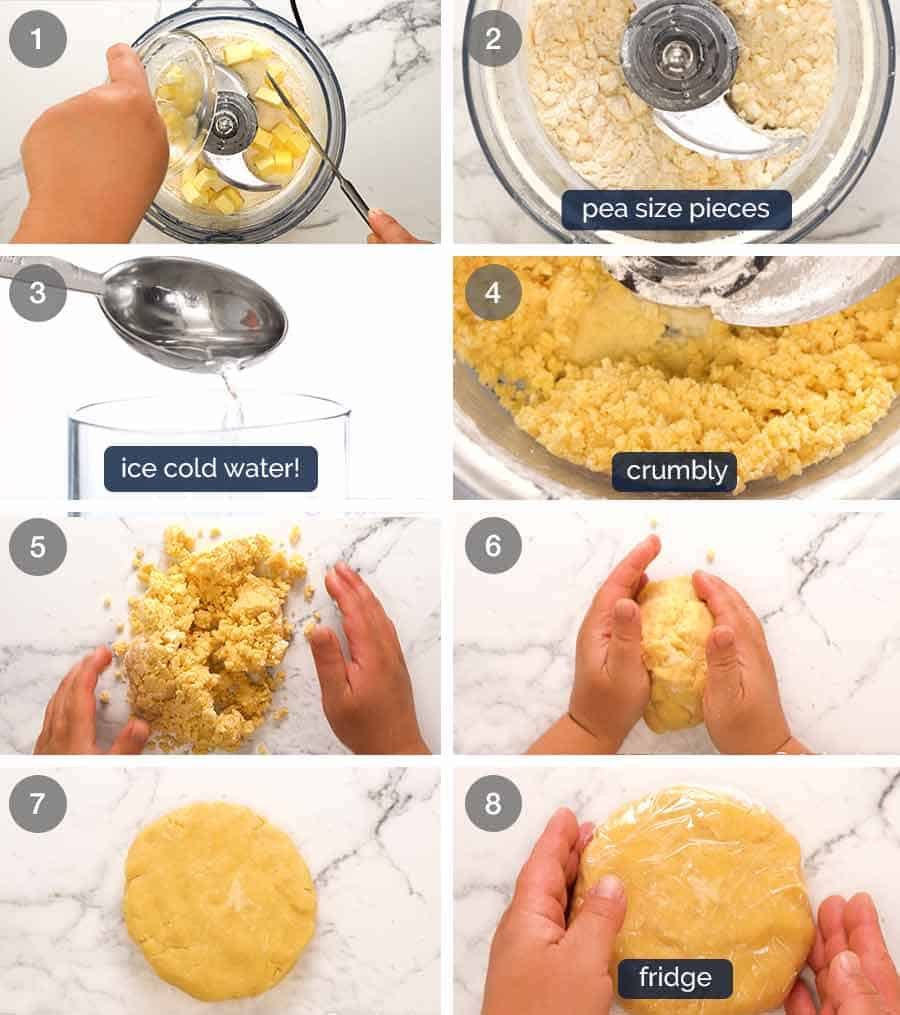
Pulse flour, sugar and salt twice just to combine, then scatter butter over;
Chickpea size butter – Pulse 5 times until the largest butter bits are chickpea size;
Ice cold water – With the motor running on low, drizzle 2.5 tbsp of water in.
Crumbly dough – after 10 seconds, it should look crumbly but when you pinch it together, it should stick and form a dough. Crumble = good = leads to flaky pastry. If it stays sandy, add another 1/2 tbsp cold water and blitz again;
Tip out crumbly dough on work surface;
Bring together with your hands – no kneading. Crumbly dough will stick together!
Pat into disc shape;
Refrigerate – Wrap with cling wrap and refrigerate. This makes the teeny tiny butter bits cold again = flaky pastry.
OK, so maybe that takes you 90 seconds. Or 2 minutes. It’s still super duper fast!
Part 2: Rolling it out
You’ll find this dough is pretty easy to work with because it’s not insanely short, like pastries used by high end patisserie chefs. (Rule of thumb: higher butter to flour ratio = more crumbly rich pastry = indulgent = pastry very hard to work with = let’s leave that to the professionals).
So here’s how to roll pie crust dough out:
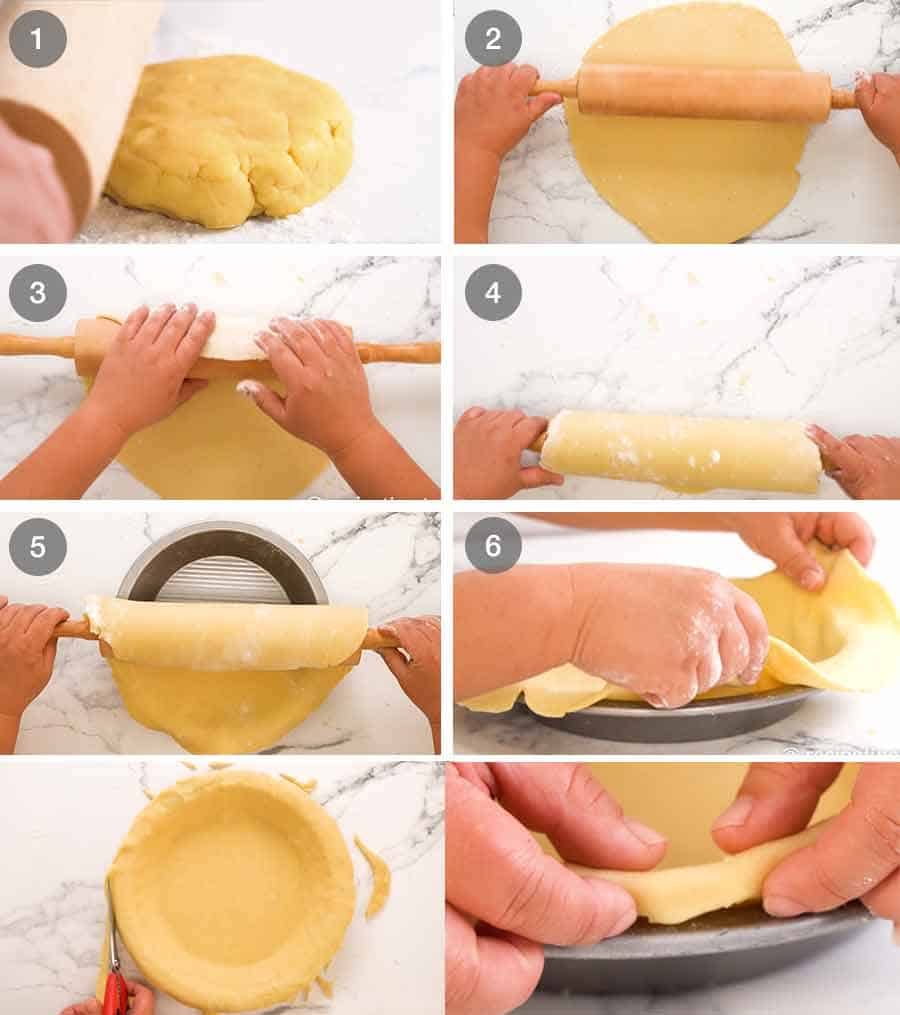
Start rolling out – Place chilled disc on floured work surface and roll out into a circle. Shift dough around / flip as you roll it out to ensure it’s not sticking to work surface – if it is, slide to the side, sprinkle more flour on the work surface then continue. Sprinkle the top of the pastry and the rolling pin if needed (sometimes it does, sometimes it doesn’t);
Roll out BIG – Roll out into a circle 10cm / 4″ larger than the pie dish. Sounds large – but you need to fit it into the pie dish and want at least 1.25cm / 1/2″ excess around the rim. Patch cracks as you go – just pinch a bit off scraggly edges;
Roll onto rolling pin – Gently roll the dough onto the rolling pin. Use a large knife if needed to get the edge started;
Transfer to pie tin – Roll the pastry completely onto the rolling pin, then transfer to the pie tin;
Unroll over pie tin then slide the pastry around as needed so it’s centred;
Drape into pie tin, don’t stretch and pull – this causes shrinkage;
Trim edges – This step depends on the pie you are making. If you are making a pie with no lid, like a Pumpkin Pie or Pecan Pie, trim the edges leaving 1.25cm / 1/2″ excess. If making a pie with a lid, like an Aussie Meat Pie, then trim the edges to align with the edge of the pie tin (ie no excess).
For no lid pies, tuck overhang under for neat edges. You do not need to do this if making a pie with a lid like an Aussie Meat Pie (which has a puff pastry lid).
Crimping! (Optional)
There’s loads of ways to decorate a pie crust edge. You really can get creative! Here’s one classic way to do it – large crimps.
If you do decorate the pie crust edge, it’s best to refrigerate for 20 minutes prior to baking just to re-chill the butter in the dough (because crimping takes extra time during which that butter is softening!).
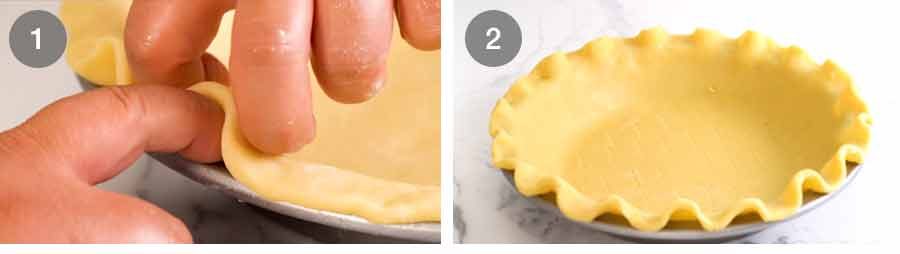
PRO TIP: Thicker pie crust on edge = crimps maintain shape better when baked. Thin pastry = floppage.
EASY TIP: Skip the crimp, just press a fork on the rim to get nice imprints all the way around.
To bake or not to (blind) bake
Once the pie tin is lined with the dough, you need to decide whether you want / need to bake or not. Here are your choices:
Blind bake – Park bake the unfilled pie crust to prevent a soggy base once filled.
Fully bake – If the pie crust will be filled with a no bake filling such as Chocolate Cream Pie.
No bake – When you fill the uncooked pie crust then bake.
Blind baking
Blind baking refers to when you par bake the empty pie crust so it doesn’t go soggy filled with a wet filling. It’s an extra step that I like to do just for extra crispiness in the base (you’ll see in the recipe video).
Do you have to blind bake? No, it’s optional. This pie crust won’t go soggy even if you don’t blind bake as long as the total bake time is 40 minutes or more (which depends on the filling you use). I personally don’t know of any pies that require less than 40 minutes bake time – but I’ve added that as a cautionary note having observed this once during a period of intense pie making (don’t ask😂).
Fully baked pie crust
If you are making a pie that has either a no-bake filling (like a Chocolate Cream Pie) or a filling that only needs to be baked for 30 minutes or less, then the pie crust needs to be fully baked. This is because one the pie is filled, the base doesn’t cook through properly if it is in the oven for less than 30 minutes.
How to Blind Bake pie crust (par bake)
Follow these par baking steps if you are making a pie that needs to be baked for 40 minutes or longer once filled. If the pie you are making will not be baked once filled, or baked for 30 minutes or less, then the pie crust should be fully baked – see next section.
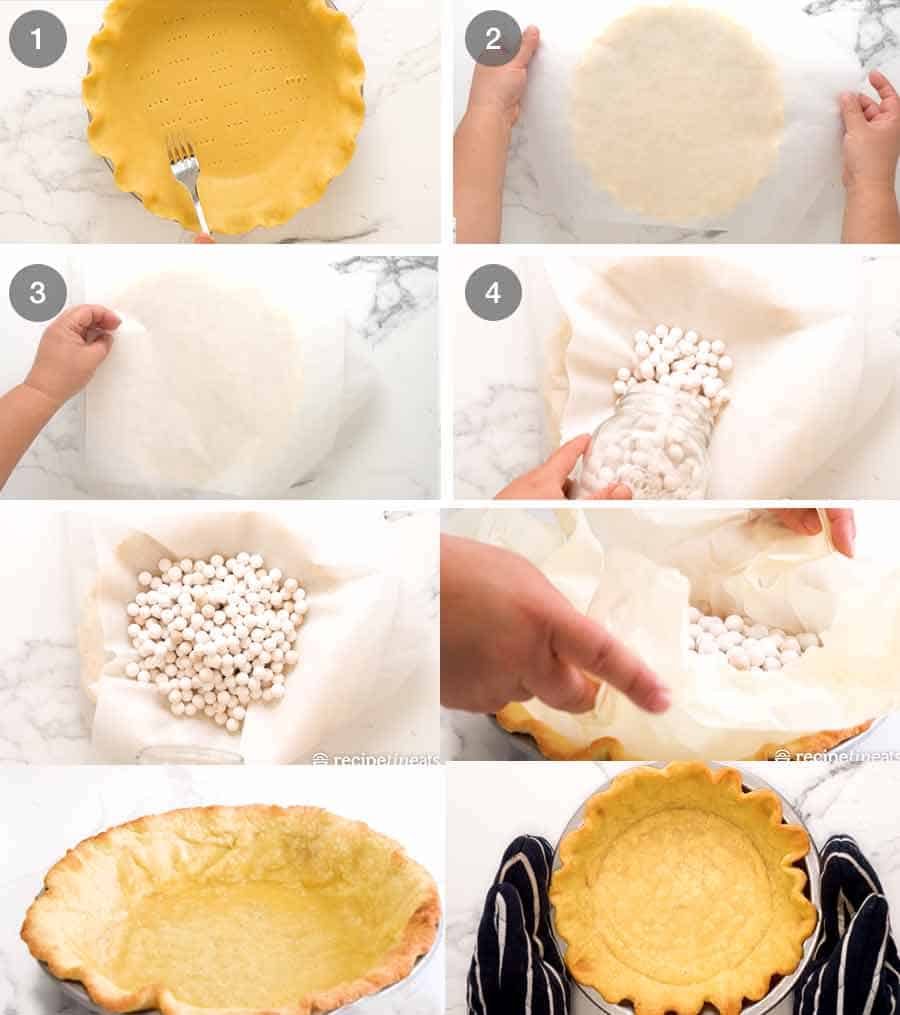
Prick the base with a fork to help stop it from bubbling up;
Place large sheet of parchment / baking paper over the pie tin;
Place another piece over it to form 90 degrees across the other one;
Fill pie tin with baking beads, dry rice or beans or sugar – this weighs the pastry down to stop the base from bubbling up and the sides from sliding down;
Bake for 15 minutes at 200°C/390°F (180°C fan).;
Remove pie weights using paper overhang. Be careful here – nobody wants hot beads bouncing all over the kitchen!!
Return to oven for just 5 minutes to “set” the base;
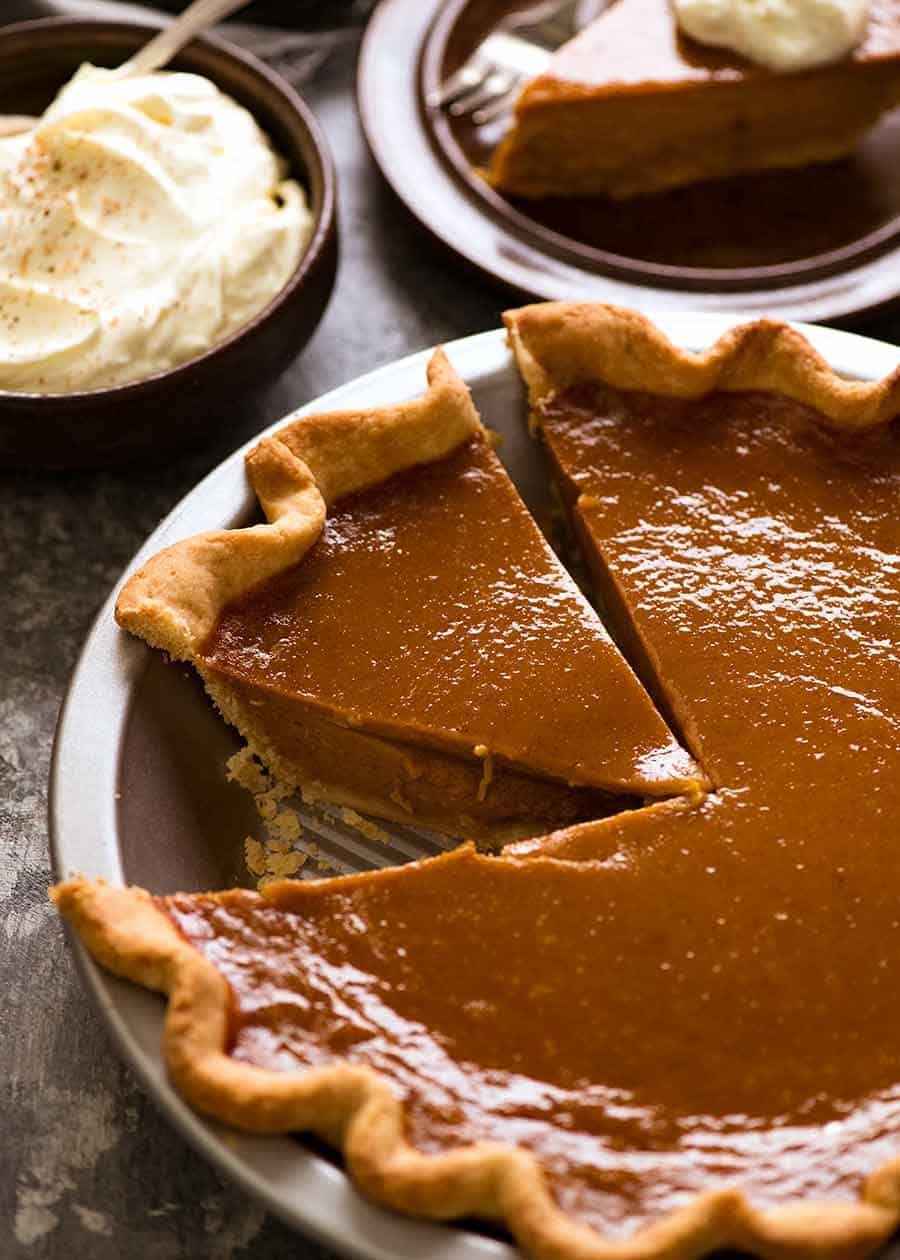
Remove from oven and voila! Ready for your favourite filling! This particular crust was filled with Pecan Pie Filling.
Fully baked pie crust
If you are making a pie with a filling that does not need to be baked, or a pie that only needs to be baked for 30 minutes or less once filled, then the pie crust should be fully baked.
To fully bake the pie crust, simple follow the Fully baked pie crust directions in the recipe card below.

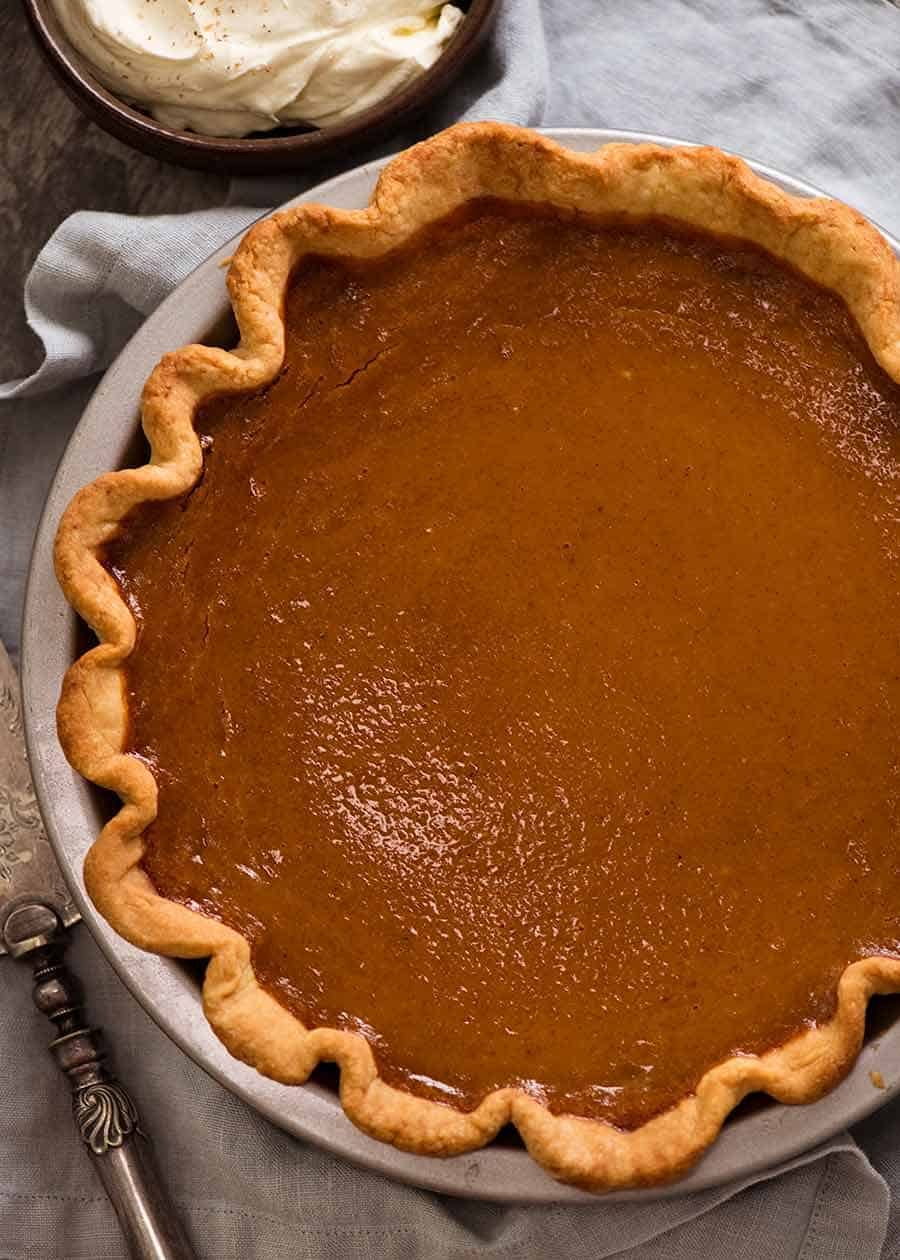
I should’ve gotten closer to the Pecan Pie so you can really see how flaky and delicate that pie crust is! You’ll get a good look in the Pumpkin Pie and Pecan Pie recipe videos though.

And here’s a close up look at this shortcrust pastry used for the base of the great Aussie Meat Pie. The lid of Meat Pies is puff pastry.
I hope you found this to be a concise but complete post on how to make pie crust. It’s hard to get motivated to document let alone film a pie crust when there’s so many other visually exciting foods to film!! But finally I’ve buckled down and done it.
Now from hereon, I can focus on the fun part – the FILLINGS!! – Nagi x
Watch how to make it
Hungry for more? Subscribe to my newsletter and follow along on Facebook, Pinterest and Instagram for all of the latest updates.
Pie Crust (Shortcrust Pastry)
Ingredients
- 1 1/4 cups flour (plain / all purpose flour)
- 2 tsp white sugar (skip if making savoury pie)
- 1/2 tsp salt
- 115g / 8 tbsp unsalted butter , cold, cut into 1cm/ 1/3" cubes (Note 1)
- 2 1/2 tbsp ice cold water (+ more as required)
Instructions
Make Dough:
- Pulse Dry: Place flour, sugar and salt in food processor. Pulse twice to combine.
- Cut in butter: Scatter butter across surface. Pulse 5 times until the largest pieces are the size of chickpeas.
- Add chilled water: With the motor running on low, pour 2.5 tbsp of water into the tube feeder.
- Form crumbs: Keep blitzing for 10 seconds until crumbs form (also see video). Pinch between fingers – they should stick and form a dough.
- HAND option: Whisk flour, sugar and salt in large bowl. Rub butter into flour with tips of fingers until it resembles crumbs – it should look the same as using a food processor. Then mix in cold water with rubber spatula, then proceed with steps below.
- Form disc: Tip crumbs out onto work surface, bring together into dome (don't knead), pat into 2cm/ 4/5" thick disc.
- Chill: Wrap in clingwrap then refrigerate 1 hour (up to 2 days, otherwise freeze).
Rolling out:
- Dust with flour: Sprinkle work surface with flour, unwrap dough and place on the flour. Sprinkle top with flour, dust rolling pin with flour.
- Roll out: Roll out into round that's 10cm/4" larger than 22.5cm/9" pie tin. Patch up and roll over cracks as necessary
- Transfer to pie dish: Gently roll the pastry so it wraps around the rolling pin. Unroll it over the pie dish.
- Drape pastry into pie tin (do not stretch/pull, causes shrinkage).
- Trim: If making a pie with NO LID (like Pumpkin Pie), then trim edges with scissors leaving a 1 cm / 2/5" overhang. If making a pie with a lid (like a Meat Pie) then trim edges so they align with the edge of the pie tin (ie no excess overhang).
- Tuck excess under, if appliable (ie per step above, if making a no lid pie). Then crimp or decorate edge as desired.
- Refrigerate: Put pie crust in the freezer for 15 – 30 minutes (while oven heats up). This helps prevent shrinkage, firms up the butter again (flakiness!) and helps to ensure decorative crimped edges remain in tact.
- Baking options (Note 4) – Blind bake the pie crust if it will be baked once filled (eg Meat Pie, Pumpkin Pie). Fully bake the pie crust if it will not be baked once filled.
Blind bake (par-bake, Note 4):
- Preheat oven to 200°C/390°F (180°C fan).
- Line & weigh down: Place 2 large pieces of parchment/baking paper crosswise over the pastry, then fill with baking beads or lots of rice or dried beans to weigh it down. (Note 2)
- Bake 1 covered: Bake for 15 minutes, then remove from oven.
- Bake 2 uncovered: Use excess paper to CAREFULLY remove hot beads, then return to oven for 5 minutes or until base is light golden (doesn't need to be 100% cooked though).
- Cool: Remove from oven. Cool 15 minutes in the pie tin before filling (another measure to avoid soggy base).
Fully baked option (Note 4):
- Follow directions per Blind Baking steps above BUT bake at 190°C/375°F (170°C fan) covered with baking beads for 25 minutes, then 15 minutes uncovered until golden. Fully cool before filling.
Fill:
- Fill and bake per directions of chosen pie filling – such as Pumpkin Pie, Pecan Pie, Meat Pie. The par baked pastry will not be 100% cooked, it finishes cooking with the filling. It's cooked enough so the crust will not go soggy.
Recipe Notes:
Nutrition Information:
Life of Dozer
Post-Pie snooze. Isn’t this what we all do??

Hi Nagi,
Thank you for your delicious recipes!!
I made your meat pie for dinner last night and we all loved it. I used your shortcrust pastry recipe which tasted great. However, the pastry stuff to the pie dish in places. I greased the dish with butter. Any hints to avoid this happening again?
I made double quantity of the filling and about to make another pie to give to my adult son…
Thank you! xx
Probably a stupid question, but can i use self rating flour over plain, or will that not work out ?
Hi Sonys1, there’s never a stupid question! You really need plain here – you want this to be shortcrust and not have the raising agent (otherwise it will puff up and crumble in the oven) N x
Oops, I ment to say, “small amount of vinegar,” in the previous text.
Hi Nagi. Can you lessen the suger in the sweet short crust by using Splenda, or is sugar the only option? My husband is diabetic so I have to be c areful when it comes to sugar. Also, I was wondering if you can use a small amount in the crust to prevent it from being tough? I believe Dozer is simply well trained and knows exactly what that tipped over stool means. Give the sweetheart credit for the super smart brain he has.? If you look, at the photo, closely you can see there is plenty of room for him to just walk around it. My final thought is… Dozer is well trained and loves his Mom enough to respect her and to mind her most of the time.
Hi Redonia, you can use a sugar substitute here, although you won’t need to add vinegar the pastry is perfect as is and not tough at all. N x
Thank you so much. I made your lemon Tart and this crust and it was mouth watering wonderful ( both crust and lemon curd! Only one problem with this recipe. My husband is already asking for another one! Thank you for so many recipes. If your brain seems to have gone on walk-a-bout… why not make it simple on yourself. Set your chapters in A B C order ie, Beef, Bird, and Pork. and just make every other recipe as One New then One Old….. I know I do not have every recipe that you have put up in my collection. If you make it too hard and too time consuming, you may not ever want to put out another, and that dear Nagi would be a shame!
I gave up on making pie crush year ago because it is so much work and it did not turn out good every time. But this recipe gives me hope. My family loves chicken pot pie but the store bought dough is terrible.
Do I need to bake the dough first before I add the chicken filling? Would it be still 40-60mins bake time for chicken pot pie?
Hi, would like to know how long do i need to bake it for, if i wanna make a no bake pie???
Hi Ben, not sure I understand? You want a no bake pie – but the base is baked? N x
Hello!! Sorry what I meant was I wanna put cold filling in it thus I want the crust to be fully cooked before I put the filling? How long do I need to bake the pie crust for if I want it to be fully cooked??
My Chocolate Pie is cooked in a heavy sauce pan, cooled, and then it is put in a pre-baked pie crust. All you need to do is Blind bake the crust till it is the perfect color you. want before making the filling. I believe that is what you are asking.
Hi Nagi, can this be made gluten-free?
Not this one as written KM, it changes the texture unfortunately. N x
Thank you for your reply Nagi! That’s a shame though
I’d like to make this but I only have 25cm tin. Can you please let me know how I can adjust the ingredients?
Hi Nat, I would just scale the recipe up slightly just to be sure you have enough – slide the servings up to 10 and work off those amounts. N x
Thanks so much I’ll try! I love your recipes and have made several and my family is very happy ❤️ Thanks!
Thank you also my mixture went to a dough not crumbly perhaps buttet too soft
I just had a hopeless disaster trying to convert an american recipe for pie crust as part of a pie recipe to our available ingredients (shortening) and it went straight in the bin. So I immediately went to your blog to find a crust recipe instead, and this worked perfectly!! Thank you so much for your amazing recipes, I have made so many of yours now and they always get rave reviews 🙂
I love hearing this!!! Thanks so much Kj! N x
Hi Nagi,
I’ve used this for a quiche base and it came out perfectly. I was wondering if I could use the sweet version as the base for a chocolate tart?
Nagi what’s the difference between this crust and another of your posts stating to bake 20” at 390F, then 10” at 350 (after removing wts)? When would you use one over the other? Tks!
Hi Nagi can I just omit sugar to make this savoury?
Hi Libby, yes as per the ingredients – skip if making savoury pie. N x
Hi there!
I just LOVE your recipes- chicken Biryani is the BEST! Wow!
Anyways ..first time making this recipe I tried a famous chefs recipe last week for pumpkin pie- it was a disaster.
The dough was fine but the filling was … not good. Keep posting your recipes they truly are keepers!
… and maybe….Hopefully you will make French fries??????? 😉
Hi Diana, fries are on my list! N x
Hi Nagi! I Want to make this for thanksgiving dessert! Could I make this crust ahead of time? If so, how much in advance and fridge or freezer?
PS. Huge fan of all your recipes!
Hi Linda, I would make the pie crust in advance and bake fresh on the day – or you could bake a day in advance and store in an airtight container at room temperature.
Hi! I followed the recipe exactly, it went together quicker than you show and describe. Chilled it over night and now it won’t roll out, it’s so cold, I can’t budge it one bit. Thanksgiving day Here in Canada -help!
Hi Suzanne, soundalike your fridge is SUPER cold – just leave out on the bench to come more to room temperature – N x
Amazing recipe! Family said it was the best pie crust ever. Even ate the crust bit.
It’s great, so easy. Have always failed with pastry dough so this is the farthest I’ve come so far. But the dough still cracks a bit and sticks when I roll it. Could it be because of the weather in Malaysia? Or could it be because I froze it, then kept in fridge the night before I wanted to use it? I left it out around 10 mins before rolling
Hi Mashy, cracks because it’s dry or just because it’s too soft? N x
It’s too soft
I have made your tiramisu and it’s. Hit with all family and friends . Thank u .
For the pie crust can we use hand mixer grinder if we dont have a processor.
Hi Divya – I’m not sure what a hand mixer grinder is – but you can definitely do it by hand 🙂 N x
Nagi what’s the difference between this crust and another of your posts stating to bake 20” at 390F, then 10” at 350 (after removing wts)? When would you use one over the other? Tks!
Hi Nagi.
I just wanted to ask a question before I make the pie crust.
Would I be able to make it tonight and bake it etc and then leave it in the fridge until tomorrow when I plan to make an apple pie.
Thank you.
You sure can Julie!
Love this crust and how easy it is to make. No more store bought crusts for me now!!!
WOOT! You wont look back now!