
Panna Cotta is that wonderful Italian milk custard, quivering and wobbly with the promise of melting into a flood of creamy goodness in your mouth. Simple yet elegant, perfect for dinner parties – make it up to a week ahead with just 10 minutes active effort!
Panna Cotta
How did it take me 11 years to share a Panna Cotta recipe? It surely must be the world’s easiest, lowest effort “fancy” dessert. With 5 simple ingredients (milk, cream, sugar, vanilla, gelatine) and barely any cooking, it can be made ahead and left in the fridge, ready to pull out on demand.
I love that it’s not too rich or sweet, so I still get my dessert ending without feeling weighed down.
Restaurants love it because it keeps 100% perfectly in the fridge for a week, and chefs can get creative with flavours, toppings and garnishes to make it look stunning.
And TV cooking show producers love it because contestants flip it out of moulds to suspenseful music (will it slide out??😱) while viewers clutch their seats for the big wobble reveal.
Truth is, Panna Cotta is dead simple. A light oiling of the moulds ensures they slip out. And using the right amount of gelatine ensures quiver. All that TV drama is just smoke and mirrors!
PS Proof of excellent quiver – I captured the jiggle on camera. Wait until you see the video!
Ingredients in Panna Cotta
All you need is cream, milk, sugar, gelatine powder and vanilla to make Panna Cotta.

Gelatine – I prefer powder over leaves for the ability to use a precise amount to get the exact quiver-wobble texture I want. I also find that the setting strength of gelatine leaves can vary from brand-to-brand and country-to-country. Gelatine powder is a sure thing (as long as you use regular ones from grocery stores, not gelatines marketed in the health food section for things like “gut well being”).
Milk and cream – A combination provides the ideal mouthfeel – creamy richness from the cream but it’s lightened with milk so it’s not too heavy. I use heavy/thickened cream but you can use what you want, as long as it’s pourable (not the thick dollop type).
Full fat for both, please. Low fat will set fine, but the mouthfeel won’t be the same, it will be kind of watery.
Caster sugar (superfine sugar) – Just 1/4 cup across 6 servings, which is plenty sweet for me. I’ve seen recipes calling for double the sugar – far too sweet for me! Caster sugar has finer grains so it dissolves easily, but if you only have regular sugar, that’s fine too. It will just take a little longer to melt, so stir well and don’t let the milk boil.
Salt – Just a pinch brings out the vanilla flavour.
Vanilla choices
Choose your vanilla! My default is vanilla bean paste (easy to use + I get the little vanilla seed specks and excellent vanilla flavour) though if I’m going for gold, I’ll use a vanilla bean and steep the milk.
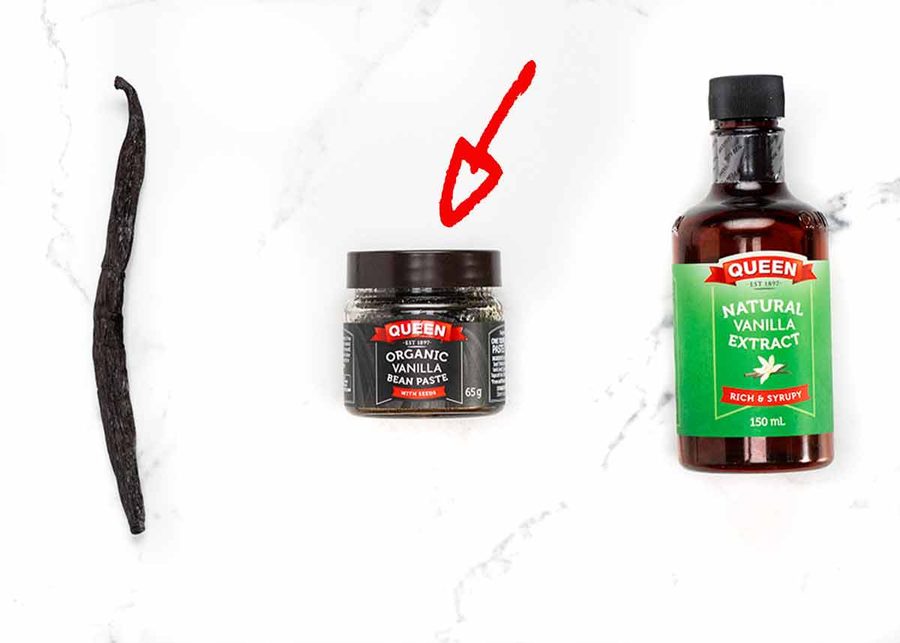
Vanilla bean paste – This is my default option. It’s a thick syrup with specks of real vanilla seeds and has a stronger and cleaner vanilla flavour than extract. Plus you get the “gourmet” look with the seeds. Use it in anything you want the seeds to be seen.
Vanilla extract – Made from vanilla beans so you get real vanilla flavour though it’s not as good as vanilla bean paste or using real vanilla beans. This is my default for general baking, and if it’s all I had, I would not hesitate to make Panna Cotta with it.
Vanilla bean (whole pod) – The purest and best source of vanilla flavour! Slice it open, scrape out those precious vanilla seeds and infuse the milk with the used pod. These days you can find vanilla bean in the baking aisle of regular grocery stores. 1 bean typically costs a little more than a small bottle of vanilla extract.
It delivers the best vanilla flavour but does take a little more effort than the other options. The seeds are more susceptible to sinking than those in vanilla bean paste (the thick syrup helps suspend them), so the Panna Cotta mixture needs to be cooled further to keep them evenly dispersed as it sets. Plus, the milk and cream need extra time to infuse with the used pod for maximum flavour. Don’t worry, I’ve provided directions in the recipe in case you choose this option!
Imitation vanilla essence – this is artificial vanilla flavour, and is considerably cheaper than the other vanilla options. I personally don’t use it as I find the flavour too artificial.
How to make Panna Cotta
Panna Cotta is easy (bloom gelatine, mix with cream and milk, pour, set).
But don’t miss these steps: lightly grease the moulds (so it slips out easily) and chill the mixture before pouring into moulds (suspend vanilla seeds and avoid risk of cream and milk separating as it sets). I know these are not typical Panna Cotta steps. But I promise it makes it more failsafe. 😊
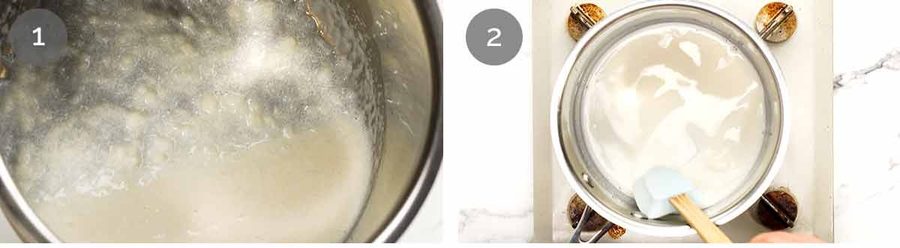
Bloom gelatine – Sprinkle gelatine powder over 1/2 cup cold milk in a small saucepan, stir, and let stand for 5 minutes to swell and become lumpy. This step is called “blooming” and ensures the gelatine melts smoothly in the next step.
💡 I use milk (not water) to avoid diluting flavour, and do it straight in the saucepan to save washing up.
Melt gelatine – Put the saucepan over medium low heat and warm the mixture so the gelatine melts and the mixture turns into liquid, lump-free milk again. ⚠️ Do not let the milk boil, this can kill the gelatine setting power. Gelatine melts at a low ~35°C/95°F so it only needs to be lightly warmed.
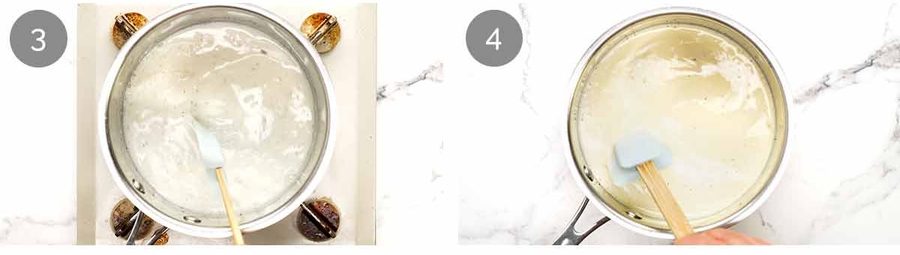
Dissolve sugar – Add the sugar, vanilla of your choice*, a pinch of salt and the milk. Mix just until the milk warms up enough for the sugar to dissolve (rub between your fingers to check) then remove from the stove. Don’t warm the milk up too much else it will form a skin when it cools (next step) which you’ll have to strain out when pouring into the moulds. ⚠️And remember, do not let the milk boil!
Bloom vanilla flavour + add cream – Remove the saucepan from the stove. Let it sit 10 minutes (to draw out the vanilla flavour) then stir in the cold cream. This will bring down the temperature and help speed up the next steps.
* Don’t forget the extra steps if using vanilla bean – add the used pod and steep for 30 minutes instead of 10 minutes. It’s in the recipe card.
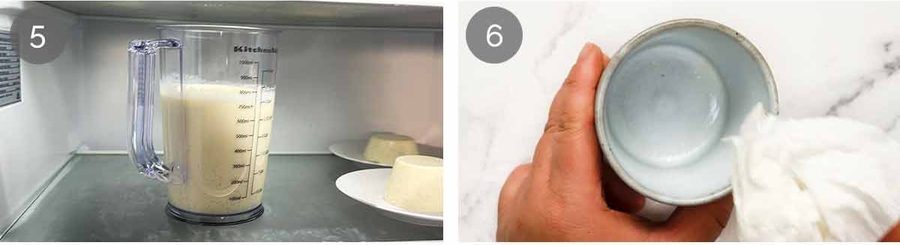
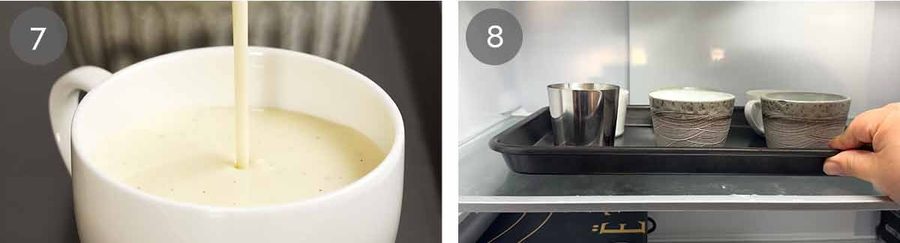
Fridge before pouring – Pour the mixture in a jug or bowl (preferably a clear one, so you can check for sinking vanilla seeds). Then refrigerate for 1 hour, stirring well at the 30 minute and 45 minute mark, scraping the sides (to ensure it doesn’t start setting), until the mixture has a consistency like thickened cream (heavy cream) so it’s thick enough to keep the vanilla seeds suspended rather than settling on the base – see photo below for before and after. Check: Stir, set aside for 15 seconds, check the base of the jug to see if they settle. If not, we’re good to pour!
WHY I REFRIGERATE -This step makes the mixture thicken enough for the seeds to remain suspended as the Panna Cotta sets in the moulds. If you skip chilling, all the seeds will settle on the base of the mould, and it kind of looks like…well, black mould!😆 But even if you are using vanilla extract (no seeds), this step is still good to do as it avoids the “sometimes” risk of the cream and milk separating as the Panna Cotta sets.

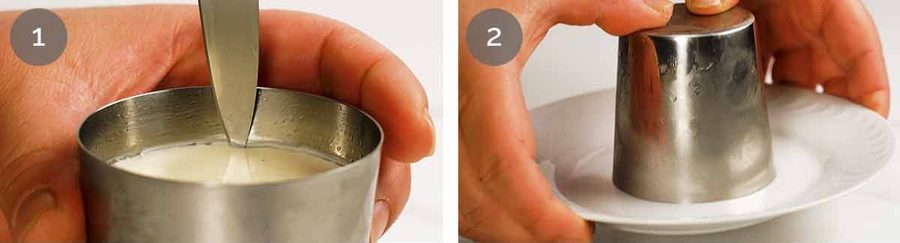
Lightly grease moulds – Give the moulds a quick spritz of a neutral flavoured oil then lightly wipe with a paper towel. This will let your Panna Cotta slip out without dipping in warm water (which secretly, I am terrified of, having melted the surface of more than my fair share of Panna Cottas. 🫣 Two seconds too long, and you’re crying).
PS You don’t need to oil if you aren’t un-moulding.
pANNA COTTA MOULD SIZE AND SHAPE
I have opinions. I know, you’re shocked!
Size – I use 6 moulds that are a smidge larger than 1/2 cup (about 2/3 cup) which I think is a good serving size, though you could absolutely go smaller or larger.
What I use – I feel like Panna Cottas look more impressive taller rather than a flat disc shape which is what you get if you use ramekins (the typical choice). For this reason, I use whatever I can find that is taller than wider. Variously pictured in post are a small coffee cup, Asian tea cups, a sauce dipping bowl and a pudding mould! But feel free to use whatever you want and have.
Headroom – If you are un-moulding, make sure there’s not too much headroom between the rim and surface of the Panna Cotta. You want a short falling distance when inverting. 😊
Pour – Give the Panna Cotta mixture a good stir to agitate all the vanilla seeds. Then gently pour into the moulds. If you spy any tiny lumps, strain first then pour. (If you heated the milk up too much then it might’ve formed a skin as it cooled in step 4, so you’d have to strain this out).
Set for 6 hours in the fridge, though I feel safer doing overnight. You can leave it for up to 7 days. If you’re serving in glasses rather than un-moulding, 4 hours is long enough.
Un-moulding
If you’re serving in glasses, you can bypass all this and go straight to the eating part!
Run knife around edge – Remove from the fridge. Run the tip of a small knife around the edge of the Panna Cotta.
Invert with confidence! Invert onto a plate. Then grip the plate and mould with two hands and give it an assertive shake (it might take a few goes!). You will know when it releases – you’ll hear a faint suction noise and a satisfying soft “plonk!”
Trouble-shooting – If needed, dip in a bowl of warm water for 3 seconds, wipe, then invert. For thin-walled metal moulds, just dip in then straight out (the risk of melting is higher).
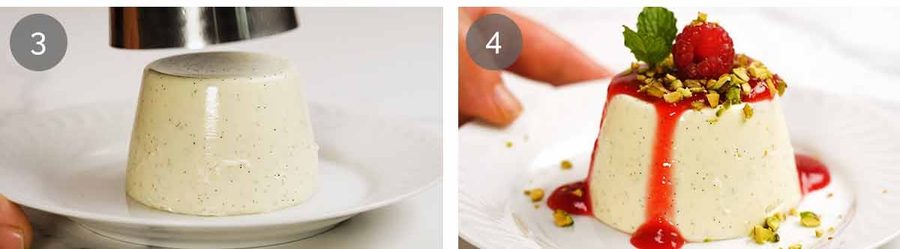
Remove mould – Carefully slide the mould off to reveal your perfect, quivering Panna Cotta.
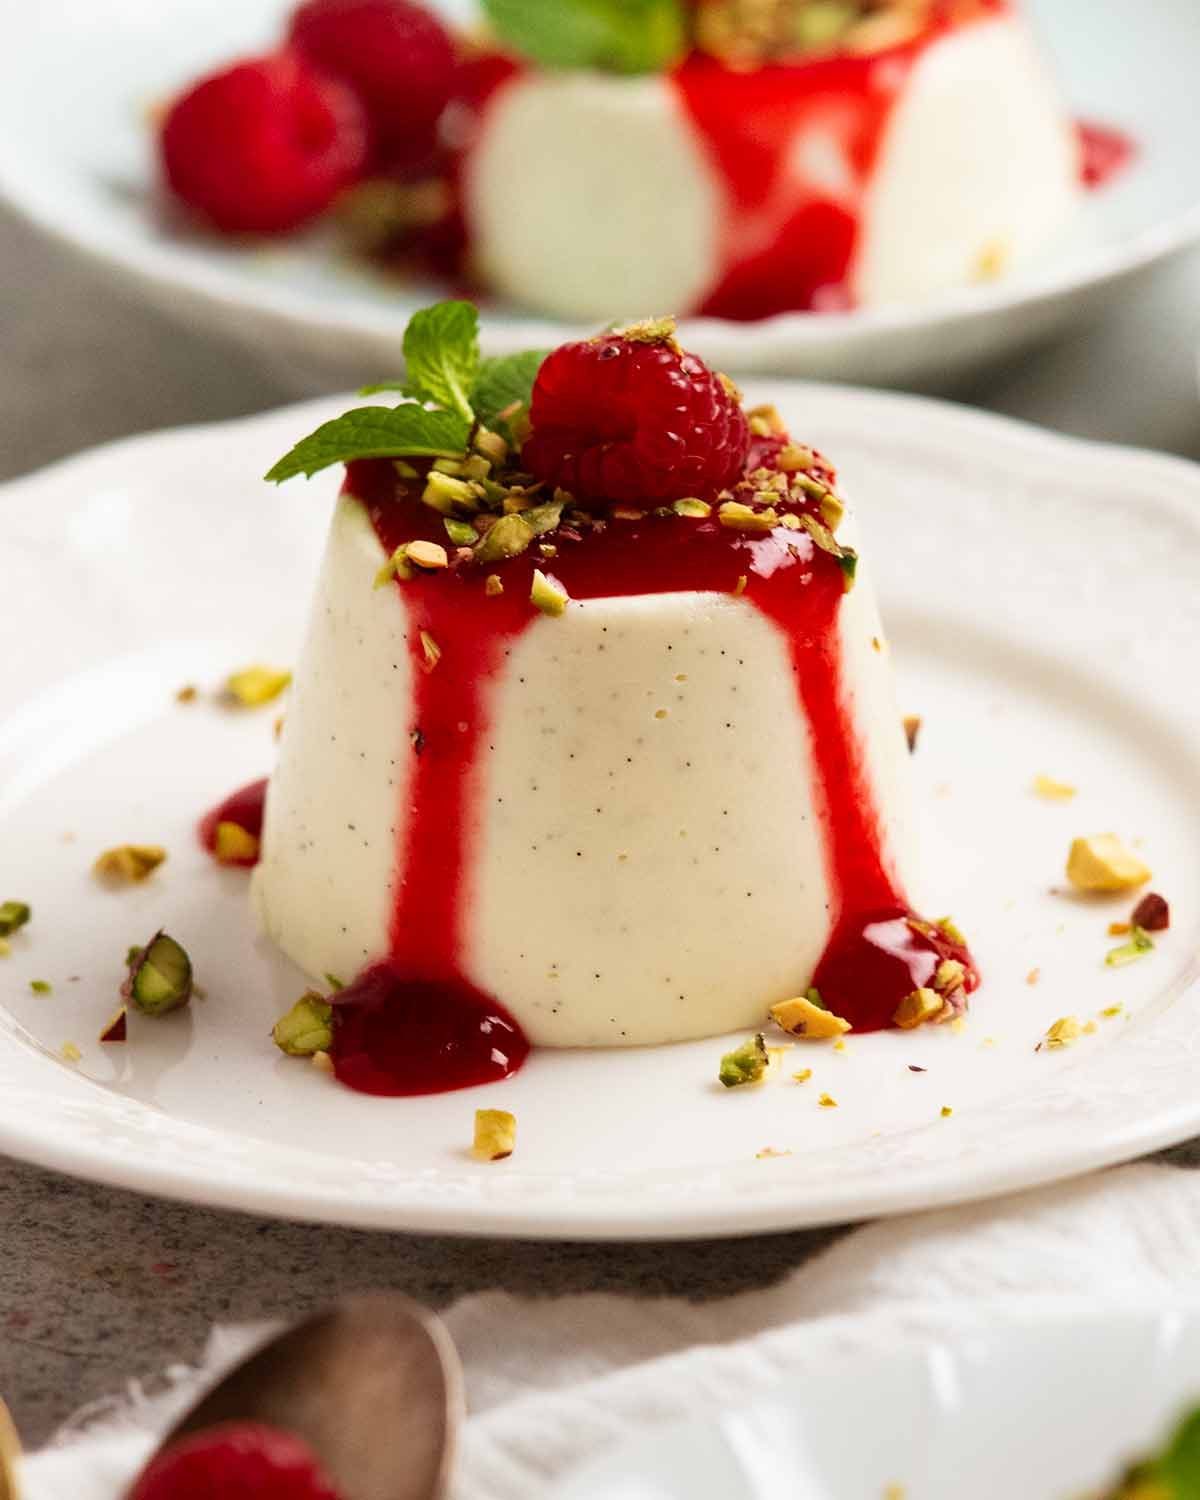
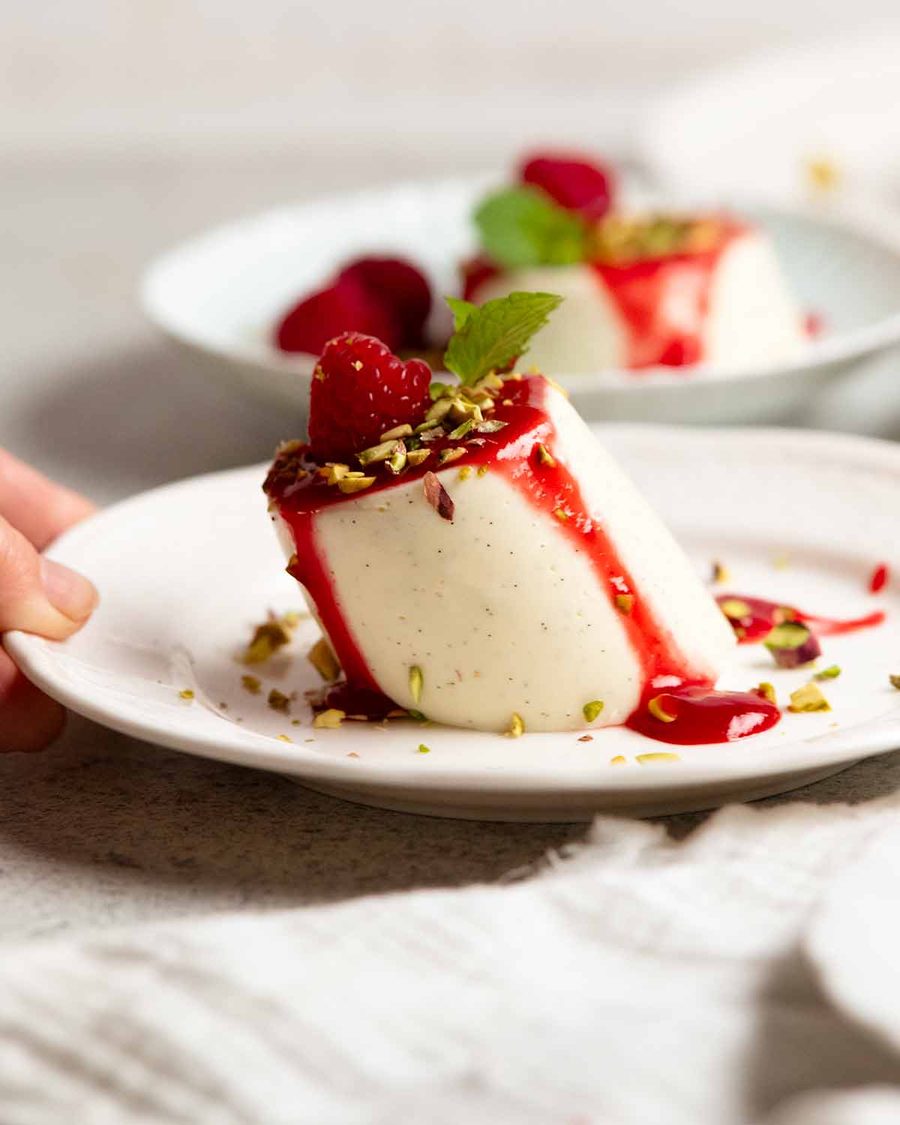
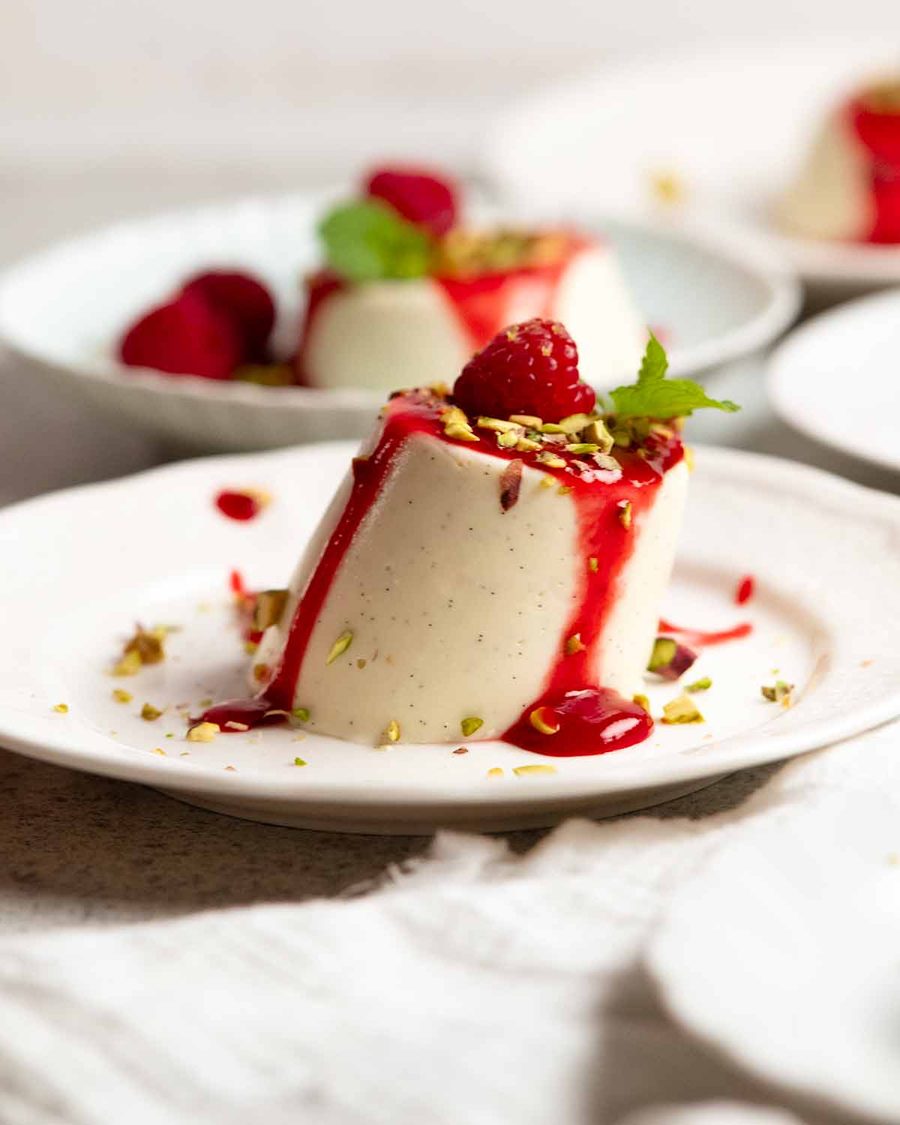
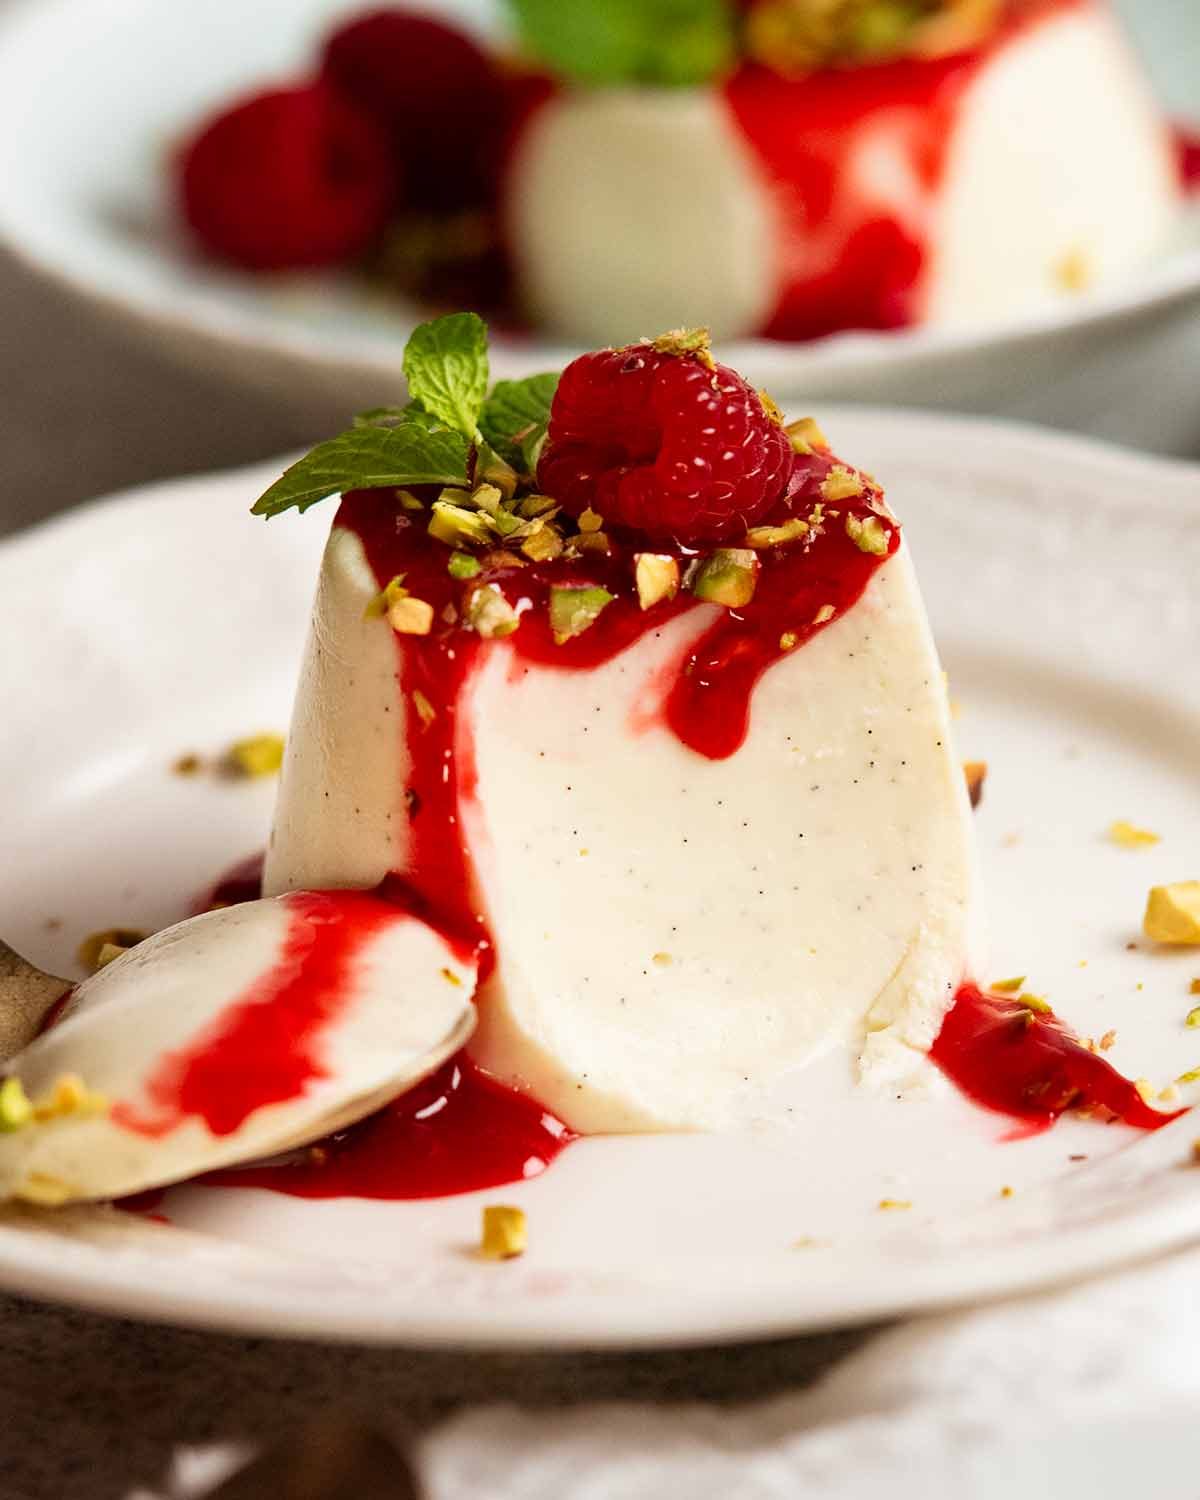
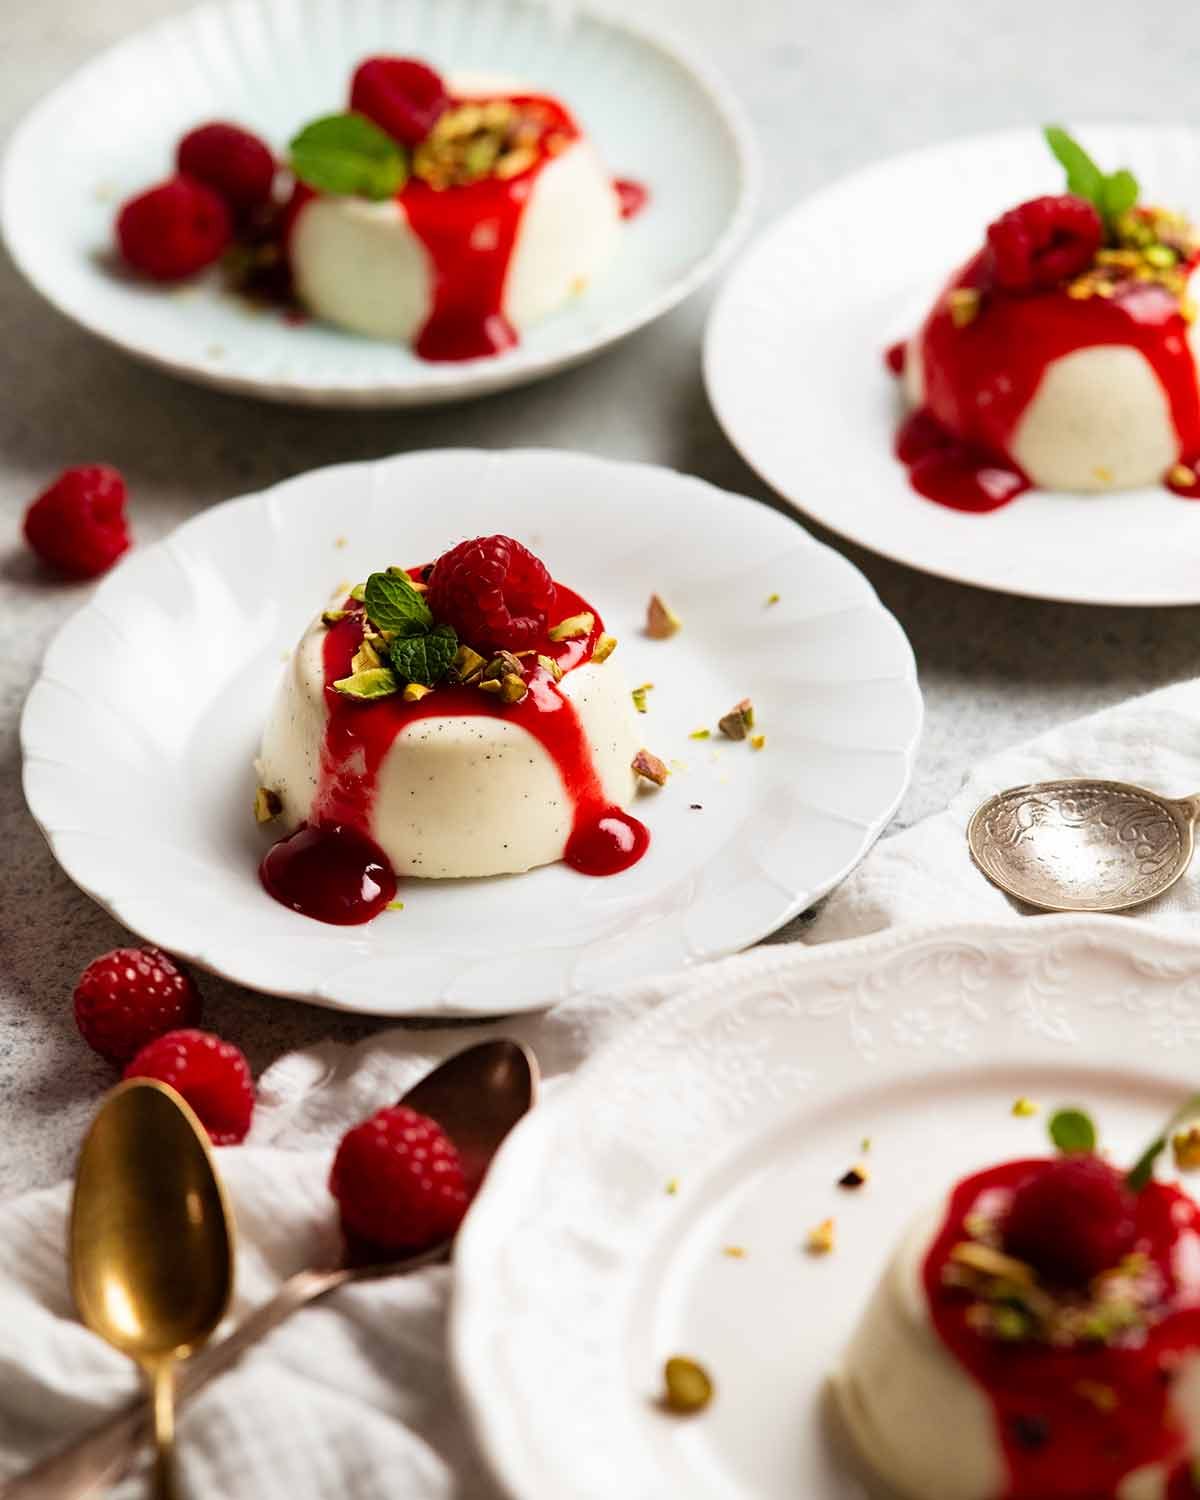
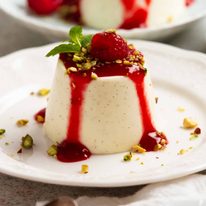
Decorate – Then decorate and serve! It’s shown here with raspberry coulis, pistachios, a fresh raspberry and mint leaf. See below for more decorating ideas. Though having said that, Panna Cotta is so silky and creamy that it’s delicious served completely plain.
Serving and decorating Panna Cotta
As mentioned above, Panna Cotta is so beautiful and elegant as it is, you really can enjoy it plain without any toppings at all.
However, toppings are a nice touch for colour, texture and extra flavour. They can be as simple as placing a few berries on top or a shaving of chocolate, or as extravagant as a full dessert-plate production with sauces, crumbs, and fancy garnishes worthy of a restaurant menu (I do not do this!).
Here are some ideas:
Raspberry coulis with pistachios and raspberries – As pictured in post.
Berries – Sliced strawberries, blueberries, raspberries (a combination is nice), and a small mint sprig for fresh green colour
Fresh fruit – slices of juicy soft fruit (mangoes, oranges, blood oranges (segmented), pineapple) or diced. Passionfruit pulp.
Poached or roasted fruit
Chocolate shavings or curls piled on the surface
Sauce – chocolate, caramel sauce, fruit sauces (raspberry, strawberry)
Fruit compotes
Pile of cotton candy (spun sugar) – for dramatic effect!
Edible flowers and dried rose petals – pretty!
Crushed praline or brittle (sticking a shard in would also look great)
Nuts! Anything your heart desired.
Caramel popcorn – Imagine a pile on top! Yes!
That’s just a few ideas off the top of my head, I could come up with a few more if I put my mind to it! One day I’d love to do an “easy-fancy desserts” post, showing simple ways to dress up sweets and make them look restaurant-worthy with low effort and cost. Panna Cotta is one of the easiest to posh up! 🙂 – Nagi x
Watch how to make it
Hungry for more? Subscribe to my newsletter and follow along on Facebook, Pinterest and Instagram for all of the latest updates.
Panna Cotta
Ingredients
Bloom gelatine:
- 2 1/2 tsp gelatine powder , unflavoured – can reduce to 2 1/4 tsp if not un-moulding (Note 1)
- 1/2 cup milk , full fat
Panna Cotta:
- 1 cup milk , full fat
- 1 1/2 tsp vanilla bean paste with seeds (substitute vanilla extract) OR 1 vanilla bean pod (see Note 6 for extra steps)
- 1/4 cup caster sugar (superfine sugar)
- 1 pinch cooking salt / kosher salt
- 1 1/4 cups heavy or thickened cream , or whipping cream (un-whipped), not dolloping cream
- Oil spray , neutral flavour (eg canola, not olive oil)
Decoration options
- Pictured – Raspberry coulis (below), chopped pistachios, mint, raspberries
- Other ideas – Fresh berries, shaved chocolate, fruit compote, passionfruit pulp, citrus slices, finely chopped mango or pineapple ,
Raspberry coulis option (optional)
- 250g / 8 oz raspberries , fresh or frozen (no need to thaw)
- 3 tbsp white sugar
Instructions
ABBREVIATED RECIPE:
- Bloom gelatine in saucepan 5 min, warm to melt. Add sugar, milk, vanilla and salt, once milk is warm, cool 10 min. Add cream, fridge 1 hr (stir), then pour into lightly oiled moulds. Fridge 6 hrs+, invert!
FULL RECIPE:
- Bloom gelatine – Pour the 1/2 cup of milk in a small saucepan, sprinkle the gelatine across the surface then whisk in. Leave for 5 minutes – the gelatine will swell and look curdled.
- Melt – Gently warm the gelatine mixture on medium low heat and stir until it melts and looks like lump-free milk again. Don't let it simmer.
- Vanilla infused – Add the milk, sugar, vanilla bean paste and pinch of salt. Heat just to let the milk warm and stir gently to dissolve the sugar. Don't let the milk simmer or even get steamy or frothy, just gently warm.(Note 2) Once the sugar is dissolved, remove from the heat and leave for 10 minutes to let the vanilla flavour to infuse.
- Add cream – Stir in cream. Pour into a large jug or bowl, clear glass is best (so you can check for seed sinking later).
- Cool to thicken slightly – Refrigerate uncovered for 1 hour, stirring at the 30 minute and 45 minute mark, scraping along the sides (in case it starts to set). See Note 3 for why this step is important!
- Check thickness – After 1 hour, the mixture should be a pouring cream consistency. Stir, leave for 15 seconds then check the underside to ensure the vanilla beans aren't settling back on the base.(SOS: If you left it too long in the fridge and it sets, you can always gently re-melt in the microwave or stove and start again. Only make it warm, gelatine melts at a very low temp.)
- Oil and fill moulds – Lightly oil spray 6 moulds (about 2/3 cup / 160ml each), then lightly wipe out excess. Divide mixture between moulds (if you spy lumps, strain).
- Refrigerate at least 6 hours, preferably overnight. (If not un-moulding, 4 hours is enough).
TURNING OUT PANNA COTTA:
- Run knife around rim – Remove the Panna Cotta from the fridge. Run the tip of a small knife around the edge of the surface.
- Remove – Invert mould onto a plate. Grip the plate and mould with both hands and give it an assertive shake to loosen the Panna Cotta (it might take a few goes). You'll hear and feel it "plop" out! (Note 4 for troubleshooting).
- Serving – It's so silky and creamy, it's delicious plain though nice to pop a few berries for colour on top. To decorate as pictured, spoon raspberry coulis onto the top and coax some drips down the sides (if you want). Sprinkle with pistachios, top with a raspberry, tuck in a mint sprig. Serve! (Also see in post for more decorating ideas).
Raspberry coulis
- Put ingredients in a small saucepan over medium heat. Once the raspberry juices start simmering, simmer for 5 minutes, mashing the raspberries as you go. Blitz with a stick blender tilt saucepan to submerge the head, else transfer into a jug), strain through a fine sieve to remove seeds. Cool completely before using, it thickens as it cools. To loosen if needed, add water 1 teaspoon at a time and mix thoroughly.
Recipe Notes:
Nutrition Information:
The only “elegant” desserts I have
I want to be that person who does sophisticated desserts with flair….but sadly I’m not. I’m much more of a cosy-dessert sort of person – give me all the Sticky Date Pudding, Chocolate Custard Cakes, Bread and Butter Puddings and Apple Crumbles!
This is all I’ve got in the Dinner-party-elegant-type category:

Life of Dozer
We don’t always agree…..

….the question is: who won? 🤔
Awww Dozer! Our groodle does the same! He’s half Goldie afterall. He usually wins … until I rustle the bag of liver treats in my pocket.
He only just started doing it this year!!!
I’ve recently been wanting to make panna cotta (probably the spring weather). I checked earlier this week and was a little disappointed to find you didn’t have one. Very happy to see this has been added and the coincidence is halarious. ❤️
So funny, there’s quite a few people that have said the same! 🙂 – N x
Hi Nagi do you have a savory recipe for Panna Cotta ?
I feel like the natural sugars in the milk and cream would fight with this idea, but I’ve seen yogurt panna cotta. Maybe you could try that.
Lots of savory custard recipes out there. Perhaps you might Google for a Quiche Lorraine recipe to give you some ideas.
No – but wow! What an idea!! – N x
I’m going to try a mushroom one, topped with prawns
All of your recipes that I have tried are wonderful. I shall also try the panna cotta as well.
Thank you.
Hope you get a chance to try it Lola! – N x
Keen to know if you tried a buttermilk version ? I make mine with buttermilk and love it.
I haven’t but I would do a direct sub of the milk with buttermilk, perhaps even both milk and cream 🙂 – N c
It’s nice to see that I’m not the only one that has this disagreement (often at busy intersections) with their lovable but stubborn pooch 🙂
Do you lose too? 😀
Dear Nagi. I desperately want to make the Panna Cotta. Do you mind very much putting the measurements in metric please? Thank you. Thank you also for sharing your never fail recipes.
Thanks! I was just coming here to ask the same question. Cup measuring is an anathema to me (in the U.K) and cup recipes ALWAYS put me off trying them. PLEEEEASE Nagi? 🤞😊
I always measure metric as it’s much more precise, it’s easy to google the metric equivalent and then note on your recipe for future use.
Agree Leslie 🙂 Especially because cups differ in sizes between countries! – N x
Done done done! I hear you Chris 🙂 I am fond of using weights myself, but mindful that most people in Australia don’t have scales! So I provide both 🙂 – N x
Same here! Please could we have ml or g instead of “cup” measurements? I am always worried I won’t get the accurate amount and the recipe will fail.
Sorry! Was in a mad rush and forgot to add the metrics, just added! – N x
Done! Sorry Helen, I was in such a rush this morning I forgot to add it 🙂 – N x
Thank you so much for your prompt reply Nagi. I’m sure the PANNA COTTA will be better than the restaurant’s. I send all my love to Dozer. He’s blessed with a devoted mum in you Nagi.
I’ve never tried Panna Cotta so I’m going to have to try this, I love the wobble, it’s kind of reminded me I need to book my gym class so I can have 2 x
🤣 I like the thought process Ann
Hi, I’m a vegetarian and don’t want to use gelatin. How would I make this using agar-agar for a similar wobbly result?
Hi Rea! I’m sorry, I haven’t tried with agar agar, I’d have to experiment to figure out quantity 🙂 – N x
Dozer won . . . ’cause you kinda let him 🙂 ! Have made many a panna cotta in my cooking years, usually being afraid it would collapse . . , and making it a tad too firm – ie being a scaredy-cat! As usual enjoyed you being such a careful teacher – how will anyone go wrong over the weekend 🙂 ?
No. Because he plonked his rump down and wouldn’t move!!! 🤣
I have to try this! So, could you please add the metric equivalents in the recipe?
I have tried another one with coconut cream and grated roasted coconut on top.
Bit your’s sounds good!
Was in a mad rush to get this out and forgot to add the metrics, just added! – N x
Thank you! 🫂
What a treat.
You just made my weekend! 😉
Nice one Nagi.. Sandra x
Hope you get a chance to try it Sandra! – N x
Looks amazing!! Rly excited to tru
Hope you get a chance Sarah! – N x