
This is a No Bake Cheesecake that tastes very similar to a classic Baked Cheesecake, made without the fuss of baking! It boasts an exceptionally smooth, light-yet-creamy filling and a buttery, crumbly crust that everybody is mad for.

The best no-bake cheesecake
I am fiercely loyal to my classic baked cheesecake, but a no-bake version is perfect for hot summer days or when I’m short on time because I don’t have to fuss with baking.
That said, I have a very firm view that a no-bake cheesecake shouldn’t compromise on quality for convenience. Like a classic baked cheesecake, the filling should be rich yet light, with a silky smooth texture, but set enough to cut neat slices.
To achieve this, we need gelatin powder. It’s affordable, widely available, and it’s essential for a successful no-bake cheesecake. I’ve tried it without, and trust me—it either doesn’t set or requires way more cream cheese, making it too dense (see FAQ for more details). There has been a LOT of cheesecake coming out of my kitchen lately!

Difference between a no-bake and baked cheesecake
This no-bake cheesecake is intentionally very similar to my classic Baked Cheesecake. However, it’s a smidge lighter because it doesn’t have egg in the filling, whereas baked cheesecake does (this is what sets the filling when it is baked).
Other than that, the texture and sweetness is very, very similar. I doubt most people could tell the difference!
My attempt at proving the creaminess of the filling to you – an elegant smear. 😂 There’s a better demo in the recipe video below!

What this No Bake Cheesecake tastes like
There are endless cheesecake versions around, ranging from incredibly delicate souffle-like cheesecakes (such as the Japanese Cotton Cheesecake, that’s my mother’s recipe BTW) to much denser, sweeter New York Cheesecake which uses four times the amount of cream cheese and 7x the amount of sugar.
My cheesecakes sit squarely in between these two. The filling texture is mousse-like, but not as delicate (else I’d call it a mousse cake!). And when you eat it the filling becomes velvety smooth and creamy in your mouth. I aim for the same texture for both my baked cheesecakes and this no-bake one.
Here’s a fun little table that summarises the above!
| Typical ingredients | Japanese Cotton Cheesecake (recipe) | New York Cheesecake | My Cheesecakes* |
|---|---|---|---|
| Filling | Light as a soufflé and barely sweet | Rich, dense, very sweet | Rich-yet-light |
| Cream cheese | 250g (8 oz) | 1 kg (2 lb) | 500g (16 oz) |
| Sugar | 35g (1.2 oz) | 260g (9 oz) | 150 – 200g (5.3 – 7 oz) |

Ingredients for No Bake Cheesecake
Here’s what you need to make this no-bake cheesecake. Not that much actually! I find the most challenging thing is planning ahead so there’s sufficient time for it to set in the fridge (6 hours for this one).
What you need for a no-bake cheesecake fillinG
See rant in the introduction paragraph above for why I insist we use gelatine! And remember – easy. And cheap. 🙂

Cream cheese – I always use Philadelphia but if you’ve had success with another brand, feel free to use that.
Softened at room temperature – Take it out of the fridge at least 1 hour prior so the cream cheese is softened, not fridge-cold-hard. We want to be able to beat it so it’s quite soft, smooth and fluffy so the whipped cream mixes effortlessly into it without knocking out the air (which means a lovely light aerated cheesecake filling = win!)
Blocks not tubs – This recipe calls for cream cheese blocks which are firmer than cream cheese in tubs which are softer as they are designed for spreading. If you can only get tubs, you just need to use a little more gelatine. See notes in the recipe card for quantity.
Gelatine – I prefer to use powder rather than gelatine leaves when I can because it’s simple to use, sold at regular grocery stores, cheap and (important to me) the strength is relatively universal around the world. The same cannot be said for gelatine leaves. 🙂
Find gelatine powder in the baking aisle in small tubs (pictured above) or packets of small sachets (open and measure using a teaspoon).
Water – This is to “bloom” the gelatine (explained in the step photos below). I use the bare minimum – just 2 tablespoons – so we don’t dilute flavour.
Whipping cream – Whipped cream helps create a lovely light textured filling. You can use thickened / heavy cream, or regular cream. Just make sure it can be whipped because not all cream is made for whipping (for example, pouring cream, dolloping cream). The label should say if it can be whipped.
Couple more cream rules:
1. No low fat! Now is not the time! Eat salad tomorrow.
2. Fridge cold! The cream needs to be fridge cold else it will not whip.Sugar – Best to use caster sugar (superfine sugar) which are finer grains than regular sugar (granulated sugar) so we can be confident it will dissolve. It’s especially important because this is a no-bake recipe so we don’t have heat on our side here. If you only have regular sugar, that’s ok. Just beat the cream cheese for a little longer than per the recipe and rub the mixture between your fingers to ensure there’s no sugar grains left.
Vanilla – Please use vanilla extract which is real flavour extracted from vanilla beans (hence the name!) rather than vanilla essence which is imitation. It’s especially important for no-bake recipes because the vanilla flavour is pure and unaltered in the recipe.
Lemon juice – Just a touch, to bring a smidge of tang to the filling. It’s not a deal breaker if you don’t have it.
Salt – Standard baking practice these days to bring out the flavours in sweet baked goods. We use just a tiny amount so it doesn’t make it salty by any stretch of the imagination.

The buttery cheesecake crust
I am a cheesecake biscuit crust fiend! So my default is to have a biscuit wall, not just a base. If you see a cheesecake recipe of mine without a wall, there will be a reason for it!

How to make a No Bake Cheesecake
If there’s one piece of advice I can give you, it’s to know that cheesecakes are not as fragile as you think they are! The biscuit crust will look a little loose and crumbly when you first press it into the pan. But once the cream cheese filling is in, it will absorb moisture which makes it set more, and once the filing is set, it holds the whole cheesecake together quite firmly.
So, handle the finished cheesecake with care but there’s no need to be terrified! (I’m talking to my 18 year old self here 😂).
1. inverted base (pro tip!)
To make it easier to remove finished cheesecake, flip the base of the springform pan so it’s upside down. Why? Because this way you don’t need to worry about bumping the cheesecake over the lip of the base which could cause cracks in the crust. Instead, it will glide off smoothly!

Flip the base of a 20cm/8″ springform upside down.
Clip with excess paper sticking out – Grease very lightly with butter, just enough to hold the paper in place so it’s not sliding around when you clip the sides in. Then top with a square sheet of paper and clip the sides in so the excess paper is sticking out.
The excess paper is useful to grip to slide the cake off the base onto a serving platter. Then you simply slide the cheesecake off the paper. Easy – and no stress about cheesecake structural issues, yay!
2. Cheesecake crust
I’m an absolute sucker for the crumbly, buttery biscuit crust of cheesecakes. So I insist on a biscuit wall. But if you want to take the easier path, just do a biscuit base and leave the sides naked.

Break biscuits up roughly by hand and put them in a food processor.
Blitz until they become fine crumbs, about 10 to 15 seconds on high, depending on how powerful your food processor is.

Add the butter, cinnamon, sugar and salt, then blitz again until it becomes wet sand.
Wet sand! It should press together when pinched between fingers.
⚠️ Not pressing together? Just add a little extra melted butter. You might have this problem if you used a drier biscuit than Digestives, or if they were a bit stale.

Roughly press – Pour the crumbs into the prepared pan, roughly spread it around the base. Push it up the walls and press it up using a rubber spatula. No need to be overly neat at first, do it roughly initially then refine it (next step).
Press and neaten – Use something with a flat base and vertical walls (I use a measuring cup) to press the crumbs firmly into the walls and the base. It will seem a little fragile at this stage but once the filling is in and the cheesecake has been refrigerated, the crust becomes firm and crispy.
Tip: For an extra neat crust, run the measuring cup (or whatever tool you use) back and forth along the corner to make it a neat 90° angle rather than curved. I also like to use a butter knife along the rim to tidy it up, but it’s not essential (you’ll see me demo this in the video).
2. BLOOM THE GELATINE
Gelatine is simple to use if you just follow the steps I’ve provided. There’s a reason for every direction!
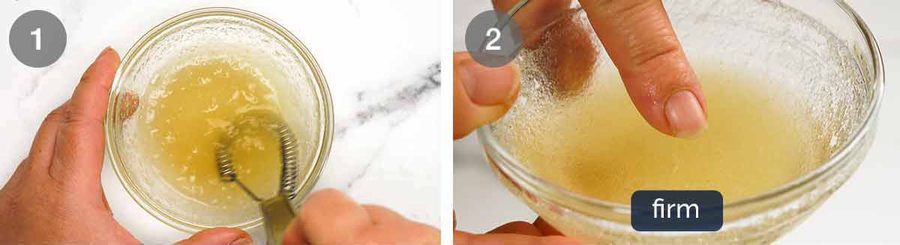
Bloom gelatine – Put the water in a small bowl then sprinkle the gelatine across the surface. Mix with a small whisk (or spoon) – it will become like lumpy jelly. Then leave it for 5 minutes. This is called “blooming” the gelatine.
⚠️ Don’t dump the gelatine in one place and don’t pour water into the gelatine. This can cause the gelatine to turn into a big lump immediately.
Rubbery! The gelatine should solidify into a firm rubber. If it doesn’t, then your gelatine is dead – time to get another!
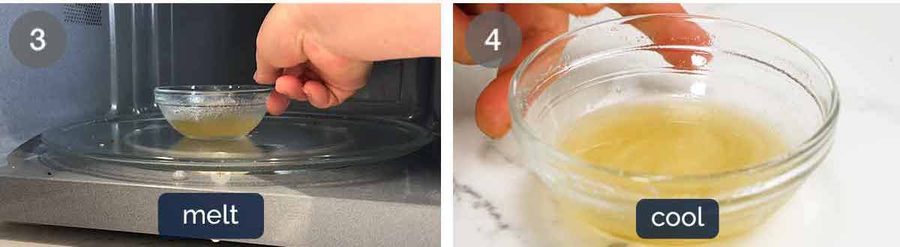
Gently re-melt – Microwave for 15 seconds on high to melt it then mix until lump free.
⚠️ Do not let it boil as it can destroy the setting abilities of gelatine.
Cool for 5 minutes while you make the filling. The melted gelatine will be whipped into the filling.
⚠️ Do not pour hot gelatine into cream or anything that it could melt or deflate. Cool it first but make sure it’s still in liquid form. If it solidifies again, re-melt gently.
3. MAKE FILLING
I prefer using a handheld electric beater to make the filling as you can move it around the bowl rather than stopping and scraping down the sides like you’d need to do with a stand mixer. You also only need to use one attachment (the whisks). If you use a stand mixer, use the whisk attachment to whip the cream, then the paddle attachment for the cream cheese step (stand mixer whisk may aerate it too much = large unsightly bubbles + risk of collapse mid-setting).

Whip cream – Put the cream in a bowl and whip it on high for 2 minutes or until stiff peaks form. We’re not looking for silky soft whipped cream, we want full on stiff whipped cream, as this makes our cheesecake beautiful light and fluffy.
Beat cream cheese – Put the cream cheese and sugar in a separate bowl and using the same whisk (no need to clean it), beat for 1 minute on high just until it’s softly smooth. Then add the vanilla, lemon, salt and melted cooled gelatine, then beat it in just until dispersed.
⚠️ Don’t beat excessively because it can cause unsightly large air bubbles in the filling (not the end of the world though, I’m just fussy!).

Fold in whipped cream – Using a rubber spatula, fold through about 1/4 of the cream into the cream cheese filling. This lichens up the cream cheese mixture a bit before adding the rest of the cream, so less air is knocked out of the cream.
Once the initial cream is mostly mixed through, gently mix through the remaining cream. Don’t stir vigorously as you will knock air out of the whipped cream which will make the cheesecake filling denser than we are aiming for!
Pour the mixture into the prepared crust.

Smooth – Gently nudge into the corners then smooth the surface.
Set – Refrigerate for at least 6 hours (12 hours is safest) or until the filling is set. I do this uncovered but if your fridge has strong smells (garlic or marinated meats come to mind) you will want to cover it.
4. REMOVING FROM THE CAKE PAN AND DECORATING
In this step, you are going to be so grateful I insisted that you invert the base of the cake pan!

Sides first – Gently unclip then remove the sides of the springform pan.
Slide paper off base – Grip the paper overhang and slide the cheesecake off the base onto a serving platter.
⚠️ If the paper is stuck to the base, it’s because you used too much butter which, when ice cold, glues firmly to the paper! You can either warm the underside of the pan to melt the butter slightly (like putting it on a tea towel damp with warm water) or run a large offset spatula, knife or something else long and thin under the paper to loosen it.

Slice cheesecake off paper – Then slide the paper out from under the cheesecake. I sort of hold the cheesecake in place as I’m pulling the paper out from underneath it.
⚠️You shouldn’t have trouble with the cheesecake sticking to the paper in this step. If you do, it is probably the excess butter from the biscuit crust that has adhered to the paper when it solidified in the fridge. Just give it 5 minutes or so to soften and loosen then try again. Else, do as above and run a large offset spatula or knife under the crust.
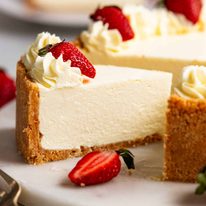
Decorate (optional) – If you’d like to decorate your cheesecake as pictured in this post, pipe whipped cream along the edge then top every second swirl with a halved strawberry. See below for more decorating ideas.

Other cheesecake decorating ideas
Sometimes, the best cheesecake is one that is left un-adorned. Just 100% cheesecake perfection! You won’t feel like you’re missing anything, eating a plain slice of cheesecake (at least, not one that’s made well, which of course, ours is! 😉)
However, when you’ve got company or if you’re taking this cheesecake somewhere, it is nice to decorate it. Here are some ideas:
Whipped cream piped along the edge with halved strawberries, as pictured;
Full coverage whipped cream – Spread softly whipped cream all over the surface, doing big beautiful swirls, then scatter with mixed berries and dust with icing sugar (powdered sugar);
Either of the above with passionfruit;
Serve slices with a dollop of whipped cream on the side and some strawberries or other berries;
Fruit compote and sauces (also see Mango Cheesecake, Strawberry and Blueberry Cheesecake, and Blueberry Cheesecake Bars);
Sauce – You could also serve with a chocolate or salted caramel sauce, though when I make chocolate or caramel cheesecakes I like to get those flavours inside the cheesecake too. They will be coming onto my website eventually! 🙂
Sprinkle of nuts and/or chocolate shavings – Think, macadamia and white chocolate, peanuts and dark chocolate, pecans and chocolate, pistachios or almonds. Lovely addition of texture!


That’s cheesecake perfection, right there.
I hope you try this one of these days. It’s such a beautiful, elegant dessert and everyone who has tried this always comments on how it tastes decadent but it’s not too rich, and borders on the “just sweet enough” line.
In fact, I’ve added tips in the recipe to dial up the sweetness for people who prefer “American-level-sweet” because as a general rule, American cake recipes tend to be on the high end of sweetness compared to, say, French and Japanese which are on the lower end.
Love to know what you think if you try it! Also, extra decorating suggestions would be most welcome. I did get a little stuck of ideas! – Nagi x
No-bake Cheesecake FAQ
A classic cheesecake is baked and it is made using egg that is whipped to aerate the cream cheese filling and then sets the filling when it’s baked in the oven. No-bake cheesecakes are not baked so they don’t include egg, but instead rely on other means to set the filling. Either more cream cheese, gelatine (my preferred method) or the cheesecake is made flatter with less filling (which means making it set properly isn’t as tricky).
See the next FAQ item below for a comparison of the methods ie gelatine v no gelatine.
Basic no-bake cheese recipes just use more cream cheese (3 to 4 blocks for a 20cm/8″ cheesecake), which is beaten with whipped cream to make the fulling. The cream cheese then firms up in the fridge and sets the filling.
But relying solely on cream cheese to set the filling means it is more dense, more costly to make (the price of cream cheese has sky-rocketed in recent years!) and the cheesecake is almost alarmingly heavy when you pick it up!
It’s nice, but just too rich for my taste (I’m not going to link the recipes I tried…you understand 🙂 ).
Other cheesecakes will use less cream cheese so it’s not as dense…but they just don’t set properly. They smear and sag when sliced, and you need to eat it immediately out of the fridge before it melts into a puddle. (Again, not going to link a recipe here. These were disappointing, I should have trusted my instincts and not bothered.)
My recipe relies on gelatine powder to set the filling. We use the bare minimum we can get away with so the filling doesn’t go anywhere near “panacotta-like”. Rather, it’s light and almost mousse-like, yet cuts into neat slices and melts in your mouth into a river of velvety richness in your mouth.
That’s ok! You will just need to use a little more gelatine to help the filling set. This is because tub cream cheese is softer than block cream cheese as it is designed for spreading (think – bagels!), whereas block cream cheese is more often used in cooking.
It is excellent for 4 days, and still good at 7 days though the base does start to soften a bit as it continues to take in moisture. However, be mindful of the shelf life of the cream you used as you will be limited by that. ie The cheesecake shelf life will be the short of the expiry date of the cream or 7 days.
Getting the gelatine vs cream vs cream cheese balance right for the perfect texture and flavour I was seeking.
Too much gelatine = panna cotta vibes. Too little gelatine = doesn’t set enough.
Too little cream = not aerated enough. Too much cream = greasy mouth feel.
Too little cream cheese = not enough cheesecake flavour. Too much cream cheese = too dense!!
I warned you…I’m fussy about my cheesecake!
Actually, I had a no bake cheesecake recipe I’ve been making *forever* which I was perfectly happy with until I went to share it on my website. Then I got paranoid about whether it was as good as it could be, and that’s when I started down the testing rabbit hole! The final recipe I published was actually not too different from my original recipe. The only thing I ended up changing was the gelatine (reduced from 3 teaspoons to 2 1/4 teaspoons for a softer mouthfeel).
Unfortunately not as I haven’t designed this recipe to be made with jelly crystals. Also, the setting strength of jelly crystals varies from brand to brand, so it would be hard for me to have a universal recipe. This is important to me because people from all over the world use my recipes, and I’d hate for someone to have problems with a recipe of mine just because jelly crystals in, say, Bulgaria are stronger than here in Australia!
Watch how to make it
Hungry for more? Subscribe to my newsletter and follow along on Facebook, Pinterest and Instagram for all of the latest updates.
No bake cheesecake
Ingredients
Biscuit crust:
- 200g/7 oz digestive biscuits (13 pieces, 1 2/3 cups crumbs), or other plain biscuits/cookies
- 90g (6 tbsp) unsalted butter, melted
- 1/2 tsp cinnamon powder (optional)
- 1 tbsp brown sugar
- Pinch of salt
No-bake cheesecake filling:
- 2 1/4 tsp (9 g) gelatin powder , unflavoured (Note 2)
- 2 tbsp cold tap water
- 1 cup thickened or heavy cream , or any whipping cream, FRIDGE COLD (Note 3)
- 500g/ 16 oz cream cheese block (not tub), well softened at room temperature (Note 4)
- 3/4 cup caster sugar / superfine sugar (Note 5)
- 1 tsp vanilla extract
- 1 tbsp lemon juice (not critical, can do without)
Optional decorations:
- 6 strawberries , halved (plus extra for serving)
- Whipped cream (half batch for decorating, or full batch for extra to serving on side)
Instructions
ABBREVIATED RECIPE:
- Blitz crumb ingredients. Press into 20cm/8" inverted base lined springform. Bloom gelatine in the water, re-melt. Whip cream. In separate bowl whip cream cheese + sugar, then vanilla, lemon, salt and gelatine. Fold in 1/4 cream, then remaining cream. Fill crust, fridge 6 hours.
FULL RECIPE:
Inverted cake pan:
- Invert & line – Turn the base of a 20cm/8" springform pan UPSIDE DOWN (Note 6). Grease with butter very lightly. Place a square piece of parchment/baking paper on the base. Then clip into the springform pan – excess paper will stick out.
- Line sides – Butter and line the side of the pan.
Biscuit crust:
- Blitz – Break up biscuits roughly by hand and place in a food processor. Blitz until it becomes fine crumbs (~30 seconds).
- Add butter – Add the butter, cinnamon and salt. Blitz until it resembles wet sand (~ 10 second). It should stay together when pinched between your fingers.
- Press – Pour into the prepared cake tin. Use a spatula to roughly spread it out over the base and up the walls. Then flatten and press the base and walls using something with a flat base and vertical edges (I used a measuring cup). Aim for the wall to be ~9mm (0.35") from the top of the rim (Note 7). Refrigerate crust until required.
Gelatine (Note 2):
- Bloom gelatine – Put the water in a small bowl and sprinkle the gelatine across the surface (don't dump it in one place. Whisk until dissolved then set aside for 3 minute or until it firms up like rubber.
- Melt – Microwave for 15 seconds on high or until it melts (do not let it boil). Cool for 5 minutes while you make the filling (make sure it's still liquid when you use it).
No-bake cheesecake filling:
- Whip cream – Put the cream in a bowl and whip it with an electric beater on high for 2 minutes until firm peaks form (ie not softly whipped, we want good aeration!).
- Whip cream cheese – Put the cream cheese and sugar in a separate large bowl. Using the same beater (no need to clean), beat on high for 1 minute just until it's soft and smooth. Add the vanilla, lemon and melted gelatine, then beat for 10 seconds on high to mix it through thoroughly. Don't beat excessively as we don't want too many air bubbles in the cheesecake (unsightly).
- Fold – Add about 1/4 of the whipped cream into the cream cheese mixture. Gently fold through using a rubber spatula or large spoon (don't mix aggressively, you'll knock all the air out of the cream!). Then fold in the rest of the cream.
- Refrigerate – Pour into the crust, smooth the surface. Refrigerate for 6 hours+ to set.
Serving:
- Remove sides of the cake pan. Use then overhang paper to slide cheesecake off the cake pan base onto a serving platter. Then slide the cheesecake off the paper.
- Decorate the top with whipped cream and strawberries, if desired (or just dollop whipped cream on the plate). Cut into slices and serve!
Recipe Notes:
Nutrition Information:
Life of Dozer
As promised in the last post – home movie of a day in the Life of Dozer!
Hi Nagi,
This cheesecake looks divine! Is there an alternative to using gelatine?
Thank you
Thanks for another wonder recipe, posting and video update.
Such a deep dive into one recipe is greatly appreciated.
Some of us really want to know all the whys and hows and you make it fun.
As always, it’s nice to see what you and Dozer are up to.
All the best to you and your team!
Nagi,
As always, this recipe sounds fantastic and enjoyable.
For over fifty years I have been successfully making a no bake cheese cake with only using cream cheese, condensed milk and a few drops of vanilla. I always make the base with Ginger Nut Biscuits.
It always turns out perfectly and works perfectly every time. Scrumptious!!!
Looking forward to October 15 and receiving your new book – ordered a copy months ago when you first advised this would be published.
Good Luck!
Saturday, September 21, 2024
Would love to try out this recipe as we love all your recipes but don’t own a springform pan. Do you have a suggestion for a good one?
Love, Love, LOVE the video with you and Dozer!!! Thanks so much for sharing!
If using tubs of cheese spread, is Is two 3/4 tsp of gelatine or 2 And a 3/4 tsp? It is not clear from the end notes?
Can you use flavored gelatin like strawberry, etc to make a flavored no bake cheesecake instead of the type you list in the recipe?
It would help if the comments were made AFTER the recipe was tried out… making suggestions doesn’t really help
Thank you.So kindly for all the amazing reciplease and dozer I have huge doggie crush on you!!! Coming at ya all the way from Reno Nevada USA
This looks fantastic! Have you considered making up a recipe for Baklava Cheesecake? I would love your version, to include a light, smooth and creamy cheesecake along with the rich and decadent baklava top and bottom!
In #3: Fold in whipped cream: “This lichens up the cream cheese mixture a bit” I think this means “Lightens” but not sure. I really am going to make this recipe. I only know the NY version and that is too rich for me these days. Dozer warms my heart every day I see him. Lost my Vino in January, they could have been twins.
Can this be successful frozen
Can someone help me with which cookie from my American grocery store to use? I’d love a trip to London or Sydney to pick up ‘digestives’ but that’s not happening soon!
I think I’d just do a traditional graham cracker crust. Otherwise you could order the digestive biscuits online or for me, I’m fortunate I live nearby a World Market store and they tend to have these types of items. Actually where I purchase the Mutti Passata called for in many of her recipes.
Thank you. I didn’t think of World Market..there is one near me too. But Graham cracker does sound easier!
Nagi! What a delightful video of you and sweet Dozer!! Love it! Oh, and yes, I love your cheesecake recipe too!😉 Must try!
I will definitely try this recipe. Thank you for being very thorough. Your videos is very precise.
Love all your recipes, and will definitely try this one. Hugs for Dozer…he reminds me of my golden grandpuppy, Buddy. Best wishes to both of you, and keep up the great work you do.
Flipping the base of the pan over is so genius!
Thank you for this gloriously simple cheesecake recipe.
Would you consider replacing the word “corners” with “edge”?
A round springform tin doesn’t have any corners 😘
(I know I’m beingpedantic 🙈)
It’s not being pedantic! Honestly, I kept re-reading that bit because I was like what angles can there be in this??
This recipe looks simply wonderful, however, what do I do about melting the gelatine without a microwave? Suggestions would be gratefully received!
Add to a small pot and melt, or over in a bowl of boiling hot water, stirring until melted.
Hi, looks like a great recipe. Can I just check when to add the gelatine? It’s not mentioned in your detailed instructions but in your abbreviated run through it says to add with lemon and vanilla. I assume this is also when the salt is added as stated in detailed instructions?
Yes, as in the Abbreviated instructions and the video.