
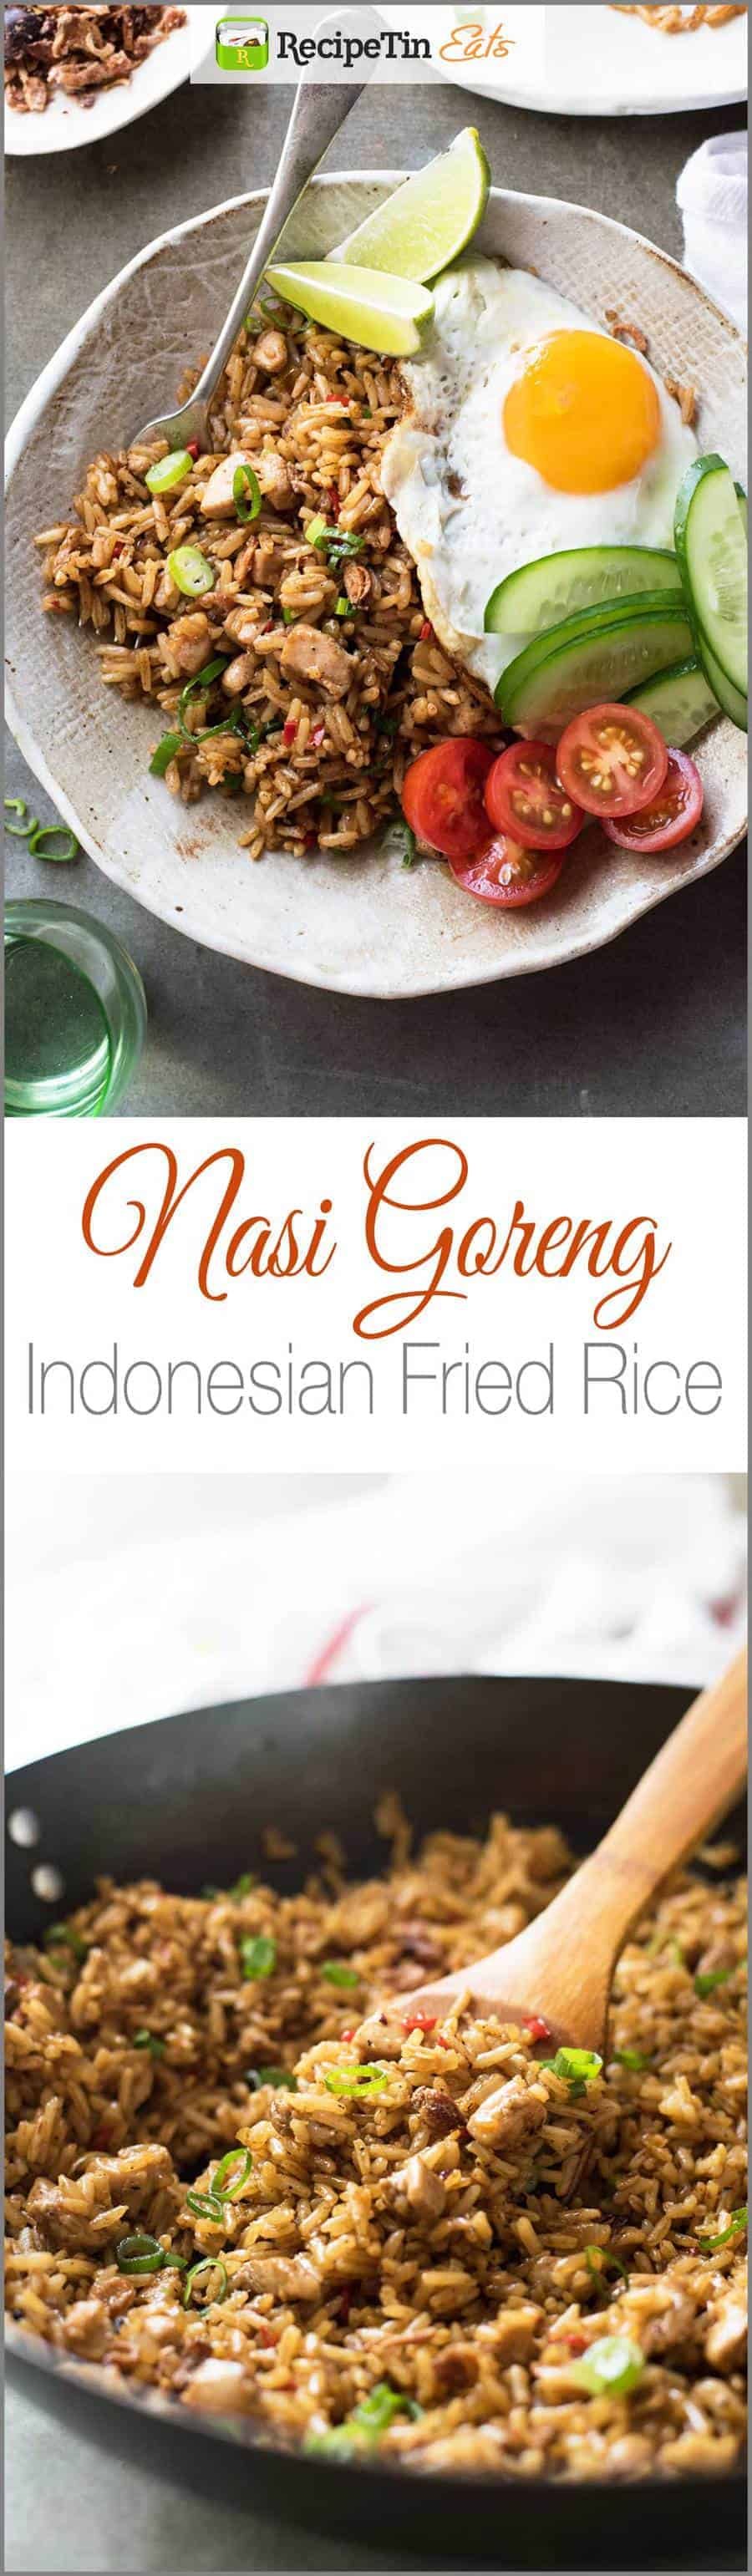
Nasi Goreng is the popular Indonesian fried rice which is traditionally served with a fried egg. I love the unique dark brown, caramelised colour of the rice! It’s a simple recipe, you won’t need to hunt down any unusual ingredients, and it’s one of my favourite Indonesian foods – and I’m betting you will love it too. 🙂

Nasi Goreng
Anyone who has been to Bali would be familiar with Nasi Goreng and probably had it almost every day because it’s everywhere and darn delicious!
So for those who have tried and love Nasi Goreng, you will be surprised how easy this is to make in your very own home.
And for those who haven’t tried it, I hope you do!
What is Nasi Goreng?
The literal translation of Nasi Goreng is “fried rice” in Indonesian and Malaysian – and that’s exactly what it is! It’s mainly rice with just a little bit of meat and just onion for the vegetables. The thing that distinguishes it from other Fried Rice dishes is the sauce which is made with kecap manis, a sweet soy sauce that stains the rice dark brown and caramelises the rice when it cooks.
Typically it’s served with a sunny side up egg (love how the yolk runs into the rice!) and a side of fresh cucumber and tomato (no dressing) to make a meal of it.

Shrimp Paste is optional!
As with almost every traditional dish, there are many versions of Nasi Goreng. Some are more complicated than others, calling for the use of dried shrimp (belacan) which, astonishingly, is now sold in large supermarkets in Australia as well as Asian stores.
I make it with, and I make it without. It’s tasty even without dried shrimp – and in fact, when I originally shared this Nasi Goreng recipe in 2016, I chose the version without shrimp paste because of that reason.
But it is tastier and more authentic with dried shrimp.
So I’ve compromised and taken the easy route by using shrimp paste rather than dried shrimp which requires more effort in the preparation process (crumble and toast before using).
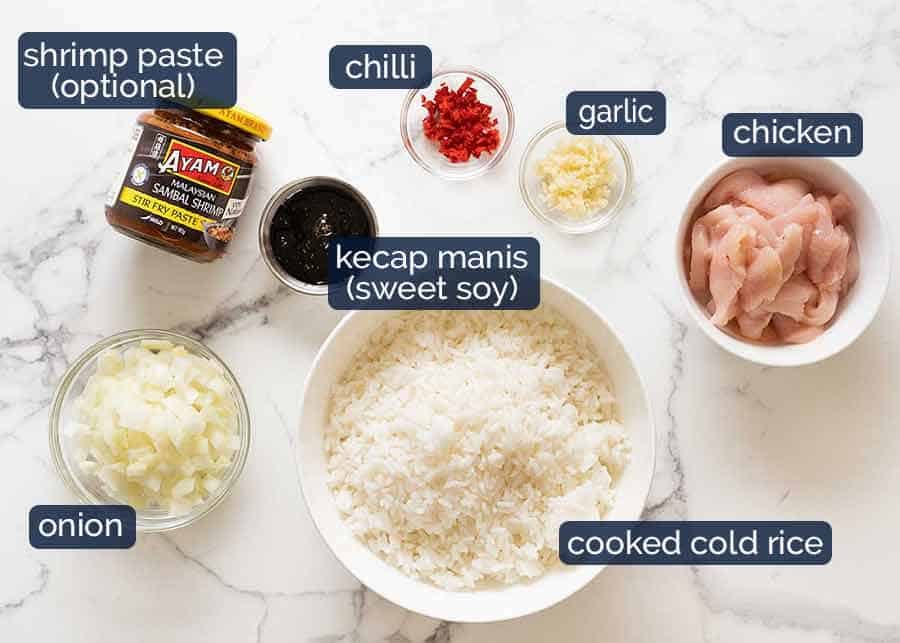
Kecap Manis (sweet soy sauce)
A distinguishing feature of Nasi Goreng is the dark brown colour of the rice from the kecap manis / ketjap manis which is an Indonesian sweet soy sauce. It’s thicker and sweeter than normal soy sauce, with a consistency like syrup.
Don’t go running for the hills thinking it’s a hard-to-find-ingredient! Here in Australia, kecap manis is available in major supermarkets (see here for Woolworths).
And if you can’t find it at your supermarket, don’t worry! It is SO easy to make – just reduce soy sauce and brown sugar. Seriously. I’ve included directions in the recipe for you.

Cold, day old rice is not optional!
While shrimp paste is optional, the COLD cooked rice called for is not!
It’s simply not possible to make any fried rice with hot, freshly cooked rice – it gets kind of stickier when stir fried in sauce.
On the other hand, day old cold rice is drier and harder, so the rice can be stir fried in the sauce in a way that makes it become caramelised which gives Nasi Goreng the signature colour and flavour.
Speedy option: Cook the rice, spread out on tray then FREEZE for 1 – 2 hours, or refrigerate for 3 – 4 hours. It’s not just about cooling the rice, it’s also about making the surface of the rice dry out.

Super quick 20 minute recipe
The making part is very straightforward, no different to typical fried rice recipes. Garlic, chilli and onion first, then chicken, then rice, kecap manis and shrimp paste, if using.
Cook for a couple of minutes until the rice grains start to caramelise. Trust me – you will know when it’s ready, it smells amazing!
How to serve Nasi Goreng
Nasi Goreng is traditionally served with a fried egg and a side of fresh vegetables (commonly plain juicy wedges of tomato and cucumber).
Both these side options are very typical in various parts of Asia to add protein and vegetables to a plate to turn something carb-heavy into a meal.
Nasi Goreng is also a terrific Asian side dish option, something a little different that packs a bit of a flavour punch! Try it on the side of:
Asian Chilli Garlic Shrimp/Prawns – big punchy flavours, tastes like Thai Chilli jam!
Or have a browse of my Asian recipes collection for more ideas!
I do hope you try this. Super tasty, it’s probably one of the most flavour packed Asian fried rice dishes! – Nagi x

Watch how to make it
Hungry for more? Subscribe to my newsletter and follow along on Facebook, Pinterest and Instagram for all of the latest updates.

Nasi Goreng (Indonesian Fried Rice)
Ingredients
Chicken
- 1 tbsp oil
- 5 oz / 150g chicken breast , thinly sliced (or other protein)
- 1 tbsp kecap manis (sweet soy sauce, Note 1)
Rice
- 1.5 tbsp oil
- 2 garlic cloves , finely chopped
- 1 tsp red chilli , finely chopped (Note 2)
- 1 onion , small, diced
- 3 cups cooked white rice , day old, cold (Note 3)
- 2 tbsp kecap manis (sweet soy sauce, Note 1)
- 2 tsp shrimp paste , optional (Note 4)
Garnishes / side servings (optional)
- 4 eggs , fried to taste
- 1 green onion , sliced
- Tomatos and cucumbers, cut into wedges/chunks
- Fried shallots , store bought (optional) (Note 3)
- Lime wedges
Instructions
- Heat oil in a large skillet or wok over high heat.
- Add chilli and garlic, stir for 10 seconds.
- Add onion, cook for 1 minute.
- Add chicken, cook until it mostly turns white, then add 1 tbsp kecap manis and cook for a further 1 minute or until chicken is mostly cooked through and a bit caramelised.
- Add rice, 2 tbsp kecap manis and shrimp paste, if using. Cook, stirring constantly, for 2 minutes until sauce reduces down and rice grains start to caramelise (key for flavour!).
- Serve, garnished with garnishes of choice (green onions, red chilli, fried shallots).
Serving
- Serve as a side for Asian main dishes or as part of a large spread, Asian or not! 🙂 See in post for suggestions.
- Make it a meal – traditional Indonesian style!: Serve with a fried egg sunny side up (runny yolk!), tomato wedges and slices of cucumber on the side.
Recipe Notes:
Nutrition Information:
Nasi Goreng recipe originally shared March 2016. Updated June 2019 with new photos, new writing, brand new video, slight recipe improvement and most importantly, Life of Dozer added!
Life of Dozer
Annual check up – passed with flying colours! And he behaved pretty well too…. until he saw the needle….

…. but the teeny tiny little prick was soon forgotten as he launched himself onto the reception desk for treats. 🙄 The wonderful team at Mona Vale Vetinary Hospital spoil him!! (And you know I totally love it)

Can I use roasted belachan paste instead of the shrimp paste you recommend?
So I had this for dinner last night, along with the Crispy Grilled Garlic Shrimp. Mmmmm. Guess what I’m having again tonight!
Perfect Combo Krisby!!
Love this easy recipe! I feel like I learned the secret to fried rice in the technique you use. I double the sauce when adding lots of veggies (spinach and snap peas!)
So easy and quick to make, and its delicious!
Yes totally Lana, it’s one of my emergency meals!
Sharing my 3 step hack for day old rice..
1) Cool down freshly cooked rice (use less water than normal)
2) Put in freezer uncovered for 1 hour
3) Transfer to fridge
I take out fm the fridge at least 30mins before cooking, hey presto, the texture is like day old rice, so you can easily cook fried rice on the same day. Hope this helps.
Great suggestion Selene!
Nasi Goreng was THE fashionable dinner party dish to serve amongst young marrieds in the 1960s and 70s alreadyalbeit with a few more ‘additions’ around the side, but never as a side dish. Delightfully easy but then made more decorative on the plate . . . still often make it as have a penchant foi kecap manis . . . 🙂 . . . to me belqchan is kind’of mandatory . . . lovely!!
Ba ha ha I LOVE reading that!!! So, specifically the “young marrieds” hey?? 😉 N xx
OMG, you have now made me want to hunt some down for lunch LOL. I will add this to next weeks menu plan!
Yes do!! I’d love to know what you think 🙂 N x
Thanks Nagi, this sounds great and really appreciate the hint re making a GF Kecap Manis- this a still a tricky one to buy GF,
Yes! It works really well 🙂 N xx
Hi. I have a burning question. I cook with organic produce, so really hard to get long grain white rice. No matter how much I rinse my rice…..it’s still all clumped together. Hubby is really polite and never complains LOL Any ideas how to cook rice that doesn’t go on the plate in 2 inch cube?
Hi Evelyn! Can you tell me what type of organic white rice you can get? Then I’d be happy to share some tips! N x
Thanks for getting back to me. I’m experimenting with Sun Rice Organic white rice.
Simple and absolutely delicious, which describes all 3 recipes I’ve tried from your site so far – I will be trying many more !!!!! Thankyou
That’s so great to hear Esther! I’m glad you enjoyed it, thank you for letting me know! N x
I absolutely love nasi goreng.. This looks so so delicious 😋 😋
Isn’t it awesome?? I can’t get enough of it! N xx
I loved Mi Goreng when I worked in Malaysia. Do you just substitute noodles for rice to make it?
Different recipe I’m afraid Claudia! It has tomato ketchup and curry in the sauce as well as soy sauce and other condiments 🙂 I have it on my list of things to share! N xx
I’m Indonesian lives in Perth, tried your nasi goreng and I must say: You’re awesome!! Look forward for next recipes xx
Thanks Jo! So glad you enjoyed it! N xx
Just cooked this for dinner tonight & we really enjoyed it. Thanks for the recipe
You’re so welcome Pat!
We lived in Indonesia for 3 years. This is what my husband always ate if we ate out. I make it often. I’m at a camp now and offered to make it for lunch. Thanks for the authentic recipe. If I have them, I often add chopped carrots, celery, and even frozen peas at the end. We had our eggs scrambled and fried like an omelette and placed in strips on the top in Indonesia.
Sounds divine Kathryn!
The BEST Nasi Goreng I have tasted, even the fussy husband who hates trying new things loved it. This one is now a regular on the dinner!
this is brilliant!
great directions. Love your site!
Been craving a decent Nasi Goreng since we got back from a holiday in Bali but all the local takeaways have been disappointing to say the least.
I’m not much of a cook but even I can follow this easy recipe to make it and it was deadset AWESOME!!
Thanks!!
WOOT!!!! I’m so glad you loved it!
Thank you Nagi for the great recipe!
Hi,
If I wanted to keep this sugar free when making my own kecap manis, what could I use instead to reduce down the tamari?
And is it possible to have the egg stirred through rather than cooked and eaten on the side with the rice? At which point would you do this?
And instead of chicken, to make this vegetarian, would I just cook the tofu in the exact same way?
Thanks so much for your help. I’m new to it all (trying to be vegetarian/refined sugar free etc)!
Dilushani
Hi there, not sure what you can use instead of sugar, sorry! Yes to the egg – make an omelette, roll it up and chop, or just scramble it. And yes I would cook tofu the same way! N x
You can also do what I just did tonight, beat 4 eggs and after you’ve cooked the onion in the above recipe – pour the eggs in. Immediately start stirring it and breaking up the eggs as they cook. It will be like bits of omelette all through the cooked garlic, onions and chilli.
Then keep going by adding the rice and kecap manis as per the rest of the recipe.
😉