
This is my best vanilla cake recipe. A classic butter cake but with Japanese techniques applied for the most plush, soft and moist yellow cake like you’ve never had before. This professional bakery style cake stays fresh and moist for 4 days — that’s unheard of! Use the same batter for perfect Vanilla Cupcakes.
This is a reader favourite recipe included by popular demand in my debut cookbook “Dinner”.


My best Vanilla Cake recipe is…..
Plush, moist, fluffy crumb without being freakishly unnaturally so (as some store bought can be). No more dense cakes!
Keeps near perfectly for 4 whole days. 100% fresh on Day 1, still 96% perfect on Day 4. That’s unheard of!
Lovely vanilla and butter flavour without a greasy mouthfeel;
Even, elegant crumb – no large tunnels or irregular, crumbly holes;
Bakes perfectly flat – no levelling required!
Makes perfect cupcakes;
Not overly sweet; and
As tender as it can be but still be stable enough to make a large layered cake smothered with frosting or piles of cream and berries. In contrast, Chiffon Cakes and Japanese Sponges which, while lighter still, cannot actually hold up to much extra weight – the bottom layer gets quite squished.
So if all that appeals to you too, then I dare say this might become YOUR favourite vanilla cake recipe too! And here’s a little preview to show you how soft and fluffy it still is after 4 days:
Freshness preview – this cake is 4 days old!
Origins of this vanilla cake
This vanilla cake is the result of bringing together the best of Japanese sponge cakes and Western butter based cakes. It has the world renowned very soft, fluffy crumb of Japanese cakes and uses the Japanese baking method, combined with the buttery goodness and sweetness of Western cakes.
But it’s more sturdy than Japanese cakes which are so delicate, they can really only be decorated with cream. Anything heavier and the bottom layer gets squished!
Also, importantly, this cake incorporates my cake shelf-life requirement to stay perfectly fresh for at least 2 days after it’s made. (This lasts perfectly for 4 days.) Because who bakes cakes on the day they are intended to be served??
Interestingly, baking experts will recognise the method and ingredients in this cake to be very similar to what is called a Hot Milk Cake in America – albeit strangely it’s often described as a “dense” cake, presumably because they don’t preserve the egg aeration to the extent I insist we do and also because sometimes it’s baked in bundt pans which takes far longer to bake (= dense cake).

The words “best served on the day” on a cake recipe is never a good sign – it means it drastically degrades overnight. But THIS cake recipe is near perfect for 4 days – even 5 days!
I don’t want to get too cake nerdy with you… but one sign of a well made cake is an even crumb. No large tunnels or lots of irregular size holes. It looks and tastes velvety – a similar plush texture to Red Velvet Cake.

There’s a widely held misconception that cake flour is the secret to a better cake. That’s only true for certain cakes. For this one, plain / all purpose flour yields better results.
Ingredients in my Best Vanilla Cake recipe
Here’s what you need to make this plush, soft vanilla cake. No cake flour, no buttermilk, no sour cream. Tried them all – this cake is better with plain / all purpose flour and just milk.

Plain / all purpose flour – compared to cake flour, the flavour of the butter and vanilla comes through better, the crumb is slightly more velvety AND it keeps slightly more moist too. Bonus: no need to hunt down / pay a premium for cake flour! Do not substitute with self raising flour or gluten free flour.
Eggs – whipped to aerate, these are key to make the cake extraordinarily light and fluffy. You don’t get an eggy flavour;
Baking powder – not baking soda (bi-carb), it doesn’t rise as well. This is our safety net, extra helping hand to make the cake rise.
Milk, full fat – just plain cow milk. Low fat works as well but rises marginally less. Do not substitute with non dairy milk or buttermilk;
Sugar – best to use caster / superfine sugar if you can because it dissolves better in the eggs. But regular / granulated sugar works just fine too – you may just end up with some little brown spots on the base;
Oil – just 1 tablespoon adds a noticeable hint of extra moistness, especially on Day 4, without weighing down the cake in the slightest. Don’t be tempted to add more – I tried an extra tablespoon and it didn’t rise as well;
Vanilla extract – the best you can afford. Imitation will work just fine, but the flavour isn’t as pure or real. I use Queen Vanilla Extract. Don’t waste your money on vanilla beans or vanilla bean paste – it’s not worth it for cakes.
Why this cake is safer than typical “cream butter and sugar” cakes
Making a really good cake that starts with “cream butter and sugar until fluffy….” is actually harder than you think. The butter has to be at the perfect temperature, and you can’t have chilly mixing bowls.
If the butter is too soft, the cake will be greasy and dense – sound familiar? If it’s too hard, you’ll never manage to cream it and you’ll end up with grease pockets. If you beat butter too long, you break the air pockets.
There’s more room for error with cookies and some other types of baked goods. But the butter temperature needs to be near perfect for cakes and cupcakes. (17°C/63°F is the perfect temperature for “softened butter”).
And even if you nail it, the cake rapidly loses freshness. Even the next day it’s noticeably drier. I’ve tried dozens and dozens over the years, to compare to this Vanilla Cake. This recipe puts all to shame in terms of fresh shelf life.
Heads up – this is a long step by step explanation post, to ensure those who are new to baking are armed with everything they need to make this cake perfectly, first time and every time!
Why is vanilla cake “so hard”? It seems hard to find the perfect cake because there is nothing to hide behind, it is one of the purest forms of baking. And the “cream butter and sugar” step is the biggest cause of problems, setting up the cake for success or failure from the very start (read above).
This Vanilla Cake recipe is much more foolproof!

How to make my best Vanilla Cake
A stand mixer makes this vanilla cake a breeze to make, though it can be made with a handheld electric beater. While it takes time to beat the eggs to make a lovely fluffy cake, this recipe is more fail-proof than the usual “cream butter and sugar until fluffy” recipes – read the above box for why.
The unique plush, fluffy crumb of this cake is from double lifting power – whipped eggs PLUS baking powder!

1. Whip the eggs and sugar – Beat the eggs with sugar for a whole 7 minutes until thick and glossy, it changes from yellow to white, and tripled in volume (just over double depth in the bowl).
The aeration created during this step is key for a soft, fluffy crumb. This is a technique borrowed from Japanese sponge cakes.
TOP TIP: After this step, keep beating to a minimum otherwise you’ll knock the air out. Just follow my time and beater speeds and you can’t go wrong!
Here’s what it looks like before and after beating:


2. Gradually add flour – Whisk together the flour, baking powder and salt. Then add into egg mixture in 3 lots, mixing for just 5 seconds on Speed 1 in between. This should make the flour just incorporated – don’t worry if there are some bits not mixed in.

3. Hot melted butter in milk – use a microwave or stove to heat milk with the butter until it melts. Believe it or not, HOT milk helps with aeration in this cake. I doubted it, so I tried with cooled melted butter in milk and found it did not rise as well.
The use of hot milk with melted butter in a cake batter is another technique used in some types of Japanese sponge cakes (such as this one from Chopstick Chronicles, a Japanese food blog). Interestingly, I recently discovered it is also used in a traditional Southern cake called Hot Milk Cakes.
4. Mix some batter into hot milk – this serves two purposes: a) bring down the temperature of the hot milk so it won’t “cook” the eggs (ie. tempering); and b) it lightens up the density of the hot milk (see above – it becomes foamy) so it blends together faster when added to the rest of the whipped egg mixture. Remember, minimal beating is key so we don’t knock out the cake-rising-bubbles we created in Step 1.
The melted butter in hot milk infuses this cake with beautiful subtle buttery flavour without the greasy mouthfeel inherent with butter cakes.

5. Slowly pour milk mixture back into whipped eggs over 20 seconds on Speed 1. Scrape down sides of bowls, then mix for 10 seconds on Speed 1 – the batter should now be smooth;
6. Pour into 2 cake pans lined with parchment/baking paper.
This cake can be made in various pan sizes, bundt pans and also makes perfect cupcakes. Click here for a handy table of different sizes, bake times and cake height (including 3 layer cakes).

7. {Optional} Knock out big air bubbles by dropping the cake pans on the counter 3 times. This won’t affect the cake-rising bubbles created in Step 1. But it makes large bubbles in the batter rise to the surface and burst.
If you don’t do this, you end up with maybe 6 or so large bubbles on the cake surface that go brown, and more unsightly large air pockets in the crumb. The surface blemishes don’t really matter if you are frosting. But if you’re not frosting the cake (eg just dusting with icing sugar / powdered sugar), you may care.
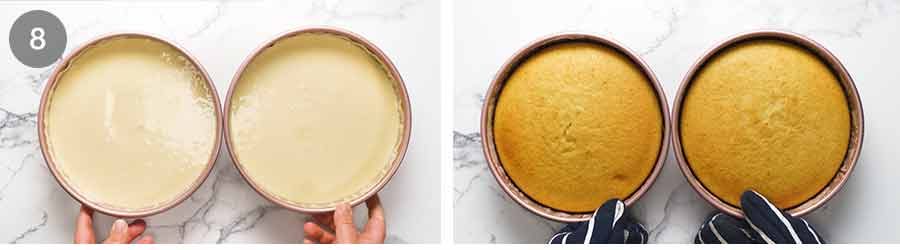
8. Bake 30 minutes until golden brown and a toothpick inserted into the middle comes out clean. The cake will have a slight dome but it flattens when it cools.
You may get the faintest cracks on the surface, like you can see in the middle of the left cake in the photo above. That can occur if your oven doesn’t distribute heat evenly (my left front is hotter). But don’t fret – once the cake cools and the slight dome flattens, the cracks will disappear.
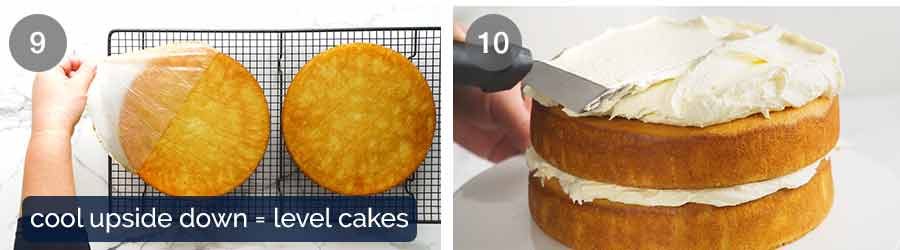
9. COOL upside down for level cakes (so you have neat, straight layers in a layer cake) on a cooling rack. If you don’t mind a slight dome surface / specifically want to show the beautiful golden brown surface (eg if making a cake dusted with icing sugar / powdered sugar, or a glaze), then cool it right side up; and
10. Decorate! Frost with your favourite frosting, smother with cream, fresh berries, swirl with chocolate fudge frosting or simply dust with icing sugar and serve with a dollop of yogurt or cream!
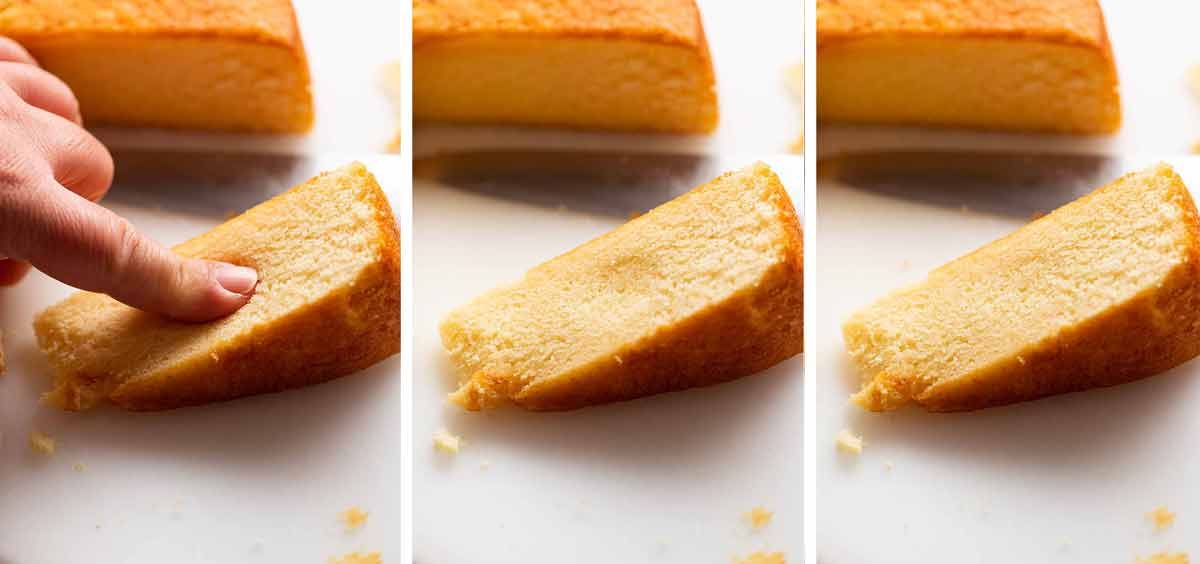
Day 4 – still super moist and fresh
The photos below are my attempt to show you how incredibly soft the cake still is four days after it’s made! If it were dry like typical butter cakes that start with “cream butter and sugar until fluffy”, the crumb would break when I jabbed it, and it would never spring back.
Tips for Vanilla Cake success
You’ll love that this list is a lot less stern than many other cake recipes!
Eggs at room temperature – these will fluff better and faster. It’s easy to warm up fridge cold eggs – just leave in warm water for 5 minutes. What’s a room temperature egg? Pick up the egg. Fridge cold? Too cold. Cool but not cold? That’s ok. Very warm? I would be worried they might be off! (Note: fridge cold eggs will still fluff just fine, but it takes a couple of minutes longer. Just more consistent results with room temp eggs).
De-chill icy cold mixing bowls – Cold kitchen? Cold bowls! Run them under warm tap water then dry before using. Not hot tap water – just warm. Why? Eggs aerate faster and better when slightly warm. Cold bowl will lower temperature of eggs. This is a general useful baking tip – eg softened butter creamed in an icy cold bowl will make it firm up.
Make sure your baking powder is still good – if you do everything right and the batter looks like it does in my video, but your cupcakes don’t rise, the culprit is probably your baking powder. Even if it’s not past the expiry date, if not stored in a cool dry place, or if “someone” left the lid off for days, it can lose rising power. See here for how to check if your baking powder is still good.
Make sure the milk and butter are hot when you mix in the batter. I don’t understand the science, all I know is that when I melted the butter in the milk ahead of starting the batter, then let it cool to lukewarm while I faffed around getting everything else ready, the cake didn’t rise as well.
Once you start, don’t stop – once you start beating the eggs, keep going until the cake is in the oven. Do not at any point stop and take a call from your chatty Aunt Margorie! Reason: bubbles in batter will subside if left sitting around, resulting in a dense cake.
Follow steps in the order per recipe – I’ve written out the steps very specifically in the most efficient order for the best result. Don’t try to do things ahead like melting the butter in hot milk then leave it sitting around while you do everything else – it will either cool (cake doesn’t rise as well) or it gets a skin on it (this doesn’t dissolve in batter).
Cake pan WITHOUT loose base is best – the batter is quite thin so it can leak a bit if using springform pan or loose base sandwich pans. Not much, but a bit. Not the end of the world – you can prevent this by greasing the base extra well and “plugging” the gap with butter.
Recipe can be halved for one single layer cake, baked in one pan. However if you do make a full batch, do not try to bake all batter in one pan or it won’t rise as well. Only exception is bundt pan – the hole in the middle helps with faster heat distribution.
Different cake pan sizes and bake times
Click here for a handy table of different cake pan sizes, bake times and cake height. This Vanilla cake will work with the following cake pan sizes:
2 x 20cm / 8″ cake pan – my base recipe (I like the cake height, slightly tall), 30 minutes
3 x 20cm / 8″ cake pan – 21 minutes (if all one one shelf). Otherwise, put 2 on middle shelf and 1 pan on shelf underneath. Bake top 2 pans for 21 minutes, remove from oven. Move bottom pan up and bake for another 2 minutes then remove.
2 x 23 cm / 9″ cake pans – 27 minutes
2 x 15.25cm / 6″ cake pans – 25 – 27 minutes, only make half a batch
Halve the recipe for a single round cake, 20 – 23cm / 8 – 9″
12 cup tube pan or bundt pan (grease & dust with flour) – bake 1 hour, but note cake is not quite as fluffy as pictured and described. Still soft, but it’s slightly more dense (still delicious and thoroughly enjoyable, just different to intended)
23 x 33 cm / 13 x 9″ rectangle pan – 30 minutes (large single layer sheet cake, excellent for large groups)
CUPCAKES! 24 perfectly domed, golden cupcakes – or halve the recipe to make 12. Here’s the Vanilla Cupcakes recipe.

Ideas for frosting and decorating Vanilla Cake
Here are a few ideas for finishing this Vanilla Cake.
Vanilla buttercream (pictured in this post) – the white on white(ish) looks pretty and of course, driving home the vanilla flavour. Classic buttercream is loved for its rich, buttery, sweet flavour and creamy texture;
Chocolate Mirror Glaze – for the ultimate professional touch! You will need to use the Vanilla Buttercream suggested above to create the supported frosting, and follow all directions in the Mirror Glaze recipe concerning flat and even surface etc.
My Secret Less-Sweet Fluffy Vanilla Frosting – 100% silky smooth, fluffier and way less sweet than buttercream, this magical frosting pipes like a dream! It looks just like Vanilla Buttercream. Used in another incarnation of this Vanilla Cake in Lemon Cake with Fluffy Lemon Frosting;
Sprinkles for an easy cheerful, birthday appropriate decorating option;
Fresh flowers for an elegant option. Tip: Wrap the ends with a tiny bit of foil as a precaution before sticking it in the frosting or cream;
Chocolate Buttercream for a classic Birthday Cake or pastel-coloured buttercream like this Easter Cake;
Rich Chocolate Fudge – frost it with Chocolate Fudge Frosting made with melted chocolate. Double the frosting so you have enough for the inside, top and sides. Bonus: No electric beater required for this one!
Jam and cream for Victoria Sponge (photo above, halfway down) – spread the upside-down base with strawberry jam, top with lightly sweetened vanilla whipped cream. Place top sponge on then dust with icing sugar / powdered sugar. Note: this cake is a fluffier (and I dare say, better!) version of traditional Victoria sponge cakes which are actually very dense;
Strawberry Shortcake – essentially, the Classic Japanese Shortcake (on my mother’s Japanese recipes website) but instead of using a Japanese sponge cake, using this Vanilla Cake instead;
Glaze it with a semi-see-through glaze that drips elegantly down the sides, like the Lemon Glaze in this Lemon Yogurt Cake. Make it 2 x single layer cakes (or halve the recipe); and
PLAIN – do not underestimate the power of this cake. It’s so moist with such a lovely vanilla and buttery flavour, it is sensational eaten plain. Though if serving to company, I do think it’s nice to at least finish it with a dusting of icing sugar / powdered sugar, and perhaps add a dollop of cream on the side and a fresh strawberry (or two)!

And with all that – I’m finally done. Finally happy. This is THE Vanilla Cake recipe that is my best all rounder. For birthday cakes, special occasions, to make to impress the pants off your family and friends.
And now it’s all over to you — tell me what you think! – Nagi x
Watch how to make it
This recipe features in my debut cookbook Dinner. Mostly new recipes, but this recipe is a reader favourite included by popular demand!
Hungry for more? Subscribe to my newsletter and follow along on Facebook, Pinterest and Instagram for all of the latest updates.

My best Vanilla Cake – stays moist 4 days!
Ingredients
- 2 cups plain / all purpose flour (cake flour OK too, Note 1)
- 2 1/2 teaspoons baking powder (check it's still active, Note 2)
- 1/4 tsp cooking salt (kosher salt)
- 4 large eggs (50 – 55g / 2 oz each), at room temp (Note 3)
- 1 1/2 cups caster / superfine sugar (granulated/regular ok too, Note 2)
- 115g / 1/2 cup unsalted butter , cut into 1.5cm / 1/2” cubes (or so)
- 1 cup milk , full fat (Note 5)
- 3 tsp vanilla extract , the best you can afford (Note 6)
- 3 tsp vegetable or canola oil (Note 7)
Vanilla Buttercream
- 225g / 2 sticks unsalted butter , softened
- 500g / 1 lb soft icing sugar / powdered sugar , SIFTED
- 3 tsp vanilla extract
- 2 – 4 tbsp milk , to adjust thickeness
Instructions
Preparation:
- Preheat oven to 180°C/350°F (160°C fan) for 20 minutes before starting the batter (Note 8). Place shelf in the middle of the oven.
- Grease 2 x 20cm / 8” cake pans with butter, then line with parchment / baking paper. (Note 9 more pan sizes) Best to use cake pan without loose base, if you can.
Combine Dry Ingredients:
- Whisk flour, baking powder and salt in a large bowl. Set aside.
Beat eggs until aerated:
- 30 sec beat: Beat eggs for 30 seconds on speed 6 of a Stand Mixer fitted with a whisk attachment, or hand beater.
- Slowly add sugar: With the beater still going, pour the sugar in over 45 seconds.
- Triple volume: Then beat for 7 minutes on speed 8, or until tripled in volume and white.
Finish cake batter:
- Heat Milk-Butter (Note 5): While egg is beating, place butter and milk in a heatproof jug and microwave 2 minutes on high to melt butter (or use stove).
- Gently add flour: When the egg is whipped, scatter 1/3 flour across surface, then beat on Speed 1 for 5 seconds. Add half remaining flour, then mix on Speed 1 for 5 sec. Add remaining flour, then mix on Speed 1 for 5 – 10 sec until the flour is just mixed in. Once you can’t see flour, stop straight away.
- Combine milk, vanilla & oil – Pour hot milk, vanilla and oil into the now empty flour bowl.
- Lighten with some Egg Batter: Add about 1 1/2 cups (2 ladles or so) of the Egg Batter into the Milk-Butter (don't need to be 100% accurate with amount). Use a whisk to mix until smooth – you can be vigorous here. Will look foamy.
- Slowly add milk: Turn beater back on Speed 1 then pour the Milk mixture into the Egg Batter over 15 seconds, then turn beater off.
- Scrape and final mix: Scrape down sides and base of bowl. Beat on Speed 1 for 10 seconds – batter should now be smooth and pourable.
Bake:
- Pour batter into pans.
- Knock out bubbles: Bang each cake pan on the counter 3 times to knock out big bubbles (Note 10 for why)
- Bake 30 minutes or until golden and toothpick inserted into centre comes out clean.
Cool & frost:
- Turn out & cool: Remove from oven. Cool in cake pans for 15 minutes, then gently turn out onto cooling racks. If using as layer cakes, cool upside down – slight dome will flatten perfectly. Level cake = neat layers.
- Frost: Once cake layers are fully cool, top with frosting of choice, or cream and fresh berries or jam. See list of ideas in post!
Vanilla Buttercream:
- Beat butter with paddle attachment in stand mixer for 3 minutes on high until it changes from yellow to almost white, and it becomes fluffy and creamy.
- Add icing sugar / powdered sugar gradually in 3 lots, beating slowly (to avoid a powder storm) then once mostly incorporated, beat on high for a full 3 minutes until fluffy.
- Add vanilla and milk, then beat for a further 30 seconds. Use milk only if needed to make it lovely and soft but still holds it's form (eg for piping). Use immediately. (If you make ahead, refrigerate then beat to re-fluff).
Recipe Notes:
- Read recipe from start to finish before starting;
- Make sure your baking powder is not past its expiry – here’s how to check;
- Fresh eggs make the cake rise properly (old eggs don’t aerate as well);
- Work in order of steps per recipe;
- Don’t incorporate add-ins like funfetti or blueberry (they sink); and
- Once you start, keep going until it’s in the oven. Do not at any point leave batter sitting around – bubbles will subside!
RECIPE NOTES 1. Cake flour works just fine with this recipe, but butter and vanilla flavour, and crumb is ever so slightly better using plain / all-purpose flour. Also, cake flour makes the cake surface sweaty and sticky the next day. 2. Caster / superfine sugar are finer grains than regular / granulated sugar so it dissolves when whipped with the eggs. Regular sugar sometimes doesn’t fully dissolve which doesn’t affect the cake rise or texture but can leave some small brown sugar specks on the surface. Not a big deal – just visual if serving undecorated. 3. Eggs – important to be at room temp as they fluff better when whipped which is key to the fluffy texture of this cake. Also, fresher eggs aerate better = better rise. Old eggs don’t fluff as well. Quick way to warm up fridge cold eggs – place in a large bowl, cover with warm tap water (just warm, not hot), leave for 5 minutes. Wipe dry (to avoid residual water dripping into bowl), then use per recipe. Large eggs – 50 – 55g / 2 oz per egg this is the industry standard of egg sizes sold in cartons labelled as “large eggs” in Australia and the US. If your eggs are significantly larger or smaller in size, just weigh your eggs and use 200 – 220g / 8 oz in total (including shell) or 180 – 200g / 7.3 oz in total excluding shell (this is useful if you need to use a partial egg to make up the total required weight. Just crack eggs, whisk THEN pour into a bowl to measure out what you need). 4. Baking powder – dead baking powder is a common problem with cake fails, even if not past the expiry date. Here’s how to check yours is still good. Baking soda (bi-carb) won’t make the cake rise quite as well. If you have no choice, then use 3/4 teaspoons of baking soda. 5. Milk – if you sub with lower fat milk then the texture of the crumb becomes a little less tender. Do not substitute with non-dairy milk, such as soy or almond milk. Heating milk – Do not let milk bubble and boil (foam is ok). Don’t heat ahead and let the milk cool before using, it must be used hot (I tried and the cake didn’t rise as much). 6. Vanilla come in all sorts of qualities. I use Vanilla Extract. Better quality (more expensive) = better flavour, but I think vanilla bean paste is wasted in cakes. 7. Oil – just 3 teaspoons makes a noticeable difference to the tenderness of the crumb AND keeps the crumb moist for days. 8. Oven preheating – 30 minutes preheat is recommended to ensure no loss of heat when the oven door is opened. Never use the rapid heat function on your oven for baking, no matter how fancy your oven is! 9. Cake pans – the batter is quite thin so to ensure no leakage, best not to use a cake pan with a loose base or a springform pan. If that’s all you’ve got, then use butter to firmly fill the gap (this should be enough – I had no leakage when I did this) and for extra insurance, try to cut the paper for the base slightly larger so it goes slightly up the wall. Cake pan sizes – click here for a useful table of different cake pan sizes, cake height and bake times.
- 2 x 20cm / 8″ cake pans- per base recipe above, bake 30 minutes
- 3 x 20cm / 8″ cake pans – 23 minutes at temp per recipe. If they don’t all fit, put 2 on the middle shelf and one on shelf below. Take out top 2 at 23 minutes, then move bottom one up and bake for further 2 minutes.
- 2 x 23 cm / 9″ cake pans – 27 minutes
- 3 x 23 cm / 9″ cake pans – 20 minutes
- 2 x 15cm / 6″ cake pans – halve the recipe, I haven’t made this size yet but expect will be 25 – 27 min bake time.
- 12 cup tube pan or bundt pan (grease & dust with flour) – bake 1 hour, but note cake will not be as fluffy as pictured and described
- 23 x 33 cm / 13 x 9″ rectangle cake – 30 minutes
- Cupcakes – refer to Vanilla Cupcakes recipe
- Chocolate cake – different batter recipe works better, see this recipe
Nutrition Information:
Life of Dozer
Dozer on the job (and doing it a little too well, as you will see. 😂)
WOW…Japanese mix into this Vanilla Cake sends it to another dimension. This is superb, just amazing, this cake is nek level, I have never seen my cakes I have baked, look stunning all the way around it, and the top of the cake is just flat, no cracks, hmmm amazing..Thank you Ngai what awesome recipe.
This was my first time ever baking a cake (a surprise for my bf’s birthday) and everything was absolutely perfect! The recipe seems complicated, but I read through it a couple times before starting and it was a shockingly easy. It’s by far the best cake either of us have ever had. 10/10 recommend and will absolutely make this every year! Thank you!!
This was my first time ever baking a cake (a surprise for my bf’s birthday) and everything was absolutely perfect! The recipe seems complicated, but I read through it a couple times before starting and it was a shockingly easy. It’s by far the best cake either of us have ever had. 10/10 recommend and will absolutely make this every year! Thank you!!
This is my favorite vanilla cake recipe- I’m wondering if I can add a smidge of almond extract and sprinkles and turn this into a confetti cake?
This cake was so lovely!! I made it for my daughter’s birthday and it was just perfect. Easy to make, and yummy. Just need to perfect my buttercream application now!!
I used this recipe to make my daughter’s birthday cake and party cupcakes. Wow. Just wow. Nagi you have never failed me, not once. This cake is so light and fluffy, and the vanilla flavour is right there. Just stunning. Thank you!
I have no words, I have tried several different vanilla cake recipes throughout the years in search of a winner and this one is by far the most delicious.
Probably my favourite vanilla cake recipe ever. It does take a few extra steps but the pay off is worth it. Good quality vanilla is worth the extra money for this one. 10/10. Nagi always nails it
I can confirm that this recipe works great with Caputo gluten free flour.
Also the freezes well ready for a birthday two weeks away!
My first time of ever leaving a comment after a recipe. I baked this today for my daughter’s 15th birthday and it was super rich, moist and delicious 💜
What is the best way to make this cake into chocolate cake?Besides adding cocoa powder (and how much and when), are there other ingredients you would adjust? Thank you!
I assumed two 8” cake pans would be enough, but there was plenty left for a third pan. My other round was larger, so I had to trim the 3rd layer to 8” once baked.
I won’t know if it’s still moist in 4 days. There’s only one slice left, and it’s still day one. Everyone loved it, despite my substituting table salt for cooking salt. The frosting was perfect, too.
Does anyone know if I could gently fold through sprinkles in the batter to make a “funfetti” style cake if this will work? Thanks
Best recipe and fool’s proof..Will never try another for moist vanilla cake.Thank you 🥳🤩
How could I adjust this recipe to make it chocolate?
Would love to try this for my daughter’s birthday cake today. However she is wanting a strawberry cake and I was planning to use freeze dried strawberries (they would be a fine powder after going in the food processor). I saw the note about no sprinkles or blueberries, but do you think something this fine would be okay? I’m thinking I would add it in with the dry flour and baking powder mixture. Also, if no sprinkles, what about a few drops of dye free food coloring after adding to the pan and then swirled with a toothpick, for those kiddos wanting some color? Here’s to hoping someone sees this comment before I have to start baking! Haha
It’s a super delicious cake but has anyone tried to substitute the eggs for something else? My mom doesn’t eat eggs and would love to make this an eggless cake for Mother’s Day.
Made this vanilla cake as my Easter dessert and used the make ahead instructions which were spot on. Spongiest , loveliest vanilla cake ! will be making this another 4-5 times ahead of my LO’s birthday as I plan on baking her birthday cake for the first time. THANK YOU
Can I use clear vanilla instead? I’m trying to make a white cake.
The worst cake I ever made
This cake is THE BEST!
My boys loved it, but no need to replicate in a Gluten Free version as well – Nagi, help?! Any hints on substitution variations to achieve this? I saw the note saying do not use GF flour 😞
Any advice would be ace! Thanks RTE!