
An economical, easy copycat of the fan favourite Bakers’ Delight pizza bread, a much loved lunch-on-the-run! Named as such as it’s designed to be tucked into lunchboxes and eaten at room temp rather than piping hot like normal pizza. Think: morning tea, picnics, hungry teenagers, freezer stash!


A homemade pizza bread
There’s a popular bakery chain here in Australia called Bakers’ Delight which sells a myriad of baked goods, ranging from sweet cinnamon buns to savoury bread rolls that are a convenient “lunch on the run”.
I’ve always wanted to recreate the fan favourite pizza breads. And noticing that the RRP has crept up to $4.90 (inflation!) was just the kick I needed to get moving on it.
Rather than making individual pizzas, I decided to take the easier option of making a large pizza slab then cutting it into portions. I then went one step further and decided to use a simple cheesy muffin batter rather than yeast-based proper pizza dough which needs hours to rise.
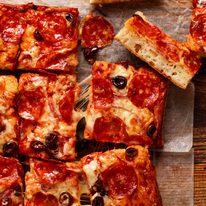
So here it is today – my pizza bread. It’s a great one for lunch boxes or taking to places, like morning tea at work because it’s designed to be eaten at room temperature.

Ingredients in pizza bread
This is a quick pizza bread that’s based on a savoury muffin batter. Which means – no yeast, no kneading, no rise time. Mix and bake!
The batter

Flour – Just plain / all purpose flour. Self raising flour will work in place of the flour + baking powder + baking soda but the crumb is not as soft or springy, and will not stay fresh for as long.
Baking powder + baking soda (bi-carb) – I know, it’s soooo irritating when I ask you to use both instead of one or the other! I wouldn’t ask it of you unless it matters – and in this case it really does make a noticeable difference.
Basically, both make muffins, cakes etc rise. But baking soda is like triple strength baking powder, and they have different rising qualities depending on what other ingredients are used. For this recipe, only baking powder = crumb not as soft or moist. Only baking soda = mound rather than flat surface. Combo of both = perfect!
Shredded cheese – Used to flavour the crumb and top the bread. Use your favourite shredded cheese (or cheese blend) that melts except mozzarella which doesn’t have much flavour. I use Devondale 3 cheese blend (mozzarella, colby, parmesan) which is my favourite store bought shredded cheese for both melting qualities and flavour (I’m in Australia).
If mozzarella is all you’ve got, just add an extra 1/2 teaspoon salt in the batter.
Pre-shredded ok! Usually I recommend shredding your own but in this case pre-shredded is fine, in the spirit of this quick & easy recipe!
Milk & sour cream (or yogurt) – These are the liquids for this batter. The sour cream keeps the pizza bread stay moist for several days rather than going stale the next day which is what happens to most muffins. For baking enthusiasts: the reason for this is because sour cream is thicker than milk so you don’t need as much flour in the batter to get it to the right consistency. Less flour = more moist crumb.
Olive oil – This too helps keep the crumb moist. This is because butter, the other most common fat used in baking, adds lovely buttery flavour but it firms up at room temperature = drier crumb. Oil, on the other hand, remains in liquid form which means the crumb is more moist.
Egg – This is the binding agent in the batter. We only use 1 egg and this is another reason the shelf life of this bread is so great: because more egg in batters = drier crumb.
Salt – For seasoning.

Toppings
I’m going for quick ‘n easy today, so I’ve used a store bought pizza sauce. However, if you’re a better person than me, please feel free to make your own (any of the 3 options are great).

Pizza sauce – As noted above, this is just store bought. Use any flavour your heart desires!
Toppings – Pepperoni, sliced olives, onion and green capsicum / bell peppers (yup, missing from photo above and half the pizza photos!). Feel free to use whatever you want.
Shredded cheese – I just use the same cheese as noted above in the batter.
How to make my easy pizza bread
You’re going to LOVE how easy this is! Ready?
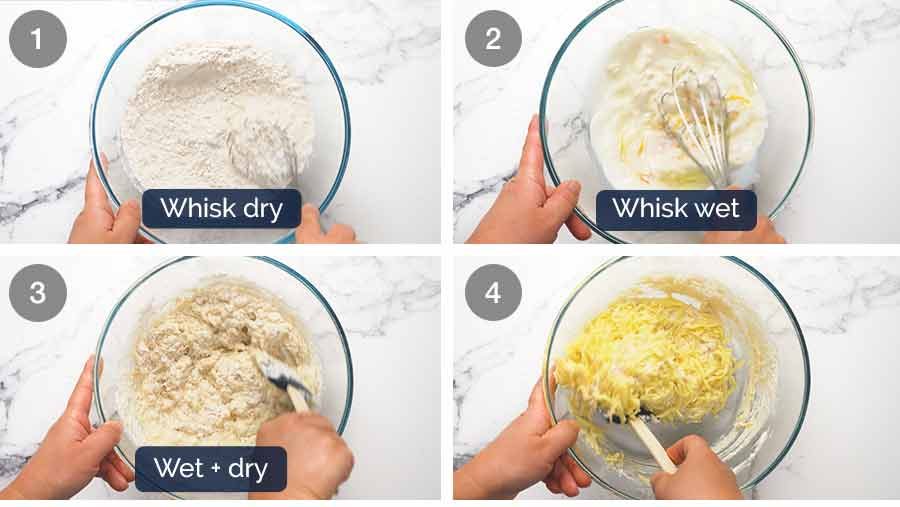
Whisk Dry ingredients in a bowl. I whisk the dry first so the whisk stays clean to use for the wet ingredients!
Whisk Wet ingredients in a separate bowl.
Combine – Pour the Wet ingredients into the Dry ingredients then mix with a rubber spatula until the flour is mostly mixed in but you can still see a bit. It will still be lumpy – that’s ok!
Add cheese then mix until you can no longer see flour. If the batter still has some small flour lumps, that’s fine as they will bake out. What you do not want to do is mix too much because this will activate the gluten in the flour and make the crumb hard and dense.
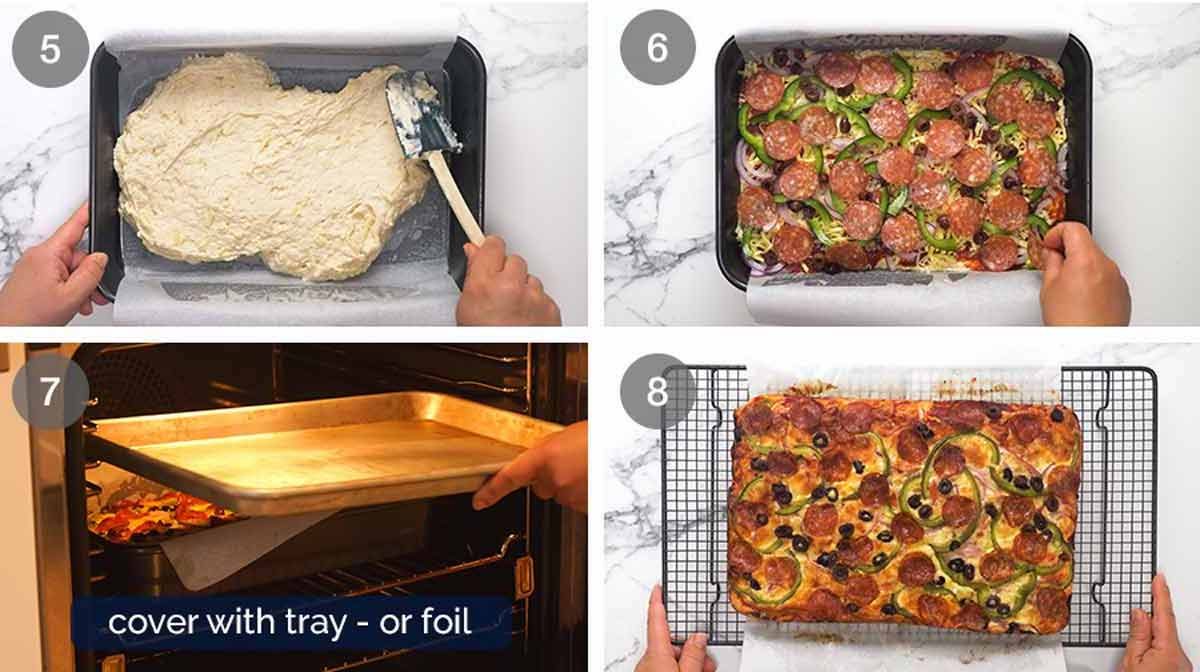
Spread the batter into a 23 x 33 cm (9 x 13″) lined metal pan. I spray with oil then line the base and long sides with a single large sheet of paper, with overhang to make it easy to lift out later. There’s no need to line the short sides if you spray with oil.
Ceramic and glass pans will also work but the bread will rise a smidge less and I would add an extra 3 minutes to the bake time. This is because glass takes a little longer to heat up.
Toppings – Spread with pizza sauce, then top with cheese, onion, capsicum (which I forgot in half the photos!), olives and pepperoni (in that order).
Bake 40 minutes – Bake uncovered for 25 minutes. Then pop a baking tray on top and bake for a further 15 minutes. This will stop the cheese from getting a little too golden.
Cool for 10 minutes in the pan, then 10 minutes on a cooling rack before slicing to serve.
It’s important to follow recipe directions for cooling baked goods because they finish cooking inside. If you slice this bread when it’s piping hot, straight out of the oven, then the inside will taste a bit “doughy” and undercooked.
This bread will still be warm after 20 minutes resting time. But it’s also specifically designed to be tasty at room temperature, for popping into lunch boxes! And it will stay fresh for 3 to 4 days.


How to serve Lunchbox Pizza Bread
As mentioned at the top, this pizza bread is designed to be eaten at room temperature like a savoury muffin rather than piping-hot-straight-out-of-the-oven like pizza, easy to make in bulk (do 2 pans at once!) and freezes perfectly.
Which means it’s:
great to pop into lunch boxes – the original idea I had when I decided I set out to create this recipe, hence the name! Pictured in post (top) with a homemade muesli bar.
ideal to take into work for a shared morning tea
a handy breakfast on the run
useful to feed permanently hungry teenagers
It’s about 70% cheaper than buying pizza rolls from Bakers Delight. And finally, my last effort to convince you to try this? There’s nothing like homemade. Right? – Nagi x
Watch how to make it
Hungry for more? Subscribe to my newsletter and follow along on Facebook, Pinterest and Instagram for all of the latest updates.
Lunchbox pizza bread (quick)
Ingredients
DRY INGREDIENTS:
- 2 cups plain flour (all-purpose flour)
- 1 1/2 tsp baking powder
- 1/2 tsp baking soda / bi-carb soda , sifted (Note 1)
- 1/2 tsp cooking/kosher salt
WET:
- 1 large egg (60g / 2 oz)
- 1 cup milk (full or low fat)
- 1/4 cup sour cream , or plain yogurt
- 3 tbsp olive oil
CHEESE FOR BATTER:
- 1 cup shredded cheese (colby, cheddar, Monterey Jack, Devondale "3 cheese blend") (Note 2)
PIZZA TOPPINGS:
- 1 1/2 cups shredded cheese, same as above (Note 2)
- 1/2 cup pizza sauce , store bought or homemade (any of them)
- 1/4 red onion , finely sliced
- 1/2 green capsicum / bell pepper , finely sliced
- 1/4 cup sliced kalamata olives
- 50g/ 2 oz pepperoni slices (about 1/2 cup)
Instructions
- Preheat oven to 180°C/350°F (160°C fan). Oil spray a 23 x 33 cm (9 x 13") metal pan then line with baking / parchment paper (Note 3).
- Whisk Dry ingredients in a large bowl.
- Whisk Wet ingredients in a separate bowl until combined.
- Combine Wet & Dry – Pour Wet into the Dry ingredients. Mix with a rubber spatula until the flour is mostly mixed in but you can still see a bit of flour. Add cheese then stir until you can no longer see flour. Some small lumps is fine, they will bake out.
- Assemble – Scrape into the baking pan and evenly spread – it's not that thick, remember it rises! Spread the surface with pizza sauce. Sprinkle with cheese, then (in this order) onion, capsicum, olives then pepperoni.
- Bake 40 min – Bake 25 minutes uncovered. Cover with a baking tray (or foil) then bake for a further 15 minutes.
- Cool 10 minutes in the pan then use the paper overhang to lift or slide out onto a cooling rack. Cool for a further 10 minutes before slicing to serve.
- Serving – Great at room temp though for VIP's, sometimes I warm it in the oven, drizzle with a swish of olive oil and sprinkle with a pinch of oregano.
Recipe Notes:
Nutrition Information:
Life of Dozer
Raise your hand if you think I said “yes Dozer, go ahead and have a swim in that stinky golf dam filled with decaying aquatic plants. I really love how you smell afterwards!”. 😖

This is the best idea ever!! It is incredibly delicious, super easy to make and the kids LOVE it! Winning!! You’re a wizard, Nagi!! x (PS I am still drooling over the gorgeous video of you making this!!)
That’s so great to hear Cat, thanks for taking the time to share yours (and your KIDS) feedback! N x
Hi Nagi! This sounds amazing and I really want to make it. I’m wondering if my 9×13 pan that is only about 1/2″ deep would be okay for this. Your pizza looks taller than that. Dozer looks cuter all the time. My dogs always liked the stinky stuff best!
Hi Gail, I actually think it will hold it in because it will puff up and because the batter is not loose like cake batter it will not overflow over the edge, if that makes sense 🙂 Maybe just pop a tray underneath to catch any spillage?
Thanks Nagi. I will definitely make this now. Hugs to Dozer
I have zero idea what Baker’s Delight is, but I saw this recipe this morning on FB, and decided to try it for lunch! I only used cheese on 1/2 – it crisped up a tad too much, but the side where I put red bell peppers, red onion, and green olives (no one else eats olives), looked fabulous! I really enjoyed it – super easy, ingredients we always have at home. I posted 2 pics on FB on Nagi’s post of my delicious lunch!
Should clarify – I used cheese on the whole pizza bread, but I left 1/2 as cheese-only, no toppings 🙂
That’s so great to hear Betsy!! So glad you enjoyed it 🙂 N x
When I went to Canada there was a bakers delight but it was named “Cobs” I figured it might be called that in other countries too
Thank you for this recipe, i can’t wait to make it myself, i always love your recipes.
Can you please try to replicate the bakers delight BBQ savoury bites! They’re a favourite in our household, but so expensive.
WOW ! Another winner !!
I love the fact that I don’t have to do the yeast and wait .
Another great surprise ,your the best .
Hey Dozer, while you’re in there, can you see if you can find any of the many balls that I’ve hit into that damn dam
Made this last night for my son’s lunch today. Just beautiful! I was looking for inspiration and you didn’t fail again to disappoint. Couldn’t help but eat a fair bit while it was warm and it was very yummy. Thanks, Nagi for sharing your creativity with us.
This is definitely happening this weekend!! Don’t you worry about it, because it so worth the wait. I’m not a gambler, but I’m willing to bet on that. We have loved all of your recipes so far , and really looking forward to making memories with the new ones. Blessings to you and Dozer
Thank you for this! After moving back to the US, we miss Baker’s Delight and these pizzas so much!!! 😂
Hi
Any reason for the red onion? I have never like red onions that are cooked for me they are better raw. Is it because they are not as wet as white onions?
Hi Stuart,Red onions or salad onions are sweeter than brown or white.Slice em thin and they are pretty mild tasting when mixed with other ingredients.Look good and crunchy.Awesome pickled on tacos.
I have been feeling like pizza all week so this easier option is perfect. Looking forward to making this over the weekend. Thank Nagi
Thank you for the heads up on your book delay. I just got the notice from the vendor as well. I was going to let you know but you beat me to it. Take care. Stay well.
Permanently hungry teenagers! Hilarious and so true. I have 4 and when one meal is cleaned up, everyone is ready to eat again! Thanks for the recipe
Just one word! You are AMAZING!!!
This looks great and I love seeing typical Australian recipes or recipes from Australian bakeries and restaurants. It’s a little way to armchair travel! I live in Connecticut, USA . I may never actually get to Australia but thanks Nagi for bringing it to me!
When I went to Canada there was a bakers delight but it was named “Cobs” I figured it might be called that in the States too.
Nagi, you had me at “freezes perfectly” and then you went and capped it off with “useful to feed permanently hungry teenagers.” ‘Nuff said!
Signed, the 15-year old’s mom 💖
Making this later today; like several others, I have the perpetually hungry teenaged boy (who happens to be the world’s pickiest eater!). This will definitely meet with his approval. As always, thank you!!
I will be trying this for sure! Any kind of pizza is always a hit at our house. Can’t wait.
Mine is cooking as I write this. Please, please, please more recipes to fill up always hungry teenagers. Mine are emptying cupboards and the fridge almost daily!
Hello! I came to ask if it would work ok without the egg as we have an allergic child. Looks yum!
Hi Holly, I don’t work for Nagi or the website I’m over I the U.S. and we use self rising flour and Greek yogurt to make all sorts of things from pizza crust to bagels it’s a 2 ingredient option. I would drop out the egg and use Greek yogurt you might have to add a little more than 1/4 cup, I haven’t made it yet, so I can’t say for sure how much. I often switch out eggs for Greek yogurt. I would look at the photo to make sure the batter is as thick as Nagi’s, you could also let it sit a couple minutes if you don’t like how it’s rising but it should work ok.
Blessings,
Gina
Thank you so much Gina, I will definitely give that a go. Give my son a change from sandwiches!
Hi Holly, you are welcome and it’s on our menu as well today