
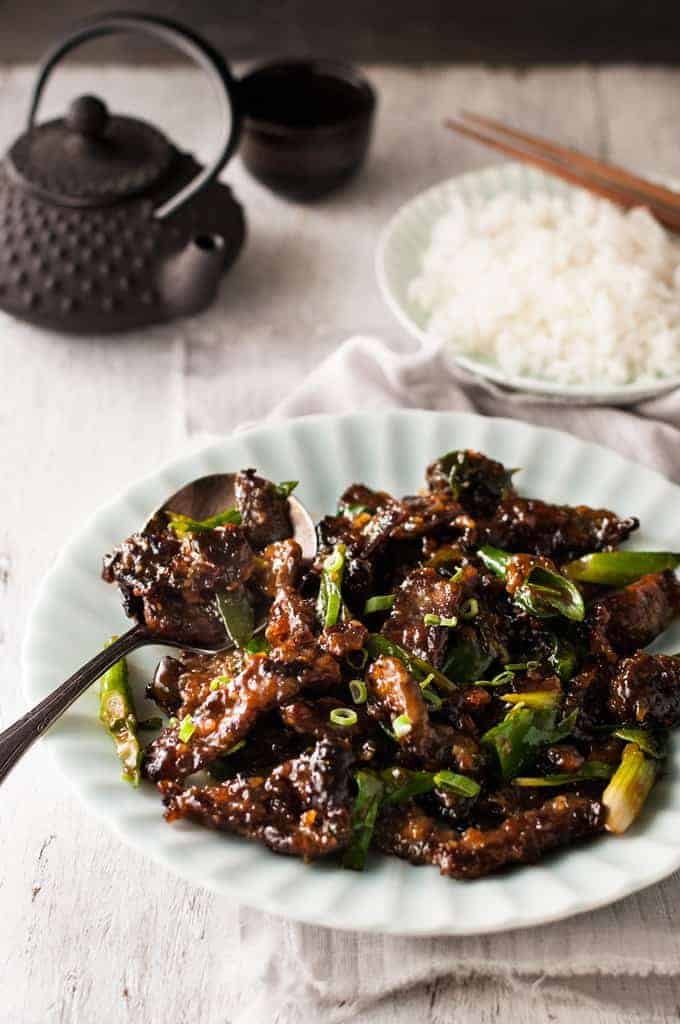
Super crispy pieces of beef coated in a sweet salty sauce = heaven in the form of a stir fry. PF Chang’s copycat – done right! Marinating the beef is key for packing in great flavour into every single bite.
This recipe is similar to Honey Pepper Beef Stir Fry – with the addition of the crispy beef!

Mongolian Beef
I cannot get enough of this Mongolian Beef. I am obsessed!
PF Chang’s is an Asian themed restaurant chain in the US. They seem to be everywhere – and it’s wildly popular. Because of its sheer popularity, I had to try it when I was in the US. I actually didn’t mind the Chow Mein that my friend got, but personally I found the Mongolian Beef too sweet and too oily.
I didn’t get it. I couldn’t understand what all the fuss was about, and why America is so obsessed with Mongolian Beef! Every single other food on my “must try” list that I had on my US foodie road trip was a home run. But Mongolian Beef? Disappointing.
But knowing how popular it is, I tried it again at a Chinese restaurant in LA. I had too, I was curious. This time, I scored! I understood! Made properly, it is absolutely addictive. Dangerously so.

What is Mongolian Beef – and what does it taste like?
For the Australians reading this, Mongolian Beef is similar to what we know as Szechuan Style Beef and Peking Beef. Thin slices of beef that is shallow fried so it’s super crispy then tossed in a sticky sauce.
It’s different to what we know as Mongolian Lamb which is not fried or crispy, and the sauce is not as sweet.
It’s the combination of crispy and sticky that makes Mongolian Beef SO good. See how thick and caramel-like the sauce is? The photo on the right is when the sauce is bubbling away, thickening and coating the beef. Heaven in a pan, that’s what this is. 🙂
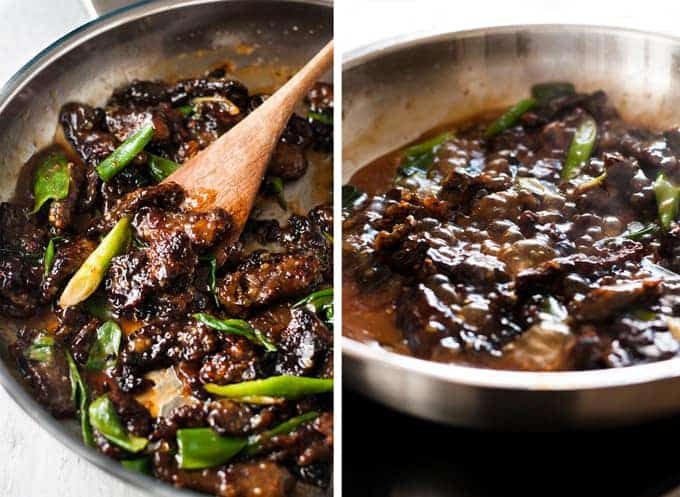
Did you notice that I made it in a skillet instead of a wok? To tell you the truth, normally I make it in a wok but I wanted to try it in a skillet too so I could provide directions for that.
It’s easier made in a wok because you can shallow fry the beef in the wok. But if you don’t have a wok, I recommend frying the beef in a small saucepan instead because the beef is cooked with only 1/4 cup of oil. If you use a skillet, then the oil spreads too thinly and you won’t get the same crispiness. After the beef is cooked, finish the rest of the recipe in a skillet. Easy!
In the crispy / sticky stakes, I have to say that this is right up there with Buffalo Wings. That is to say, if someone put a plate of this and a plate of Buffalo Wings in front of me, I am not entirely sure which one I would go for.
Actually, I do know. Probably both at the same time. 🙂
– Nagi x
PS I got side tracked and forgot to mention that I tried a few recipes I found on a mission to get the closest match to the Mongolian Beef I had at a Chinese restaurant in LA, not PF Chang’s which I didn’t enjoy very much. A few were close, but didn’t nail it. This recipe is from a blog called Woks of Life which is run by a Chinese family who used to run a Chinese restaurant in America. It’s my “go to” source for American Chinese recipes. Every single recipe I have tried has been an absolute ripper. Honestly!
WATCH HOW TO MAKE IT
Crispy Sticky Mongolian Beef recipe video!
Hungry for more? Subscribe to my newsletter and follow along on Facebook, Pinterest and Instagram for all of the latest updates.

Crispy Sticky Mongolian Beef
Ingredients
Beef and Marinade
- 8 oz / 250g beef steak (rump, scotch or flank), sliced into 1/5″ / 3mm slices (Note 1)
- 1 tsp soy sauce
- 1 tsp cornstarch/cornflour
- 1 tsp vegetable oil
Sauce
- 2 tsp cornflour / cornstarch
- 1/4 cup water
- 2 tbsp soy sauce (light or all purpose, NOT dark)
- 1/4 cup chicken broth
- 1 1/2 tbsp Chinese cooking wine or dry sherry, or more chicken broth (Note 2)
- 3 tbsp / 1/4 cup brown sugar, lightly packed
Crispy Beef
- 1/4 – 1 1/2 cups vegetable oil (Note 1)
- 1/4 cup cornstarch/cornflour
Stir Fry
- 1/2 tsp ginger, finely minced
- 2 garlic cloves, crushed
- 2 scallions/shallots, cut into 1 1/2″ / 4cm pieces on the diagonal
Instructions
Beef and Marinade
- Combine the Beef and Marinade ingredients in a bowl and marinate for 10 minutes (though you could even leave it overnight).
Sauce
- Mix the cornstarch with a splash of the water. Then add the remaining Sauce ingredients, including remaining water.
Crispy Beef and Stir Fry
- Add 1/4 cup cornstarch and use your fingers to lightly coat the beef.
- Heat 1/4 cup oil in a wok (Note 2) over medium high heat. Add 1/2 the beef and cook the first side for around 45 seconds or until golden and crisp. Then flip (I use an egg flip) and cook the other side for 30 – 45 seconds until golden and crisp. Remove onto a paper towel lined plate. Repeat with remaining beef.
- Discard the oil, leaving behind about 1 tablespoon in the wok.
- Add the ginger and garlic and sauté for about 15 seconds. Don’t let it burn!
- Add the Sauce into the wok. Bring it to a simmer and let it cook for about 1 1/2 minutes or until it thickens into a glossy sticky sauce.
- Add the beef and scallions, toss to coat and cook for a further 30 seconds.
- Serve immediately with rice – or for a low carb, low cal option, try Cauliflower Rice!
Recipe Notes:
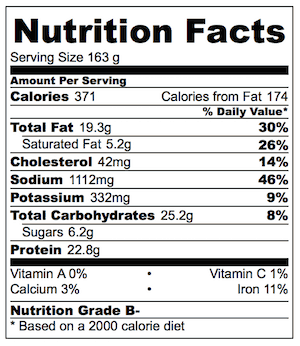
Nutrition Information:
LIFE OF DOZER
That time I washed all his toys…


I did it 😄 I’m a terrible cook so thought no way this will not turn out, meat was so tender and flavoursome.
Family loved it so I will be making this again for sure. I am in love with your website.
Thanks so much
You clearly are NOT a terrible cook! No putting yourself down around here 🙂 YOU ROCKED IT Tracey! N x
Delicious! Just ate this last night–everyone loved it from the 1year old, the 2 year old who is super picky, my 5 year old , and My husband and I loved it as well. Easy to make and a crowd pleaser–thank!
That’s so great to hear Mandy! Thanks for letting me know! N xx
Hi! I’m new to your blog. I was desperately searching for something that takes approx half an hour to prepare and I stumbled upon ur recipe (the picture for this recipe caught my eye!) So I just Made this and it’s fantastic! I can’t believe it turned out better than PF changs, no joke!! Can’t wait to try your other recipes .. They all look amazing.
WHOOT! So great to hear that Azadeh, thanks for letting me know! N x ❤️
Hi Nagi,
Made this last night and it was amazing, could we add some pepper to the marinade/ cooking stage to add some bite? Love a little bit of heat just not sure what would be best and when, Thanks
I’m so pleased to hear that Hilary! Thanks for letting me know! Marinade would be terrific, I would put it straight into the marinade! N xx ❤️
Nagi! Love the site and recipes, thank you.
I made a couple of your recipes tonight, this crispy sticky beef and the cashew chicken.
Do you use all the sauce made in the recipe? I found in both cases there seemed to be a bit too much, and they where not nicely coated like in your pictures 🙁 – would love to hear back to perfect your cooking 🙂
Hi Eddy, so glad you like my recipes, thank you! With the cashew chicken, there is definitely a lot, for soaking into the rice 🙂 With this one, you need to reduce it right down so it is basically all coating the chicken, there shouldn’t be pools of sauce left. 🙂 N x
I made this for my husband and I, and we both loved it! I’ve made it again since then and have passed the recipe on to family who have made this and LOVE it. We make a little extra sauce for rice and veggies, and everything is so yummy!
Thank you Nagi! Recipe Tin Eats is now my go-to for new recipes to try 🙂
I loved this recipe but there was too much cornstarch going on. The beef fried better without it and it gave an unpleasant texture to the food. But I will be doing this for a competition coming up. Thank you!
Hi Amanda! Did you definitely measure the cornstarch right?? There should be just enough to coat the beef well – it’s what makes it crispy! 🙂 N xx
I’ve tried and tested so many recipes online from different bloggers but have never made a comment till now. I cooked this tonight and it was SO delicious! My partner was so happy and ate so much that there wasn’t enough left for lunch the next day – despite even doubling the recipe! Thank you so much!
I’m so pleased you enjoyed this Rachel! Thank you for sharing your feedback. 🙂 N x
Nagi, can I add some green veggies like chinese broccoli to the wok when I add the beef or would you keep it seperate?
Hi Mary! I would stir fry veggies after the excess oil is drained off after cooking the beef. 🙂 So stir fry the veggies then add the garlic, ginger, sauce etc 🙂 N xx
Can this be made substituting chicken for the beef?
YES! SO GOOD with chicken!
Well Nagi, I’m usually not a fan of Chinese food since it’s usually too greasy for me. I just tried your recipe and apart from the crispiness that I didn’t get, it’s amazingly good! My husband loves it again and wants me to do it every night 😂 Thanks again for a great recipe!
I’m so pleased you enjoyed it Celine! Thank you for letting me know – N xx
Hi Nagi, I have been following your blog for a few months making various things – all amazing!!!! Last night I made this for my partner and it was incredible!!!! He loved it and immediately before even taking a 2nd bite retreats back to the kitchen to check how much leftovers I’ve made and ‘shotguns’ it for lunch today. I couldn’t get him to stop raving all night about this delicious dinner. Thank you so much 🙂
That’s wonderful to hear Leish, thank you for letting me know! N xx
I made this for dinner today and it was AMAZING!! Followed directions as-is, and it was perfect. Seriously so very good. Very much enjoy your blog. Your recipes are incredibly practical, great instructions and ll vital info is always present. Especially important for the food to turn out good, which your recipes always do. You’re quickly becoming one of mt favorite blogs to get recipes from. I’m an American that lives in Spain, so the gram measurements are wonderful. I’m also trying to eat healthy, so the calorie counts are beyond appreciated. Thank you so much for your wonderful blog with amazing recipes!!!!!
That’s so great to hear Melissa! So glad you enjoyed it – N xx
Made this sticky beef last night and it was delicious so much so that my husband wants us to make it again tonight. Love your recipes, easy to follow and love the nutritional information.
WOW what a compliment! 🙂 So pleased you both enjoyed it so much, thanks for letting me know Trudy! N xx
OMG, this is delicious! I couldn’t wait to try the recipe and I had no green onions on hand so I used a large yellow onion, half a green pepper and a chile, chopped them up and fried them in the wok after removing the beef. At the end, I tossed some dry fine rice noodles in hot oil for 5 seconds to add to the top (crispy) (like they do in restaurants). I served it with Thai fragrant rice. It was exceptional and I ate the rest for breakfast (cold) as I couldn’t stop drooling over it!!! Thanks so much Nagi, I am making it again tonight. Highly recommend!
AWESOME!! So thrilled to hear that Pam, thanks so much for letting me know! N xx
Forgot to leave 5 stars !
What can I say.. another keeper!
I made this three days ago, to rave reviews. Then my husband and son was at the local grocery store and proceeded to purchase the main ingredients for another yummy meal. 😀 { they read the recipe!}
I am obsessed with this dish even more. Thank You. !!!
That’s fantastic to hear Andrea! Thank you for taking the time to come back and let me know! N xx
Yum! Made this for dinner tonight, paired with jasmine rice and steamed broccoli.
Loved the flavour and ease of preparation of this recipe.
Can’t wait to make it again!
Thank you for mentioning The Woks of Life on your site. Your site and theirs are my favourites for dinner ideas. ☺
They are awesome! My go-to for all things Chinese takeout made properly 🙂 So pleased to hear you enjoyed this Sandra, thank you for taking the time to come back and let me know! N xx
Hi Nagi,
I doubled the recipe and added roti and a big salad and it still wasn’t enough. People were ripping up roti and trying to slop up the last of the sauce from the bowl.
Big smiles all round.
4 thumbs up, will make this again
What a response! I love hearing that!!! 🙂 So pleased everyone enjoyed it so much Jenny, thank you for letting me know! PS Roti…..loooove roti!
So Happy I found your website. Your recipes look delicious, but this was the first one i tried. It will not be the last, however. I really like the way you explain the steps. You have a real understanding of food. I’m looking forward to trying more of your amazing recipes.
I LOVE this recipe! I tweaked it slightly by adding a bit of Cayenne Pepper to add a bit of a bite and WOW! My husband loves it!
Thank you so so much!!
Oooh, I’m so glad you enjoyed this Ulrike! Thanks for letting me know! N x
This was really tastey, but it lost the crispy texture very fast. The sauce was also too thick, I had to water it down quite a bit.
Hi Brittanne! I’m glad you enjoyed the flavour 🙂 Yes as with most crispy things tossed in sauce, it does lose the crispiness but you still get that “shell” that absorbs all that delicious sauce!!