
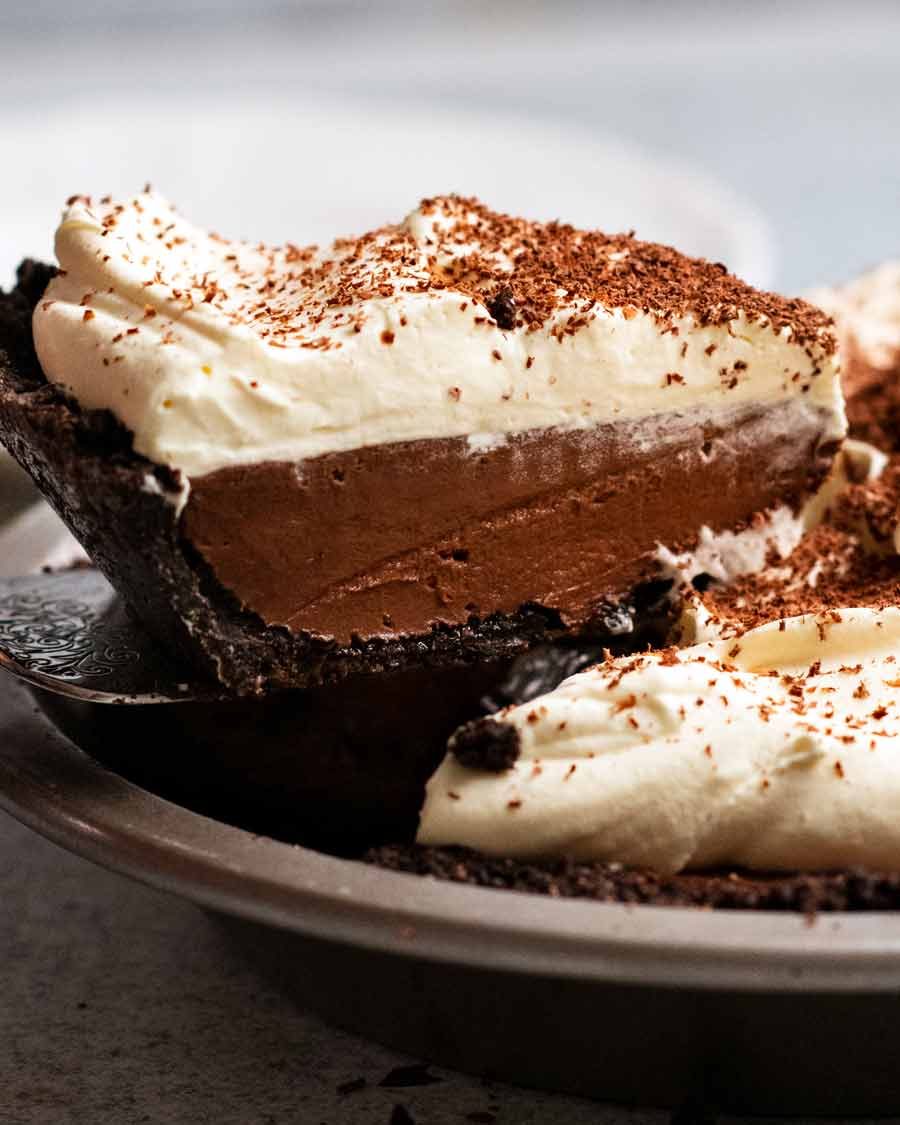
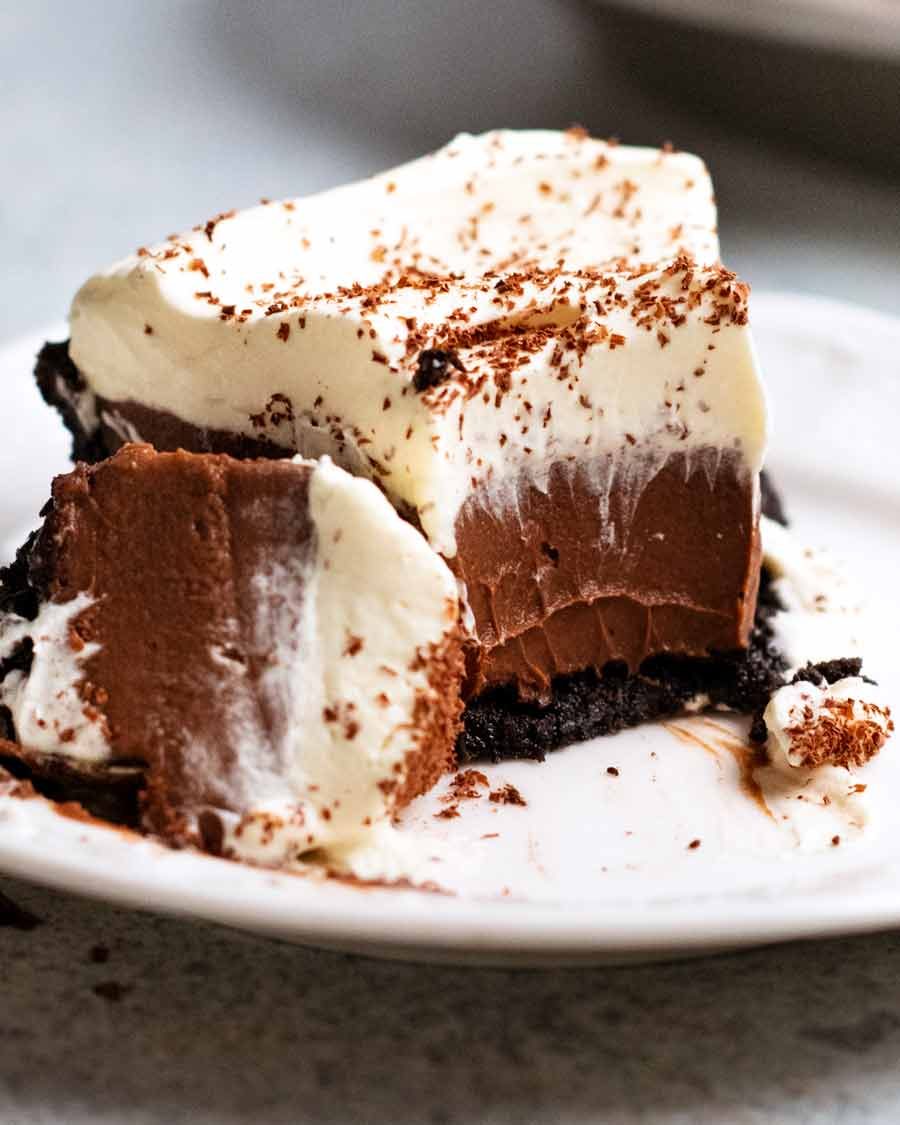
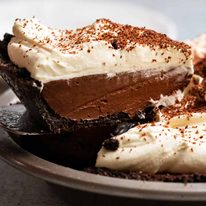
A magnificent Chocolate Cream Pie with a chocolate biscuit base, a creamy smooth chocolate custard filling, topped with clouds of cream. Also known as a chocolate pudding pie, it tastes like a cross between chocolate mousse and Chocolate Bavarian Pie!
Chocolate Cream Pie
As a kid, I’d get so excited on the rare occasion my mother would splurge on a chocolate bavarian pie. I’m talking about the kind sold in the freezer section of supermarkets. Not a fancy patisserie cake made with the beautiful French bavarian cream, crème bavaroise.
I thought it was the best thing ever. Just the right amount of crumbly biscuity base. That chocolatey creamy filling.
And it would still be the best thing ever had I not learnt to cook it myself! While the biscuit base isn’t too different, the chocolate layer is absolutely no comparison. Homemade has real chocolate flavour and a mouthfeel that store-bought never will.
My childhood bavarian pie also evolved with the addition of a generous cloud of whipped cream, which is just heavenly with the chocolate filling, Hence, re-christened as a Chocolate Cream Pie.
I could eat this every day. I predict you will feel the same!
What’s in a Chocolate Cream Pie
This Chocolate Cream Pie is a classic combination with:
chocolate cookie base – made from Oreo cookies which gives it an extra intense chocolate flavour.
chocolate filling – it’s essentially a pudding, a creamy-but-light custard chocolate filling. If you want to get fancy, it is in fact a type of French chocolate custard called crème pâtissière. Fancy it may sound, but it’s actually a surprisingly simple custard that you see contestants in reality cooking shows frantically stressing about making silky smooth and thick, rather than gritty and runny.
I’m sorry, but I don’t get it. It’s not hard to make. Not if you follow the very few simple steps required to make it! You’ll see in the recipe video. 🙂
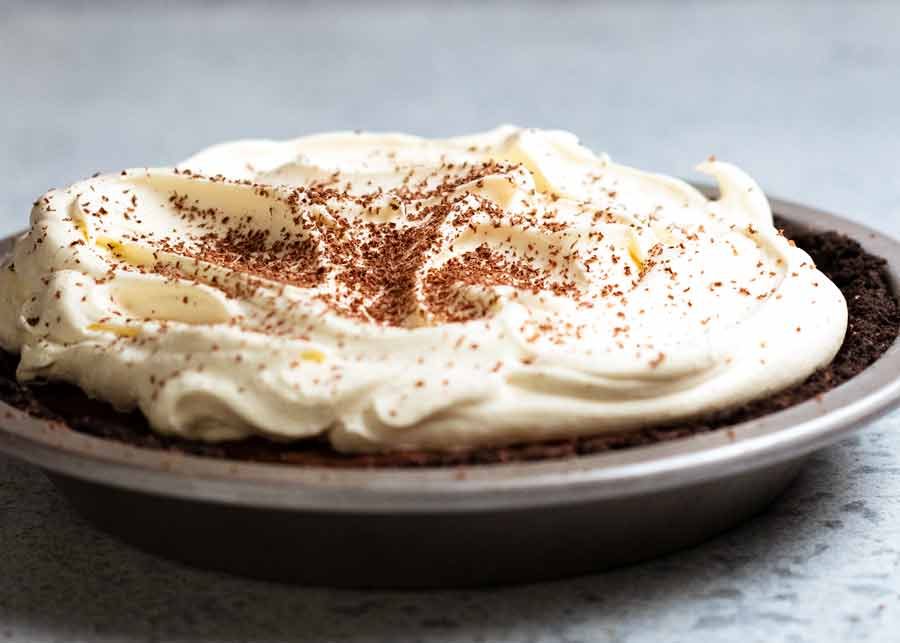
whipped cream – the pie is topped with a mound of fluffy lightly sweetened vanilla whipped cream.
Dreamy is a word that comes to mind!
Ingredients in Chocolate Cream Pie
1. Chocolate filling ingredients
This custard / pudding is thickened with a combination of cornflour/cornstarch and egg yolks, enriched with butter and cream and flavoured with melted chocolate. It is DIVINE!
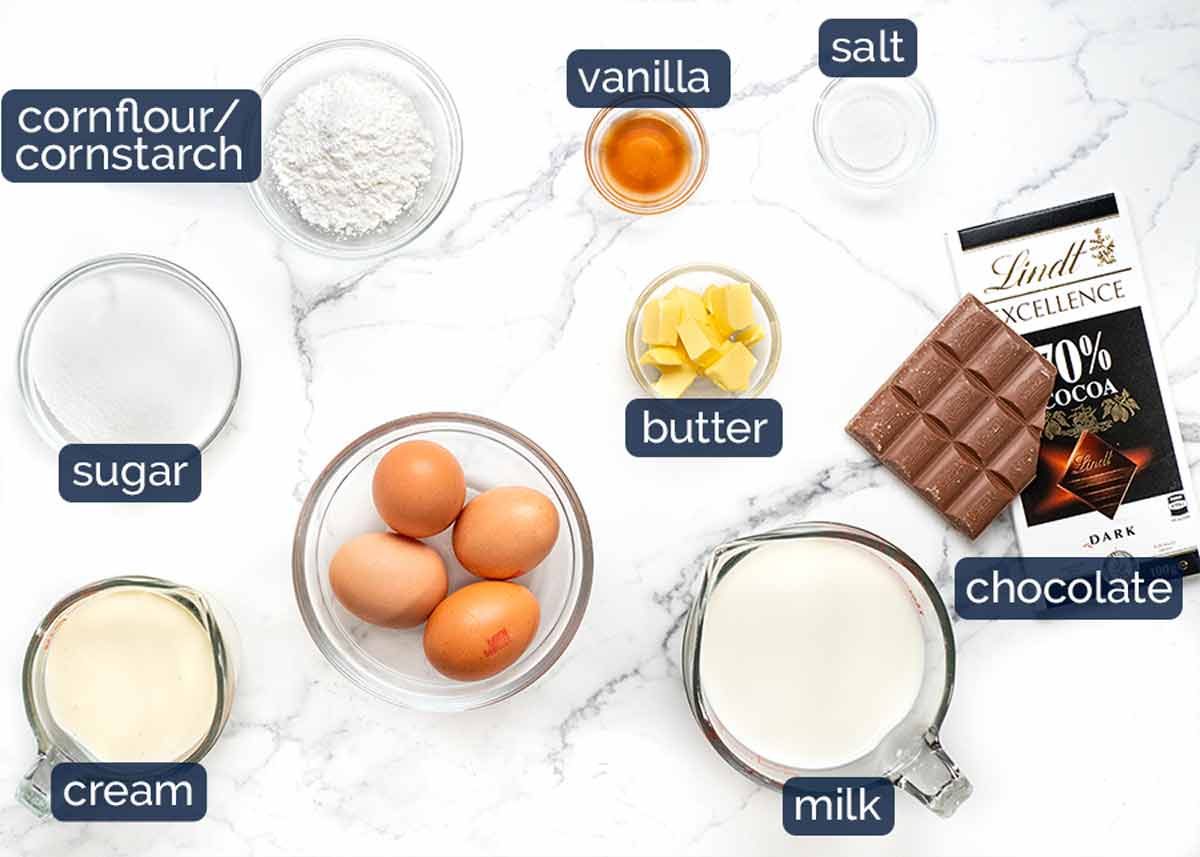
Chocolate – I use a combination of 70% cocoa dark chocolate and milk chocolate for my ideal balance of chocolate flavour intensity (70% cocoa) and creamy chocolatey-ness (milk chocolate).
Egg yolks – This helps the custard thicken and set as well as giving it a luxurious mouthfeel that frozen Sara-Lee chocolate bavarian pies can ever compare to!
Also, here is a list of what I do with leftover egg whites.
Cornflour / cornstarch – This is also used to thicken the custard.
Cream and milk – The liquids for the custard. Cream is not typical for custards but it adds richness here! You can just use milk, if you’d prefer.
Butter – This adds yet more richness into the custard.
Sugar for sweetness (this is not overly sweet), vanilla for flavour and a pinch of salt to bring out the flavours (standard sweet baking practice these days).
**Forget Cool Whip** Shortcut recipes for chocolate pie fillings are pretty common on the internet. Some are made with Cool Whip (Australia, we don’t have this and I hope we never do, it’s an artificial thickened “cream” filling), or boxed chocolate pudding powder, marshmallows (too sweet for my taste), or a simple ganache filling (which is very dense and very rich).
For me, I believe that there are some things that should be done right. And if we’re going to make a homemade Chocolate Cream Pie – let’s make the best one we can! I promise it trumps boxed pudding powder. 🙂
2. Oreo Cookie pie base ingredients
I like making Chocolate Cream Pie with an Oreo Cookie pie crust. Made with crushed Oreo cookies, there’s terrific texture contrast with the creamy filling and an extra hit of chocolate. I also like the dark almost-black colour.
Here’s what you need:
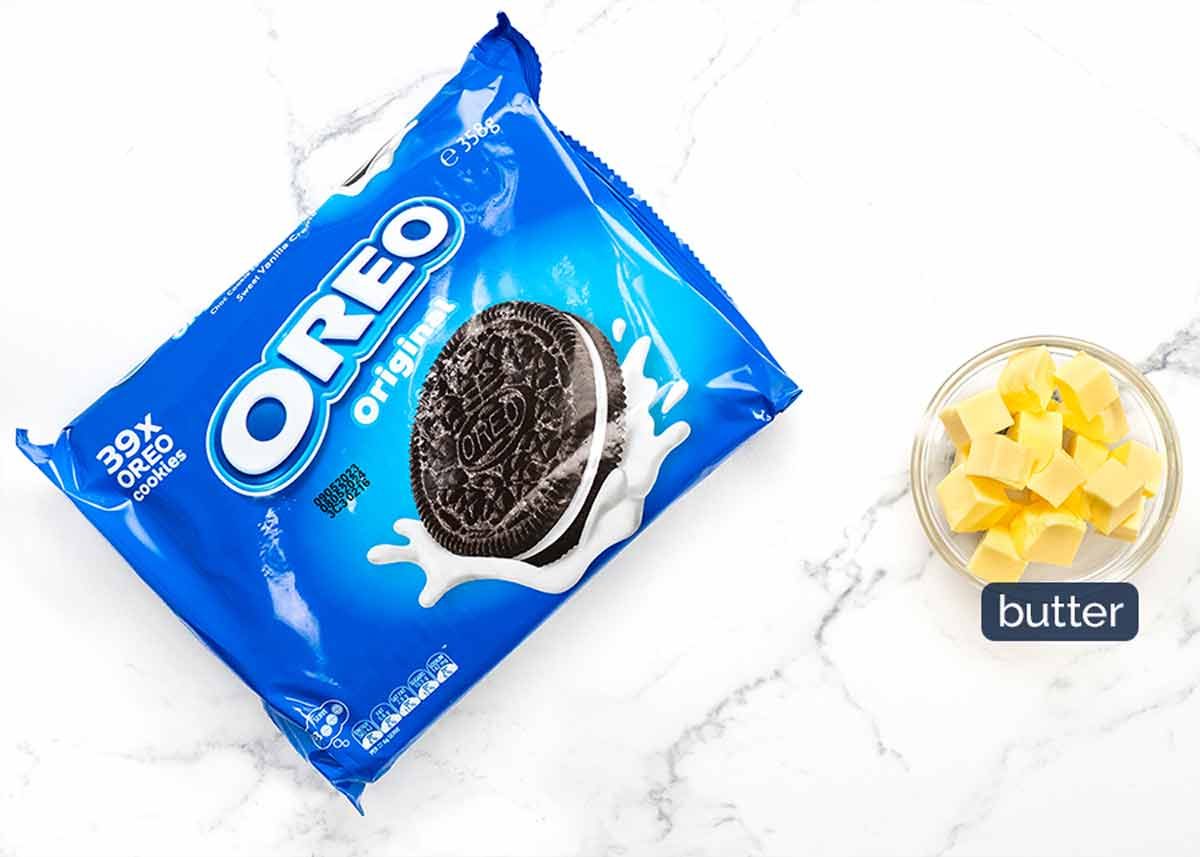
Oreo biscuits – I like using Oreo cookies for the texture and flavour, I find they’re more chocolate-y than most other chocolate biscuits. But any plain chocolate biscuits / cookies will work fine here, such as Arnott’s Chocolate Ripples.
Melted butter – This is what makes the Oreo crumbs hold together to form a crust.
vanilla Whipped cream
And here’s what you need for the fluffy mound of whipped cream:
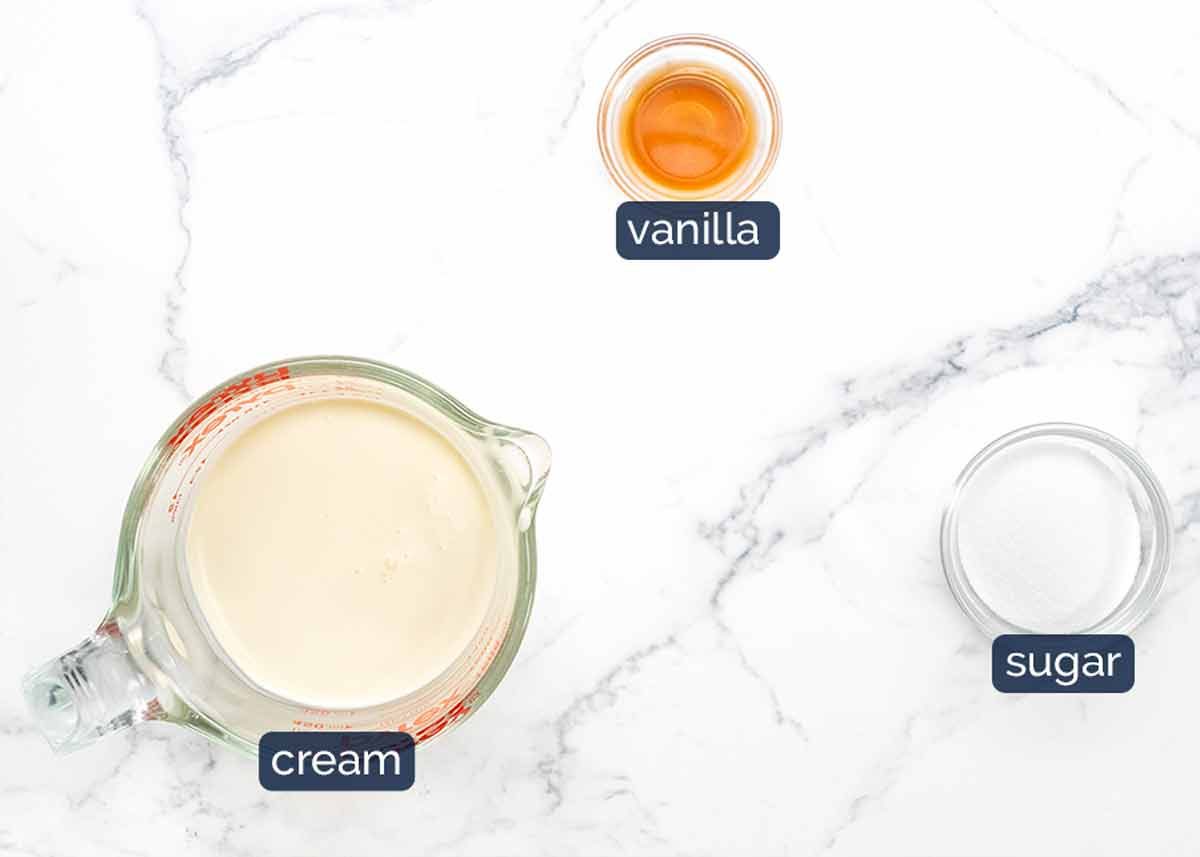
Whipping cream – Make sure you use cream that can be whipped. Not all creams are, some are made for just pouring or dolloping. Read the label to check. And – NO LOW FAT! 🙂
Vanilla for a touch of lovely flavour.
Sugar – Not too much. Just a bit, to lightly sweeten.
How to make Chocolate Cream Pie
This is an almost no-bake recipe. The crust is baked for 10 minutes to make it extra crisp. The custard-pudding filling is cooked on the stove, poured into the crust then refrigerated overnight to set.
1. how to make the pie crust
I use a food processor to blitz the Oreo cookies. It takes seconds!
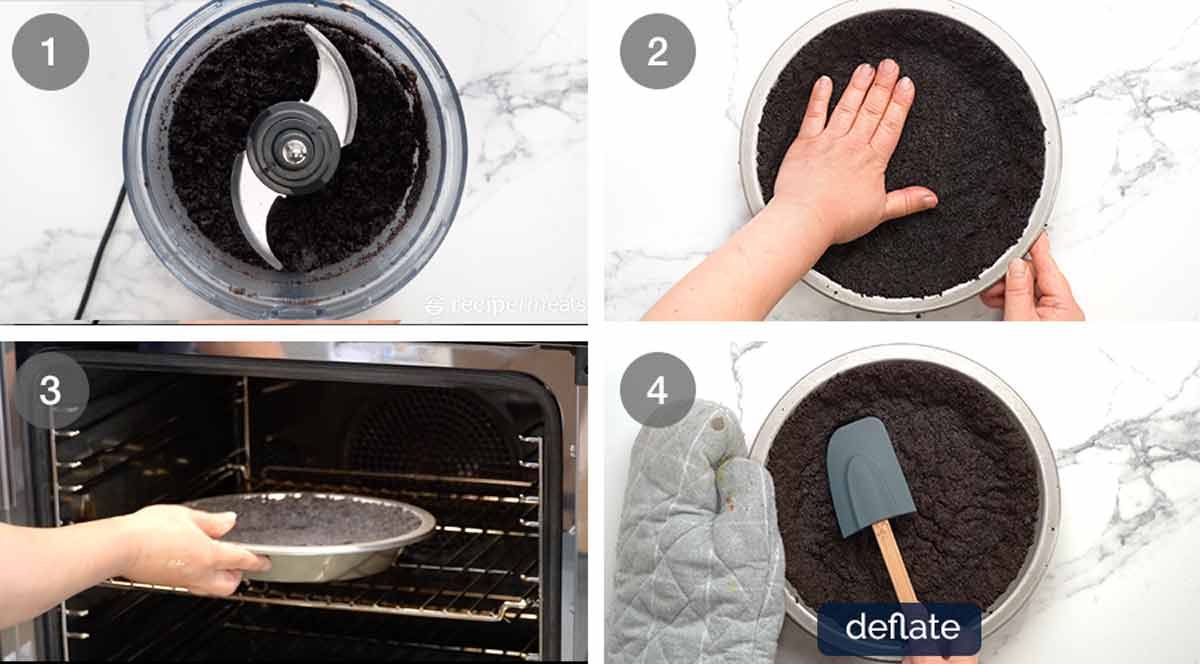
Blitz – Roughly break up the Oreo cookies by hand and drop into a food processor. Blitz into fine crumbs (~5 – 10 seconds). Add melted butter then blitz briefly just to mix through. The mixture should resemble wet sand.
Press – Pour into a 22.5cm/9″ pie tin. Use your hands / rubber spatula / something flat to press the crumbs firmly into the base and walls.
Bake for 10 minutes at 180°C/350°F (160° fan-forced). This makes the pie crust crisper.
Deflate – The crust puffs up in the oven. Gently deflate using a rubber spatula or similar – the base and walls. This too makes the pie crust crisper and firmer.
2. how to (EASILY) CUT A ROUND FROM PAPER
Before we get into the fun chocolate filling making part, a quick little tip for how to cut a circle from paper. Do this before you start the custard so you can cover the custard as soon as you pour it into the crust. It prevents a skin from forming on the surface which starts pretty quickly.
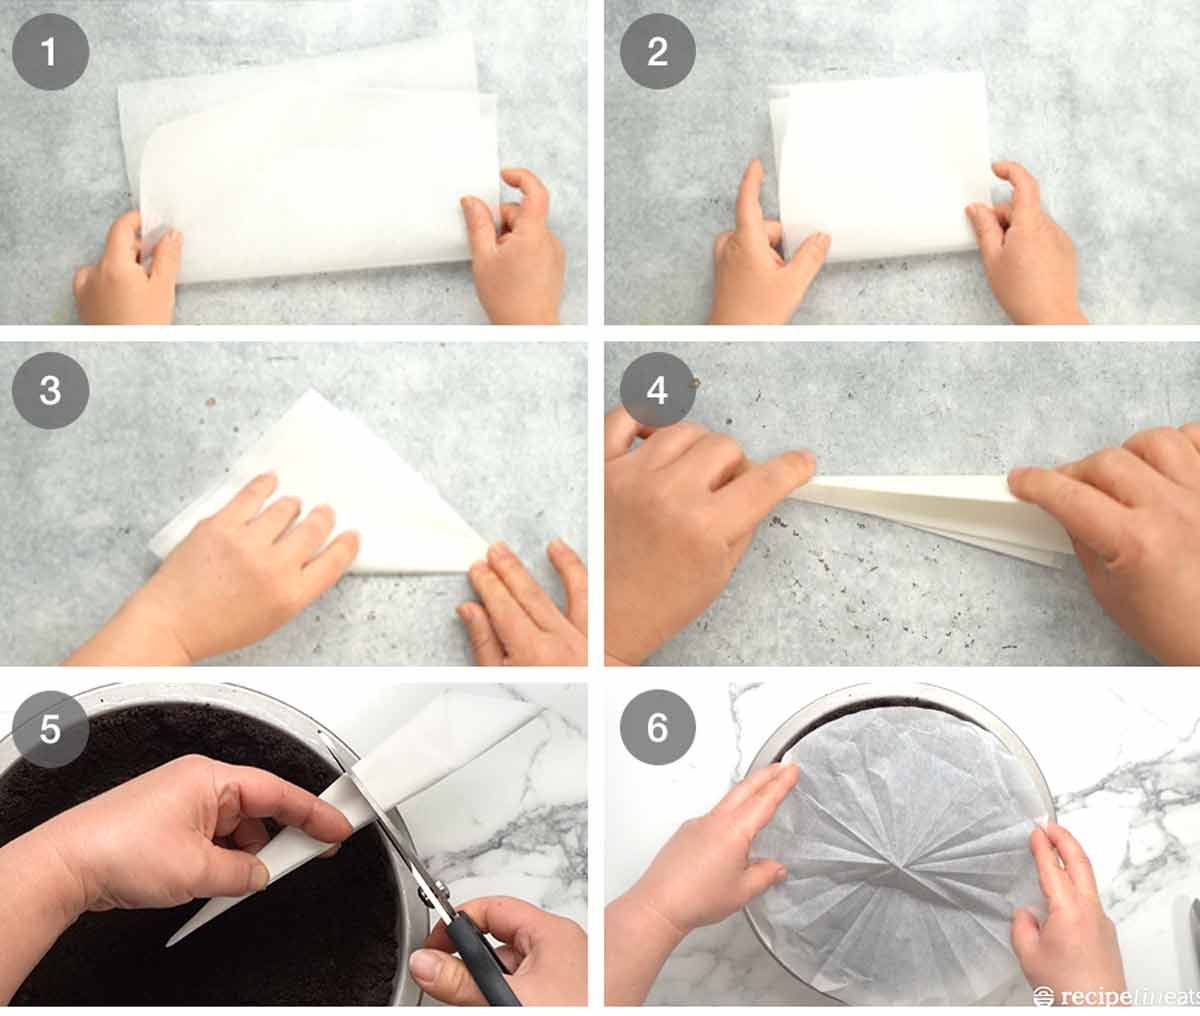
Baking paper – Tear a sheet of baking paper larger than the pie tine, then fold in half.
Fold in half again.
Then fold into a triangle.
Keep folding to form a long thin triangle.
Measure how large your pie dish is by placing the tip of the triangle above the centre of the pie tin. Cut off the end.
Then unfold. Voila! Neat circle that covers your pie!
3. how to make the chocolate filling
The chocolate filling ingredients are simply whisked on the stove which thickens into a custard as it heats up. The custard is pourable when hot, then sets so it’s cuttable once refrigerated.
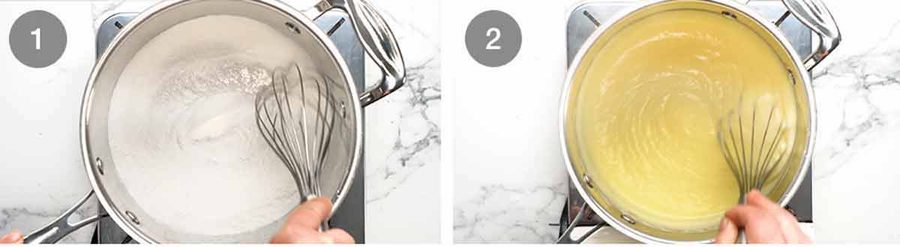
Whisk dry – Place cornflour, sugar and salt in a medium saucepan. Whisk to combine.
Add liquids – Add milk, cream and yolks. Whisk to combine. Then whisk every now and then over medium high heat (or medium for strong gas stoves) as the mixture is heating up. Once the liquid is hot (around 3 – 5 minutes, you’ll see steam), turn the stove down to medium low and start to whisk constantly to ensure the base doesn’t catch. You will feel and see the mixture starting to thicken into a custard.
45 second whisk to finish – When the mixture starts bubbling (around 4 minutes), whisk constantly for 45 seconds then take it off the stove. To see the bubbles, you will need to pause whisking. They will be slow, lazy bubbles! See video at 1:49 here.
Lumps? Don’t fret! Take it off the stove and whisk vigorously, you should be able to whisk them out. Once smooth, return to the stove and continue. As a last resort, you can strain the custard at step 5.
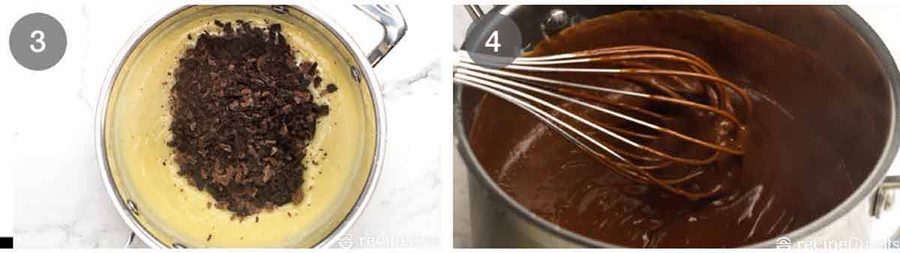
Melt in chocolate – Remove off the stove. Add butter, chocolate and vanilla and whisk until the chocolate melts and the filling is smooth.
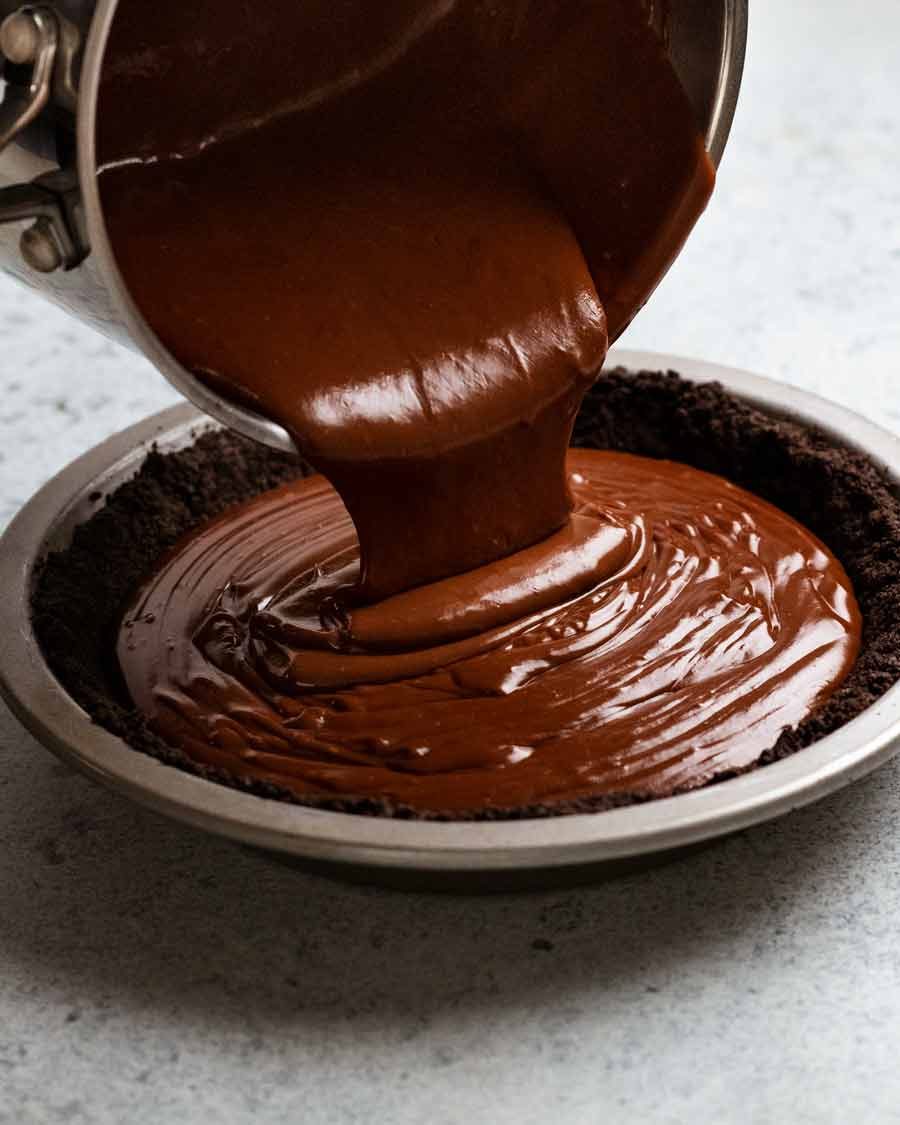
Thickness – The custard should have a thickness like honey. It will be pourable, but won’t mound.
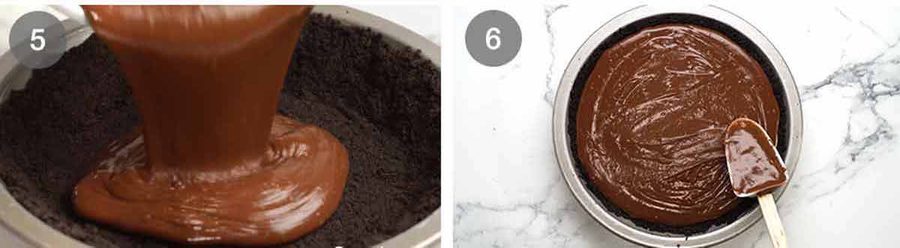
Pour the custard straight into the pie crust.
Smooth the surface.
4. Setting and decorating

Cover – Immediately cover with a round piece of baking/parchment paper, pressing lightly so it is in contact with the surface. This will prevent a skin from forming. (Don’t use cling wrap, you’ll peel a thick layer of custard off which I know you’re thinking well then I get to lick it all off! But the reality is it’s actually quite difficult to do off cling wrap. Yes, I know from first hand experience. Stick with paper!!)
Refrigerate for 12 hours+ – Cool on the counter. Then refrigerate for 12 hours+ to ensure the custard fully sets.
Don’t try to shortcut it and don’t think that you can cut a slice at the 3 hour mark because it seems pretty set! If you cut out a slice before it’s fully set, you will break the custard in the whole pie and it will never set again. Again, I know this from first hand experience from testing variation iterations of this Chocolate Cream Pie as well as this recipe, this recipe and this recipe!
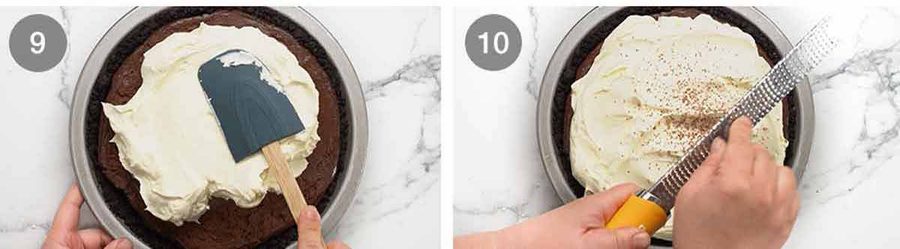
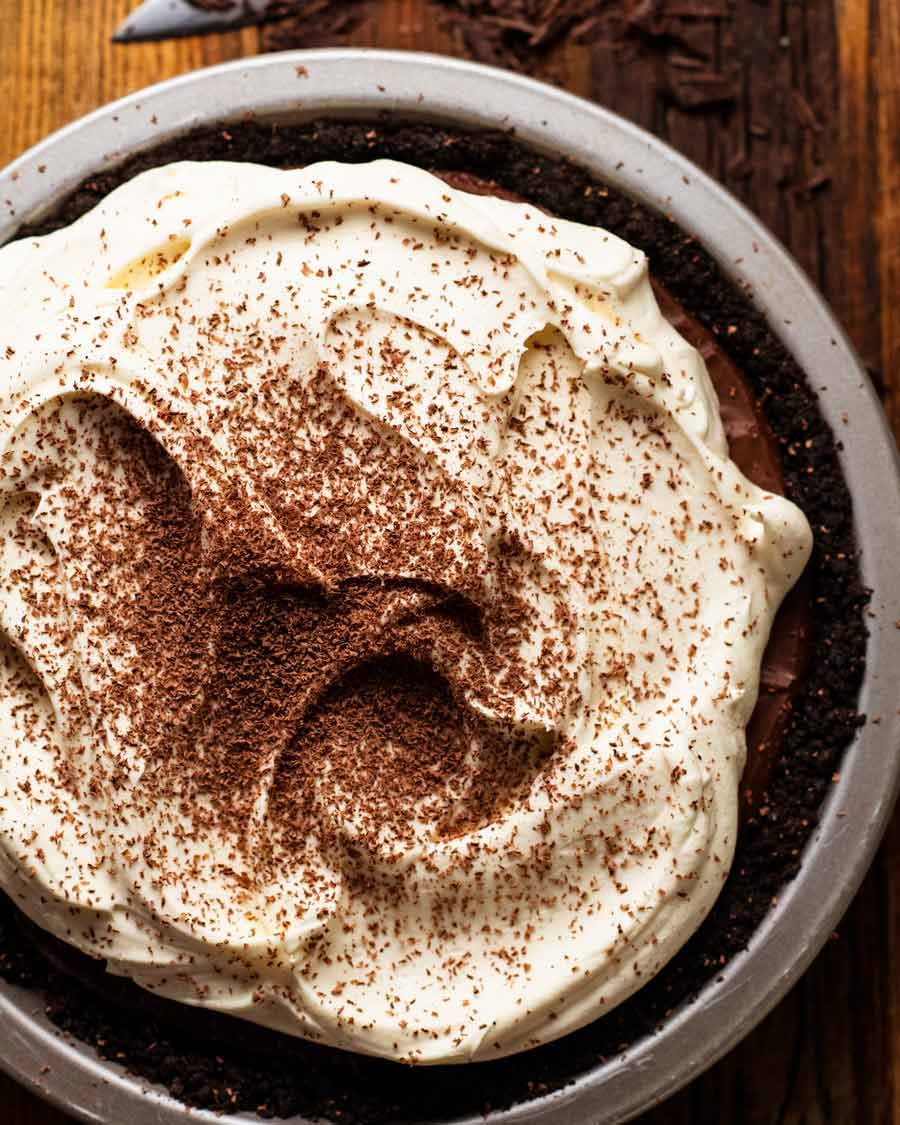
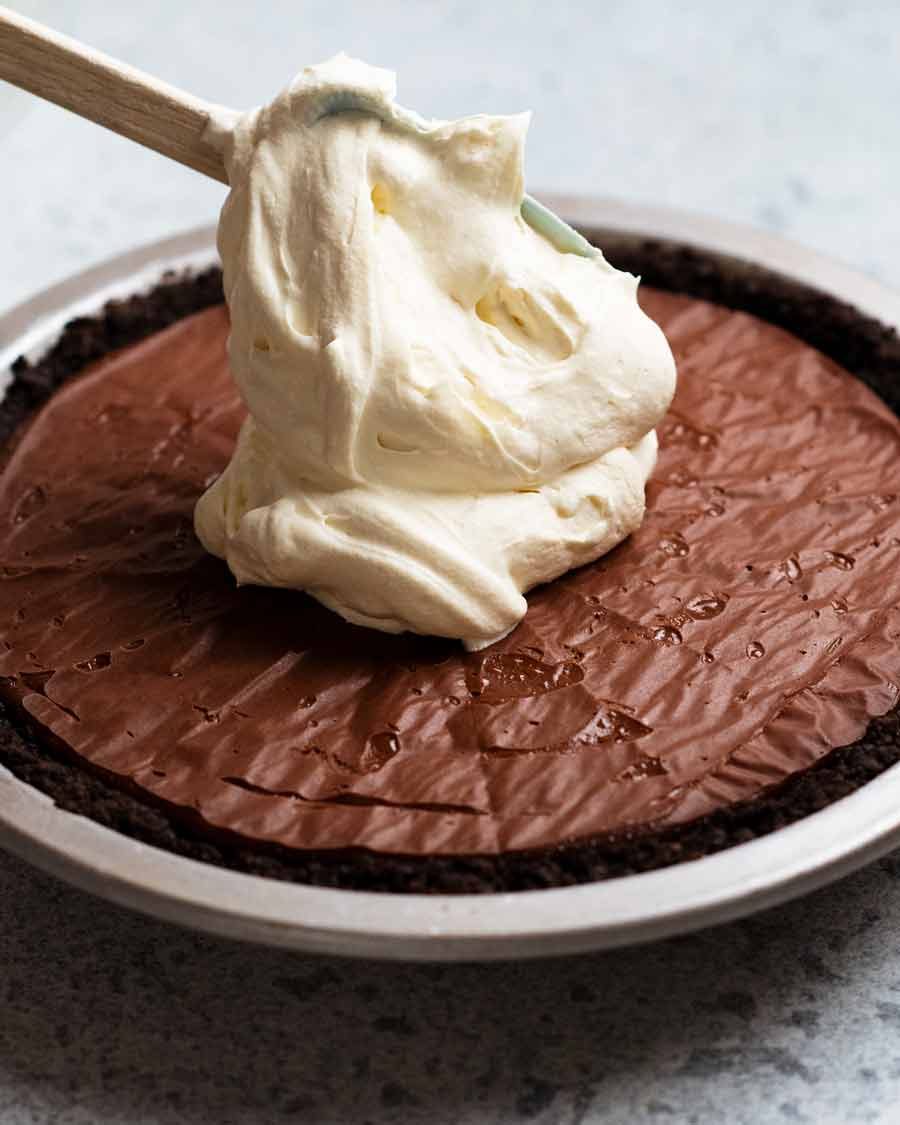
Cream – Carefully peel off the paper then top with whipped cream.
Garnish with a sprinkle of grated chocolate, if desired. Then, it’s ready to devour!
Matters of serving and eating
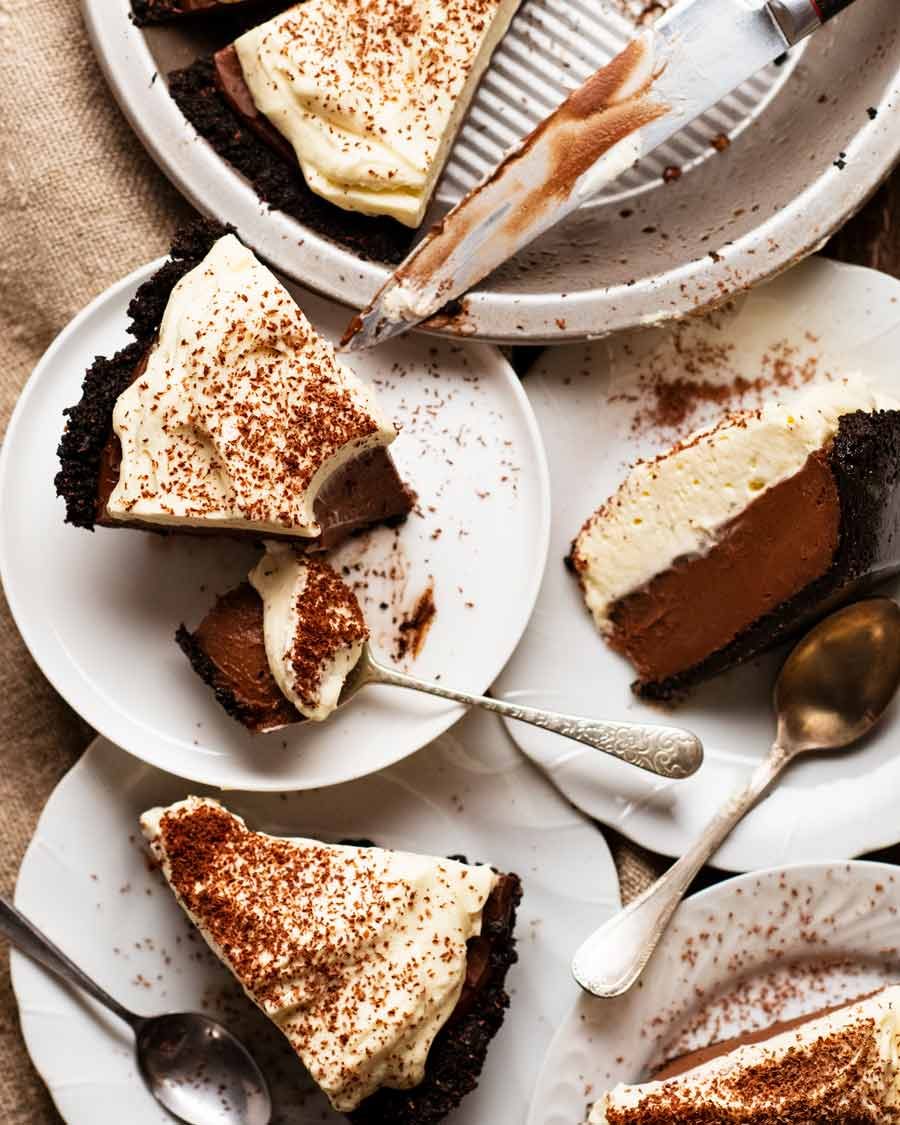
Because it’s a pie, it’s best to serve it out of the pie tin. Removing the whole pie would be risky! Cut in the pie tin and lift (pulling the first slice out neatly is always a little tricky, if necessary, I will resort to a rubber spatula to get right underneath). The Oreo cookie crust holds together when sliced (see video and photos) but it crumbles a bit as you start eating it which makes the whole eating experience even better. Because, imagine this:
A big mouthful of rich, smooth, chocolatey filling with clouds of fluffy cream PLUS little bits of crumbled Oreo cookie…..
It’s just perfection! – Nagi xx
PS If you want to make this ahead, do it up to 2 days ahead without the whipped cream weeping, then stabilise the whipped cream by adding marscapone. Information about stabilised whipped cream here, recipe is in the notes of the recipe card below.
Watch how to make it
Hungry for more? Subscribe to my newsletter and follow along on Facebook, Pinterest and Instagram for all of the latest updates.
Chocolate Cream Pie
Ingredients
Crust:
- 25 Oreo biscuits , whole with filling in tact (244g / 8.5 oz) (Note 1)
- 60g / 4 tbsp unsalted butter , melted
Filling:
- 1/4 cup cornflour / cornstarch
- 2/3 cup caster sugar (superfine sugar)
- Pinch of salt
- 2 cups milk (whole or reduced fat, not zero fat)
- 1 cup cream (pouring or thickened/heavy), or sub with milk (Note 2)
- 4 egg yolks from large eggs (Note 3 for leftover whites)
- 2 tbsp / 30g unsalted butter , cut into 1cm / 0.5" cubes
- 1 tsp vanilla extract
- 150g/ 5 oz dark 70% cocoa chocolate or bittersweet chocolate, finely chopped (Note 4)
- 75g/ 3 oz milk chocolate , finely chopped (Note 4)
Whipped cream
- 1 1/2 cups thickened / heavy cream , for whipping
- 2 tbsp white sugar
- 1/2 tsp vanilla extract
Optional garnish
- Chocolate , for grating (optional decoration)
Instructions
- Preheat oven to 180°C/350°F (160° fan-forced).
- Cut round paper – Cut a round piece of baking / parchment paper, the size of the pie dish (to prevent skin forming on custard). (Note 5)
Oreo cookie crust:
- Blitz – Break up Oreos roughly by hand and place in a food processor. Blitz into crumbs (~10 sec). Add butter, blitz to mix through. Mixture should resemble wet sand. (No food processor? Bash in ziplock bag with a rolling pin).
- Press – Pour into a 23cm / 9" pie dish. Spread crumbs out and press firmly into the base and up the walls using your hands, spatula or something flat.
- Bake for 10 minutes. Remove from oven – the crust will be slightly puffed. Press down gently using a rubber spatula (makes it even crustier!) then allow to cool on the counter before filling.
Filling (see video, it's helpful):
- Whisk dry, then wet – Place cornflour, sugar and salt in a large saucepan. Whisk to combine. Add milk, cream and yolks. Whisk to combine.
- Heat to thicken – Turn heat onto medium high. As the mixture warms up, whisk every now and then, but not constantly. As the liquid starts to get hot at around the 3 – 5 minute mark (you'll see steam), turn the stove down to medium low and start to whisk constantly. You will feel and see the mixture start to thicken. Got lumps? See Note 6!
- 45 second whisk – When you see slow, lazy bubbles (~6 minutes, you will need to pause whisking to see bubbles), whisk constantly for 45 seconds then take it off the stove.
- Chocolate and butter – Add butter, chocolate and vanilla. Whisk until chocolate melts and filling is smooth.
Assembling / setting custard
- Pour hot filling into pie crust, filling it right to the top, smooth surface. Gently place round baking paper on surface. (Surplus custard? Note 7)
- Cool on the counter for 2 hours then refrigerate for 12+ hours to allow the custard to fully set.
- Whipped cream – Beat whipped cream ingredients in a bowl on high for 2 to 3 minutes until softly whipped.
- Topping – Carefully peel back paper. Pile on the whipped cream, then grate chocolate across the surface.
- Serving – Keep the pie in the pie tin. Cut and serve!
Recipe Notes:
Nutrition Information:
Originally published in 2017. It’s such a personal favourite, I really wanted to re-publish it with better photos and a much improved recipe video. My skills have improved over the past 5 years with lots of practice!
Life of Dozer
Normally when I re-publish a recipe, I add a new Life of Dozer photo. But this one from 2017 is so lovely, I don’t want to change it!
From 2017, as originally published:
Not just food photos that Dozer photobombs….. This is a magnificent sun rise we had earlier this week. Once a year thing. Pretty, isn’t it?

This is going to seem odd but I am making a vegan chocolate pie (home made chocolate pudding, *attempt to* whipped coconut cream and the oreo base). I was wondering if I can replace the butter in the oreo base with coconut oil?
Hi Chantelle! I am not sure because I have not tried it but I think it will be ok! 🙂 N xx PS It does not sound weird at all.
Dynamite! Added a handful of white chocolate chips to give it added dimension. Came out scrumptious. Almost too decadent. Almost. Thank you!!!
That’s so great to hear Sarah! So pleased to hear you enjoyed this! N xx
Hi Nagi, I really want to make this but I haven’t got a round pie dish. Do you think I could get away with using a flan/quiche tin? x
This was the absolute best chocolate cream pie I have ever made! You really have a knack for great flavors! Thank you sooo much. You make me look like a star to my kids whenever I use one of your recipes! And teenagers, I have 3, are really critical!
I’m so pleased to hear you and the kids enjoyed this Amy!! Thanks for letting me know – N x
Hi Do you use all of the oreo biscuits including the white filling?
Yes!!
When doing the filling is the cream, heavy cream?
Hi Julia! Yes heavy cream 🙂 N x
I don’t usually make sweets, but we had friends over for dinner last weekend and it was a massive hit!
So easy to make, not too sweet but oh man, that Oreo base was amazing.
Served some leftover pie to my mother-in-law the next day and she demanded I give her the recipe 😃
Thanks as always Nagi!
MIL asked for recipe?? 🙀
I absolutely loved this pie, it was even more delicious than the pictures 😊😊 I am a young stay at home mum with little kids running around so I love your website for the most delicious and so easy recipes to fill up my kids and hubby’s Tummys and mine of course! I have even passed this recipe on to my mum who baked it and it was a huge hit from her too! All the way from Newzealand thank you for your delicious recipes for a busy mum who loves to cook x
That’s so great to hear AR! Thanks for letting me know – N xx
I made this for a bit party we had not long ago, and it was the star of the show- people still rave about it and it’s already been requested by some of our ‘regular’ guests for our next party. Thankfully I made two, and no one missed out. Just like most home cooks have a few little secret ingredients or tricks, I have my own- you! 😉
Ps- this is not only insanely delicious, it’s so damn easy and quick to make! Plus it keeps really nicely for a few days! Winner on all counts.
XX
Sarahanne
So fantastic to hear that Sarahanne, thanks for letting me know! N xx
This would have to be the best flavoured chocolate cream pie I have ever eaten. I do have a favourite which is made with marshmallows and thought nothing would ever beat it. But omg this is the BEST. Although mine did not set firm enough for my liking, is there anything I can do to make it set firmer?. I did use large egg yolks. It set for 24hrs. Would 1 teaspoon of gelatine dissolved in water be okay, or more cornflour? I have never used oreo biscuits before and the flavour was so delicious, better than using ordinary chocolate biscuits which can be very rich. this pie will be on the xmas menu. Thankyou for sharing your delicious recipes. 🙂
WHOOT!!! I’m so pleased to hear you enjoyed it Wendy! I don’t think you need to resort to gelatine. There are two things that makes it set – how long it is cooked and the amount of cornflour. You could try adding 1 tbsp extra cornflour / cornstarch OR whisk for an extra 30 seconds after it starts bubbling ON the stove (i.e. 45 sec per recipe + 1 minute extra), then follow recipe. I would not do both – I think that will set it too much. 🙂 N xx PS how soft was it? So when you cut it, did it hold it’s shape?? Did you count to 45 when it started bubbling?
Hi Nagi,
Do you know any good carrot cake recipe?
YES!!! This is the BEST! –> https://promotown.info/dorothys-carrot-cake/%3C/a%3E%3C/p%3E
is this recipe okay for pregnant women (i.e., are the eggs cooked enough?) thanks
Hi Amber! To be safe, I’d avoid custard, the eggs are not cooked at a high enough temperature. 🙂
This went down a treat, but I need to recommend reducing the baking time of the Oreo crust depending on the type of pie dish used. I have a metal/non stick tin and 15 minutes baking resiulted in an overcooked crust, I would say 7-10 min would have been adequate. Nevertheless, it’s on the ‘bake again’ list! Thanks Nagi
Thank you for reminding me Tamarra. I’m sorry it was overcooked, you’re right, it cooks faster in a metal tin. I’ve updated the baking time to 10 minutes because that is adequate for both glass and metal (rather than having to specify different times for different pans!). N xx
It was so easy and a great no bake dessert. The first day it had a very strong dark chocolate flavour, but tasted it 2 days later, it was absolutely Devine. So this dessert improves with time. Will be making it again and again. Anyone not too fond of dark chocolate can reduce it and replace with milk chocolate.
I’m so pleased to hear that Anisha!! Thanks for letting me know! N xx
Why oh why are you doing this to me Nagi!! ?
I just decided to finally go on a diet when I saw this post!! Although mind you.. I’ve been postponing my diet for 10 years so I guess 1 more day can’t hurt right? Bahaha.
Absolutely cannot wait to devour this.
P.S I actually have gained weight since I discovered your blog a couple of months ago haha! And there are absolutely no regrets. None. Best thing that has ever happened to me!
BA HA HA! Phyllis, that’s me through and through…..my diet is (always) starting on MONDAY!
Good morning, I like everything you do. I would be grateful if you would tell me the amounts in grams. Well I am Spanish and we measure in grams.
Greetings,
Carmen
Hi Carmen! Thank you for reminding me, I always forget 🙂 I just updated it. Another reader couldn’t see updates I made to recipes using this new plugin I’m using, if you visit the recipe again, could you tell me if you can see the updates? I added grams and ml for all ingredients. N xx
Yes, it has been updated.
Thank you,
Carmen
hi nagi. YUM … cannot wait to make this !!! have you tried a chocolate mousse filling instead of a custard filling? thanks
Hi Amber! I haven’t but it would definitely work. I have chocolate mousse on my list of recipes to share!! N xx
HOW did I miss this on Friday? Oh, wait, St. Patrick’s Day living in Ireland… a very probable cause. But maybe just as well. After baking a fruit cake, a marzipan and cherry cake and a flapjack over the long weekend, this might just have been too much. Next week it is then. Thank you, Ms Magnificent.
I imagine most of Friday was a blur for you!!!! N xx
Hi Nagi!! I’ve started making this pie today and will finish it off tomorrow. I was going to wait until I finished it to comment here so I won’t spam your comment section!!, but I was so impressed with the chocolate filling that I just have to tell you straight away that IT IS AWESOME!!! It tastes AMAZING!!! I could almost say, Forget the pie – just give me the filling!! Hahaha!! I see what you mean about needing to get this pie away from you, as I can already tell that this is going to be the most delicious thing ever when I finally taste test tomorrow! 🙂 🙂
WOO HOO! To hear that from you is amazing validation, thank you Jamieanne!! And I think you’re onto something there – that filling is basically chocolate custard so you can actually pour it into individual dishes and serve it as puddings!! I hope you LOVE IT!!! N xx
Thank you, Nagi! I finished the pie today! We absolutely love it! I brought some slices along for some of my friends when I went to pick up my kids from school this afternoon – they loved it, too! I will definitely be making the chocolate custard filling again, it was my favorite part!!! It was so easy and delicious and would be lovely served just on its own!! So dreamy!! 🙂 🙂
Nagi that is so unfair! how can we resist this MAGNIFICANT chocolate pie!
Who can resist Dozer in the sunset photo.. no me.
Oh well, I shall have to make this pie on saturday. It must be done!