
This Cheese and Garlic Crack Bread is EPIC! “Crack bread” is an appropriate name for this because it’s garlic bread – on crack…..
It’s basically a cheesy garlic bread, but so much more fun AND delicious! Cheese, garlic and bread – in pull apart bread form. You can’t go wrong. Guaranteed to be the most popular thing at any gathering you take it to!

A CHEESY PULL APART GARLIC BREAD
“You will never be able to look at garlic bread the same again….”
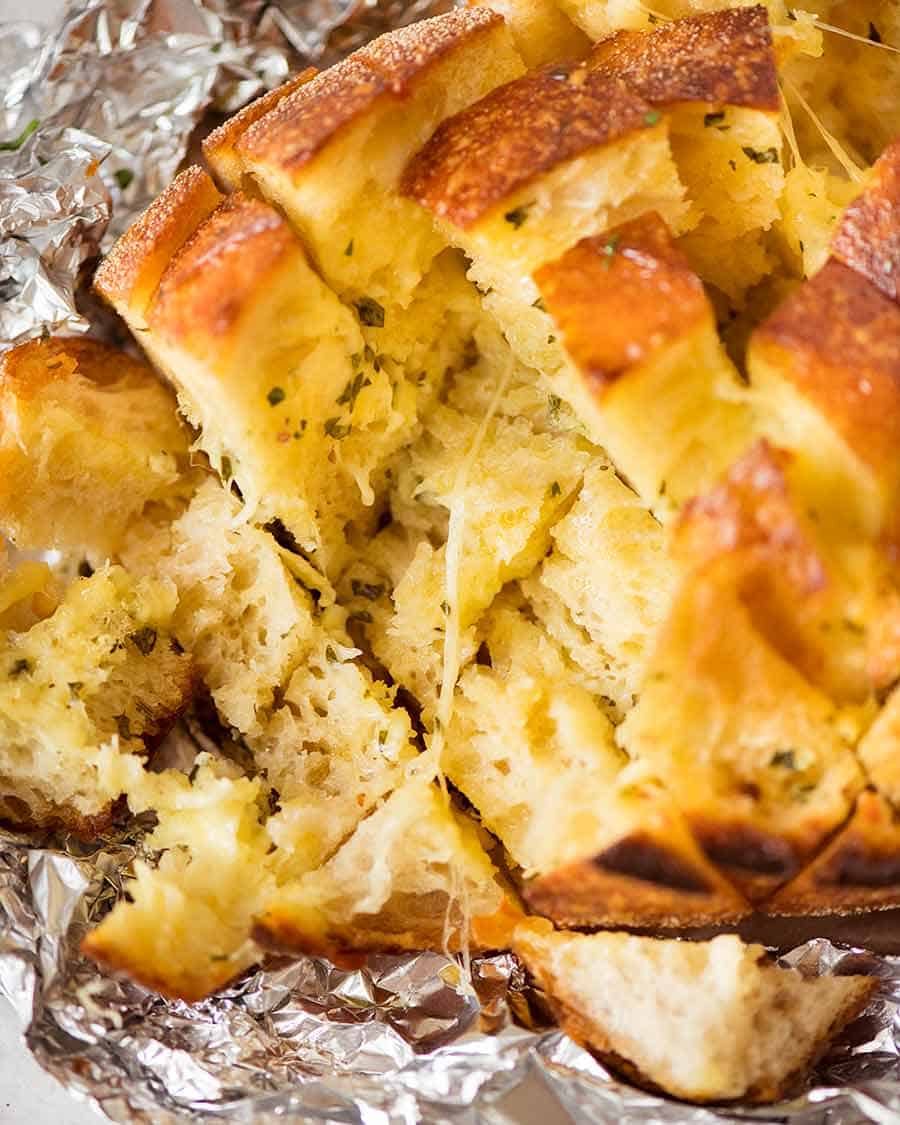
If you haven’t tried this Cheese and Garlic Crack Bread before, let me warn you now: garlic bread will never be the same again. It’s like a pull apart bread, but tastes like garlic bread plus you have the mozzarella cheese which stretches wonderfully as you pull bits off.
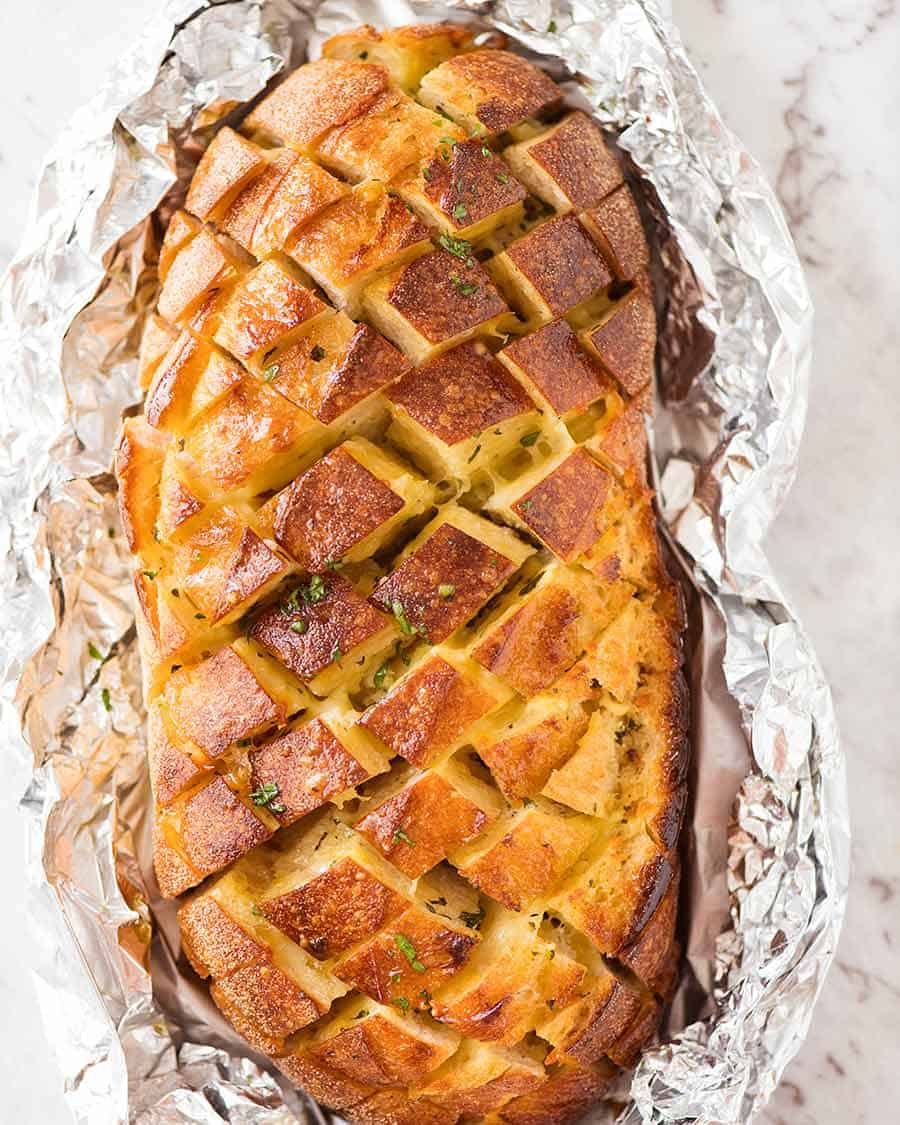
This is INSANELY delicious. I especially love the way the bread is cut into diamond shapes so you can tear bite size pieces off. Every piece is garlicky and buttery and oh-so-cheesy…….
“Kids go NUTS over this…. and adults turn INTO kids when they get stuck into this!!”
This is one the kids go NUTS over, don’t say I didn’t warn you! And grown ups turn into little kids when they get stuck into this. I made this for a dinner and let me tell you, it took 5 hands about 30 seconds to demolish this!
HOW TO MAKE THE BEST CHEESY BREAD IN THE WORLD!
Best bread – The best bread to use for Cheese and Garlic Crack Bread is crusty sourdough or another dense type of bread, but it works well with plain crusty loaves as well.
The reason it works better with sourdough is because the bread is denser so the bread tends to hold together better when you pull bits off. But believe me, there is no compromise on flavour if you use other types of bread! In fact, in the photo I chose to use a crusty Vienna loaf because it was on special.
Best cheese – I really recommend using mozzarella cheese for this, you want it to stretch and pull when you tear the pieces off.
Other flavourings – I kept the flavours quite simple, going for a garlic bread with cheese, but you can go really wild with the flavours for this! Ranch dressing, kick of chilli, other herbs – the possibilities are endless!
When it comes out of the oven, it’s all golden, crusty and buttery on the inside and you know that’s just the start of the eating experience that’s about to commence….
….then the devouring begins…. that cheesy pull! That buttery, garlicky bread!! And yet, and yet, there’s even more to come….

THE BASE IS THE BEST BIT!!
Everybody goes so nuts over the cheese bits that you pull out, but my favourite part is the base of the bread. All the butter and cheese drips to the bottom and it bakes so nice and crispy…..
PULL APART BREAD for parties!
This is a great centrepiece for a dinner that could just be accompanied by a fresh salad to make a complete meal. Or as a fabulous appetiser or party food – think game day!
It’s by far the most requested party food by my family and friends. I usually make it at home then take it to the venue and bake it there. The best way to make ahead is to use softened butter instead of melted butter and slather it into the cracks, then stuff with cheese. Wrap and bake before serving.
But you can even bake it in advance then reheat quickly in the microwave as long as you use a crusty sourdough. The crust gets so crusty when you bake it, it stays crusty even if you reheat it in the microwave.
Go forth and enjoy! Make this cheesy garlic bread once, and you’ll be asked to make it again and again and again…. – Nagi x
CHEESE and GARLIC CRACK BREAD
WATCH HOW TO MAKE IT
Hungry for more? Subscribe to my newsletter and follow along on Facebook, Pinterest and Instagram for all of the latest updates.
Cheese and Garlic Crack Bread (Pull Apart Bread)
Ingredients
- 1 crusty loaf , preferably sourdough or Vienna
- 1 cup shredded Mozzarella cheese (or other melting cheese)
Garlic Butter
- 100 g / 1 stick (8 tbsp) unsalted butter , softened
- 2 large garlic cloves , minced
- 3/4 tsp salt
- 1 tbsp fresh parsley , finely chopped
Instructions
- Preheat the oven to 180C/350F.
- Combine butter, garlic and salt in a heatproof bowl and melt in the microwave. Stir through parsley.
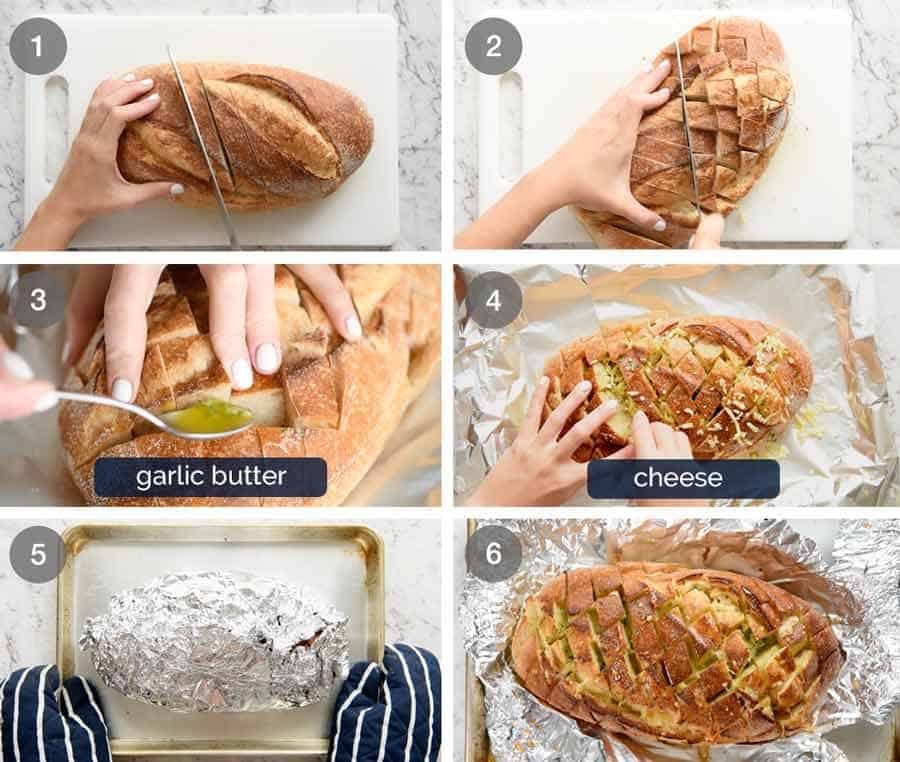
- Cut the bread on a diagonal into 2cm/1″ diamonds but do not cut all the way through the bread.
- Use your fingers or a knife to pry open each crack and drizzle in a teaspoon of butter and stuff in a pinch of cheese. This might sound like a bit of an effort, but I promise you it is worth it! You don’t need to be super neat, it’s nice to have some of the butter drizzled over the crust.
- Brush surface with remaining butter.
- Wrap with foil and bake for 20 minutes until the cheese has mostly melted, then unwrap and bake for 5 – 10 minutes more to make the bread nice and crusty.
- Serve immediately. (See note 1 for best make ahead methods)
Recipe Notes:
Nutrition Information:
LIFE OF DOZER
Yesterday, today, tomorrow… #HardLifeOfDozer

This bread is amazing! My parents made it for Christmas. I couldn’t get enough!
I can’t get enough of it either! I’m so glad you enjoyed it!!
This bread looks so amazing I am going to work on a homemade sourdough bread recipe to make this with!
Paula
Homemade sourdough? I’m so jealous! I have a starter but I haven’t made it yet – I must get onto it, you’ve inspired me!!
Hi Recipe Tin…I want made it tomorrow and I am sure it will taste awsome. Is a good idea to made this bread with mozarella cheesse and pizza sauce inside? What do you think? Thank you for your comments and for that wonderful recipe, Five stars!!!
Hi Grettel! I have never thought about making it with pizza sauce inside, that’s really clever! You could add pepperoni as well and it’s like Pizza Crack Bread!! It might be a bit tedious to spread the pizza sauce in the cracks but I think it will be worth the effort!! 🙂
I cannot wait to try this bread. I have a recipe for a pizza mix spread (cheese, oil,,( butter), olives, pepperoni ) etc. that if used would be delicious possibilities are endless
Agree! I would love to see a pizza spin on this 🙂
Jyou can use a plastic squezze bottle from dollar store the ones for mustard an ketchup. Put in sauce an put the tip in the slits of the bread,easy breezy.
Oh yes! That’s really clever Jan!! 🙂
I think if you put the pizza sauce in a squeeze bottle and then just squirted a little between each cut line it would work great.
That is a great idea!
Use one of those inexpensive plastic ketchup or mustard bottles with the long tapered spouts on them. Be generous and the bread will soak it right up.
That’s a great tip Susanne, I would not have thought to use the long spout ones!
Hi, this looks sooo good, I’m going to try it tonight but I was wondering if I can use dried parsley because that’s what I have on hand. If so how much would you recommend?
Thanks Cathy
Hi Cathy! Dried parsley will be fine, it just doesn’t look as green as using fresh parsley (I know I’m stating the obvious!) My rule of thumb is to use around 1/2 the quantity if substituting dried for fresh herbs. However, in this particular case, the parsley is more for appearance rather than flavour (because parsley has a very mild flavour) so I would still use 1 tbsp of dried parsley. Or if you are concerned, start with 1/2 tbsp and have a smell and add more if you want 🙂
Thanks so much, can’t wait to try this tonight!
Excellent for so many occasions. SPEED METHOD: Slice loaf of bread lengthwise, 3 or 4 cuts depending on width of bread. Soften butter to paste consistency and mix in garlic and/or favorite seasonings. Liberally spread butter mixture into each slice opening. Sprinkle cheese into each slice opening. Using a serrated knife slowly make diagonal cuts across the loaf. As you make the cuts the butter/cheese mix will pulled into the new openings. Good coverage in about 1/4 of the time. Now of course Nagi’s method has an advantage if you want to keeps kids busy or give a friend something to do while you work on the rest of the meal
Hi CJ! You know, it is like you read my mind – I tried this method as well! I was in two minds which method to use but because I felt the pouring of butter gave better coverage, I went with that one! However, now that I know another person in this world uses your method, I will update the recipe for it! Referencing you 🙂 Thanks CJ!
Good idea … thanks..:)
I’m glad you like it!! 🙂
This was really good!! Its going to be my go-to bread from here on out.
So glad you loved it!! It’s definitely my “go to” bread!!
This is delicious! I am actually bringing this for Christmas tomorrow. For most holidays I bring this and another one but with a mexican twist. I use cilantro, jalapeno, green chilis and pepperjack. They always disappear instantly.
Ooh, I have never tried a Mexican version! I must give it a go!!
Should the butter be melted when I drizzle a little into each piece of bead? 🙂
Oops sorry just re-read instructions! 🙂
Hi Abby! Yes, the butter should be melted. I tried it once without melting the butter and it was SUCH a pain to spread into each crevice!!
I have made this several times, after my mom found it on Pinterest. I can’t make it fast enough for my family. It is amazing. Thank you so much for this wonderful bread!!!
Thanks so much for your message Tammy!! I know, it’s insanely addictive, isn’t it?? I have to be very careful with portion control. I only make it when there are at least 6 people to share with!!
I am trying this saturday. It looks so delicious.
Yay! Love to hear what you think Patrice!!
love the idea of the crack bread and I am going to attempt to make it
Glad to hear that! Would love to hear what you think!!
This looks AMAZING! I am a HUGE fan of rosemary and love all breads with that in them, so I am going to try chopping up fresh rosemary and adding in place of the parsley. Thank you so much for this recipe! Can’t wait to try it! :O)
Thanks for reading Vicki!! I think using any fresh herbs goes wonderfully with this. I used parsley because it is the most “neutral”, if you know what I mean? Rosemary would be fantastic, and would other herbs like dill, oregano, chives. Mint might be a bit odd (cheese and mint?? Hmmm….) but I think coriander might also be nice (I think it would remind me of Mexican food! Melted cheese + coriander + garlic flavours are in alot of Mexican :))
Hi Nagi:
I just saw your delicious looking recipe on facebook for crispy, oven baked chicken wings. They look amazing. I love wings. My dad would buy chicken wings in the 60’s as they were cheap and tasty. His recipe was to fry them in ginger, bacon fat and soy sauce. It was a family favorite and the neighbors loved them. We ate wings before they became the popular appetizers and known as buffalo wings. Can’t wait to try your recipe. The garlic cheese bread looks wonderful, too. Its 4:30 am here in CA. I am such a night owl. Will try your wings and other recipes, soon. Thank you
Wow, 4.30am? You are a night owl!! I get up at around 5.30 each day so I am in bed ridiculously early every night!! I would never have thought of wings in ginger, bacon and soy sauce but it makes SENSE! It truly does, I can imagine the flavour! Did he pan fry it?? I imagine getting enough bacon fat to deep fry would be a tad difficult??!! Thanks for your comment Cheryl!!
Oh man! I found this recipe on Pinterest and decided to make it for an appetizer at Thanksgiving last week. My family ate it in less than 10 minutes! I am so excited I found your blog and super eager to read more! Thank you so much for the recipe!
Thank you for the your enthusiastic comment!! My mother happened to be with me when I read it and she actually laughed out loud at the thought of your family scoffing this down in 10 minutes….until I reminded her it took US about 5 minutes!! I hope you find more recipes on here that you like!
Nagi, this was absolutely divine, thank you for such a great recipe! There was a fight at the end over the crusty base! 🙂
Celia – thank you so much!! I saw your post where you shared it too, I wish I was having dinner at your place!!
Hi DS it is super easy to cut, using a bread knife as Nagi mentioned is a must. I use the round sourdough bread. Hold your knife up and then just bend your wrist to the left, keeping the knife at that angle cut into the bread starting at the outer edge, hold the bottom of the bread to keep it steady. Cut down to about an inch from the bottom, do not cut all the way through. Do this till you get the other end of loaf, now cutting on an angle in the opposite direction cut down the same way and presto you are done. I have served it many times and everyone raves. I also use monteray jack cheese, it adds a bit more flavor. Beware though, my dinner guests couldn’t stop eating it before dinner and during so watch they don’t fill up on it
Margi, thanks so much for giving those tips to DS! It’s really kind of you! (And yes, I know what you mean about “accidentally” filling up on it before dinner!! I am very careful about portion control when I make this!) Thanks again!
Please email me a PDF of your recipe -it looks so delicious and I would like to make it for Thanksgiving Day – I am having my entire family come over and thank you for your ideas
Done! I just emailed it to you 🙂 You can also click on the Print Button then you should get an option to “Save as PDF” instead of printing to a printer 🙂 Useful tip!
I wish I could see a video of how you cut this in diamond shapes w/o ruining the soft bread. I am dying to take it to a dinner party for appetizer.
Hey DS! Sorry I don’t have a video but if you use a crusty loaf like a sourdough or Vienna and use a bread knife, it doesn’t ruin the bread! Because they are crusty, when you slice it, the bread doesn’t get squished. I hope you do try it, it is SUCH a great dish to take to a dinner party!
That loaf….and a bowl of tomato basil soup, a warm blanket, and a purring cat. I could die happy then.
That is a perfect Friday night to me 🙂 Except I’d replace the purring cat with my pup!
Nagi…you know I am no stranger to your awesome blog!!! I featured youthis week on my faves for #foodiefridays! Thank so much for linking with us…Clearly I am enjoying seeing your recipes 🙂
Oh wow, thank you Mila! You are such a sweetie! Popping over shortly to check out all the great recipes in your link up this week!